7
per band and easily return to them with the touch of a button. To set a preset:
1. Turn the receiver on.
2. Select the band.
3. Tune to the desired station.
4. Press and hold one of the six numbered buttons for more than 2 seconds
to store the selected station. During the 2-second set time, the radio will
be muted and the number icon will not be visible. Both the audio and
selected preset icon will return, indicating the station has been set.
5. Repeat steps 1-4 for each pushbutton.
Pressing a preset button in the future will tune the radio to the station that you selected.
Using the Weatherband
NOAA – Weather Radio is a service of the National Weather Service. It provides
continuous broadcasts of the latest weather information directly from the National
Weather Service offices. Taped weather messages are repeated every four to
six minutes and are routinely revised every one to three hours or more frequently
if needed. Most of the stations operate 24 hours a day.
The weather for the area you are in can be found on one of 7 stations. When in
the Weatherband mode, the display will show the “WX” icon and “CHAN #” to
indicate the channel. The channel can be adjusted using the
sTUNE/SEEKt
button. The channels can be set to the presets just like you are setting the radio.
The frequency associated with each channel is as follows:
1. 162.550 MHz 5. 162.450 MHz
2. 162.400 MHz 6. 162.500 MHz
3. 162.475 MHz 7. 162.525 MHz
4. 162.425 MHz
The National Weather Service operates approximately 372 stations. Approximately
90 percent of the nation’s population is within listening range of an NOAA
Weather Radio broadcast.
Using Satellite Radio (If equipped)
Before you can use your receiver to access Satellite Radio broadcasts, you must
purchase a monthly subscription from either XM or Sirius Satellite Radio and
install the corresponding satellite receiver and antenna that can be purchased
from your dealer.
To activate the external satellite receiver, you must furnish your satellite radio
provider with its Electronic Serial Number (ESN). To find the ESN, install the
satellite radio receiver according to the instructions that come with it, and follow
the instructions in the “Activating Satellite Radio” section of this manual on page 4.
To listen to satellite radio stations, select a satellite band (XM1, XM2 or SR1,
SR2) by pressing the BAND button. When you have selected a satellite radio
band, use the
sTUNE/SEEKt button to select a channel.
PROGRAM TYPE SEARCH (PTY)
:
If you have subscribed to XM or Sirius Satellite
Radio, Pr
ogram T
ype Sear
ch allows you to seek by music type. T
o per
for
m a
PTY search:
1. Press SCAN and Preset 1 at the same time. PTY will appear on the radio
display.
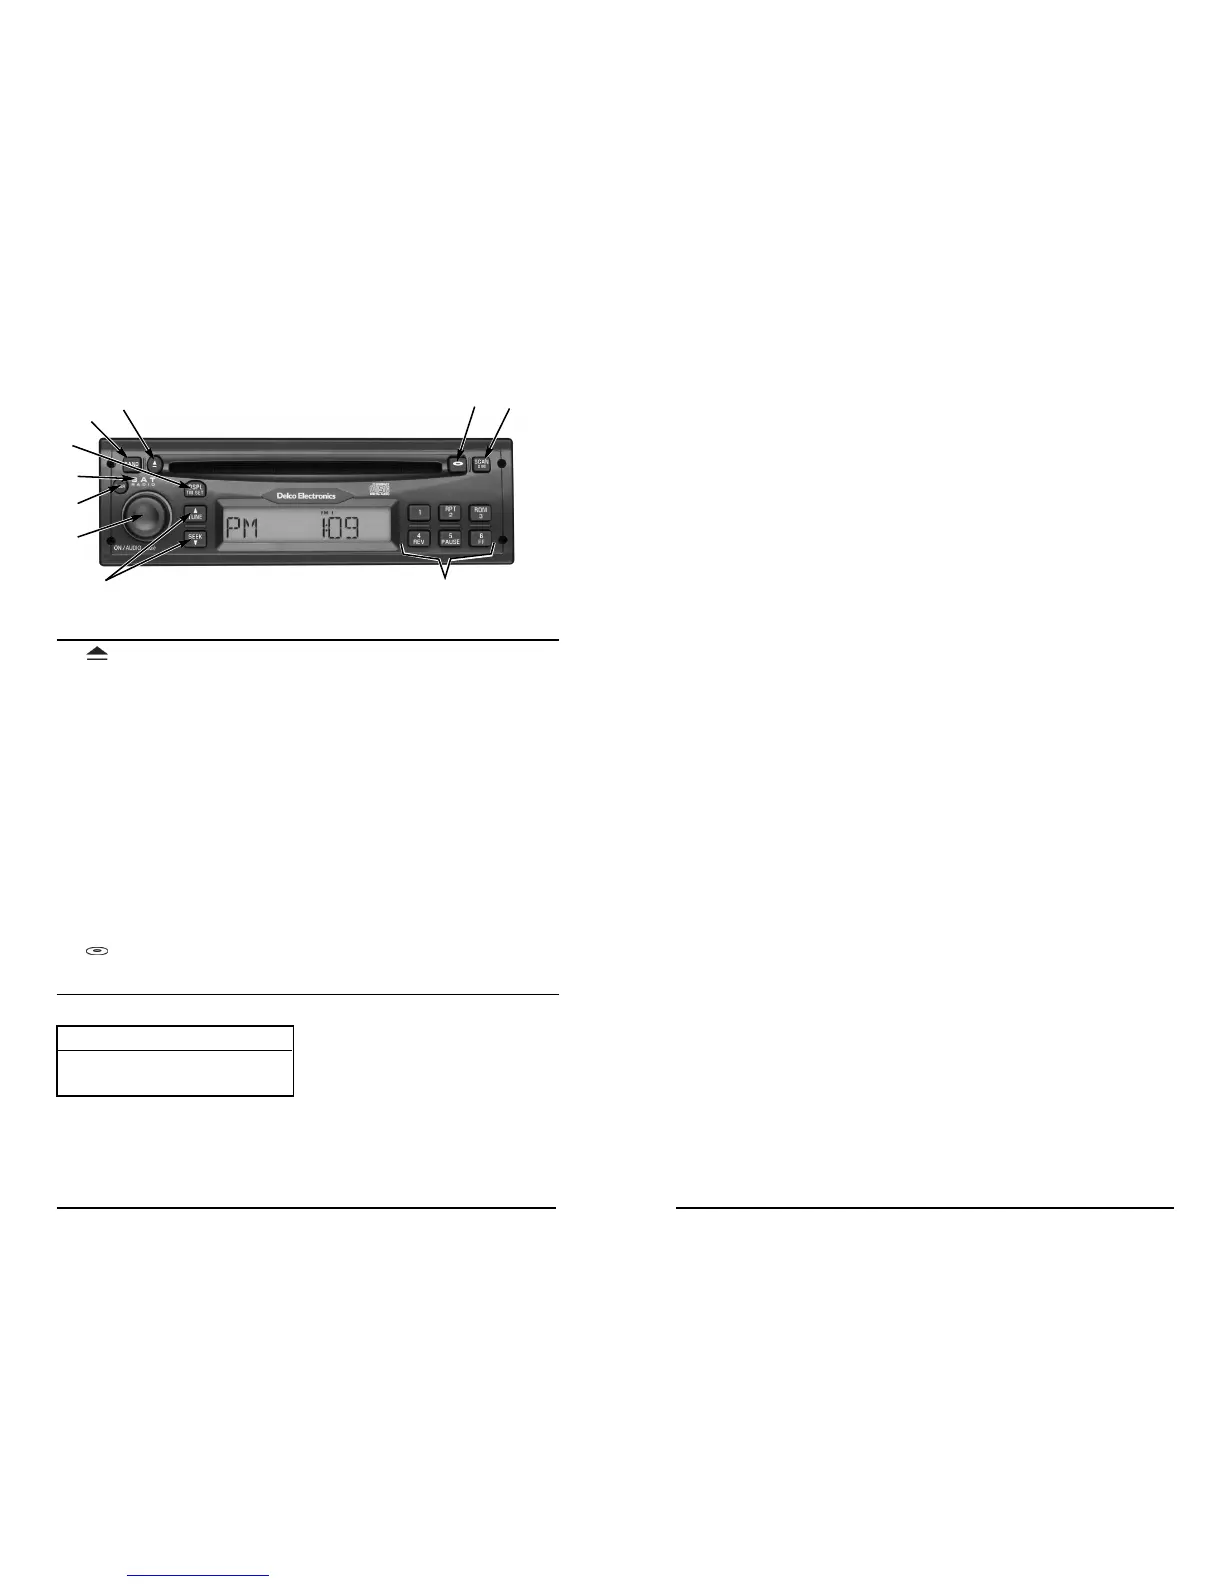
Radio de discos compactos XTA-2400 de Delco Electronics
Botón Función Página
1. Expulsa el CD . . . . . . . . . . . . . . . . . . . . . . . . . . . . . . .32
2. BAND (Banda) Cambia entre AM, FM1, FM2, WX
(información meteorológica), Satélite 1,
y Satélite 2 (si así está equipado) . . . . . . . . . . . . . . . .29
3. DSPL/TM SET Cambia display/interruptores a modo
(Ajuste del de ajuste de la hora . . . . . . . . . . . . . . . . . . . . . . . . . .27
display/hora)
4. SAT RADIO Significa que su radio es compatible con el
(Radio Satelital) radio satelital (véase la página 30 para conocer
funcionamiento) . . . . . . . . . . . . . . . . . . . . . . . . . . . . . .27
5. PWR (Encendido) Encendido . . . . . . . . . . . . . . . . . . . . . . . . . . . . . . . . . .27
6. ON/AUDIO Configuraciones de encendido/volumen/radio . . . . . .27
(Encendido/audio)
7. TUNE/SEEK Cambia la estación de radio o la pista del CD . . . . .29
(Sintonizar/buscar)
8. Botones a Programa estaciones/funciones de CD . . . . . . . . . . .29
presión 1-6
9. SCAN/DIM Explora todas las estaciones (pistas) en la banda
(Exploración/ del CD actual/ajusta el brillo del display . . . . . . . . . .32
atenuador)
10. Cambia a modo de CD . . . . . . . . . . . . . . . . . . . . . . . .31
ADVERTENCIAS DE DAÑOS AL VEHÍCULO
En este manual encontrará los siguientes avisos:
En el ár
ea de A
VISOS, se le infor
ma algo que pueda dañar su vehículo. Muchas
veces ese daño no estaría cubier
to por la garantía y podría ser costoso. El aviso le
informa qué debe hacer para evitarlo.
NOT
A:
En otr
os manuales se puede utilizar el A
VISO de for
ma diferente.
1
2
3
5
6
7
8
10
4
AVISO:
Éstos indican que algo podría dete-
riorar su vehículo.
9
26