CAUTION: You must note the number of each hard drive and temporarily label them before removal so that
you can replace them in the same locations.
4. Remove the cooling shroud.
5. Remove the cooling-fan assembly.
6. Remove all hard drives.
7. Disconnect the SAS data, signal, and power cable(s) from the backplane.
8. Press the release tabs and slide the backplane upward.
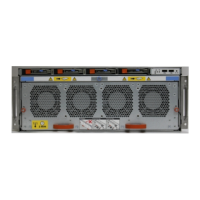
Figure 39. Removing and Installing the 3.5 Inch (x12) SAS Backplane
1. release tabs (2)
2. pass-through I2C cable
3. left control panel cable
4. I2C cable
5. power cable A
6. USB cable
7. SAS cables (3)
8. power cable B
9. front I/O cable
10. right control panel cable
11. x12 hard-drive backplane
12. hard-drive backplane connectors (12)
73