EasyManua.ls Logo

DeLonghi ECAM35 35 Series - User Manual

DeLonghi ECAM35 35 Series
24 pages
Print Icon
To Next Page IconTo Next Page
Loading...
De’Longhi Appliances via Seitz, 47 31100 Treviso Italy www.delonghi.com
5713232491/10.16
Question and Answer IconNeed help?

Do you have a question about the DeLonghi ECAM35 35 Series and is the answer not in the manual?

Summary

1. FUNDAMENTAL SAFETY WARNINGS

2. SAFETY WARNINGS

2.1 Symbols used in these instructions

Explains symbols used to denote warnings and important information for user safety and appliance care.

2.2 Designated use

Specifies the intended purpose of the appliance for preparing coffee and heating beverages.

3. INTRODUCTION

3.2 Troubleshooting and repairs

Directs users to specific sections or Customer Services for problem resolution.

4. DESCRIPTION

4.1 Description of the appliance

Lists and describes the main components of the coffee machine, referencing diagrams.

4.2 Description of the accessories

Lists and describes the included accessories with reference to the diagram.

5. BEFORE USE

5.1 Checking the appliance

Verifies the appliance and accessories are complete and undamaged after unpacking.

5.2 Installing the appliance

Provides safety warnings and guidelines for positioning the appliance for proper ventilation.

5.3 Connecting the appliance

Details voltage checks and requirements for connecting the appliance to a suitable power socket.

5.4 Setting up the appliance

Guides initial setup: language, water tank fill, and water circuit priming.

6. TURNING THE APPLIANCE ON

7. TURNING THE APPLIANCE OFF

8. MENU SETTINGS

8.1 Rinsing

Explains how to use the rinsing function to clean and heat the appliance's internal circuit with hot water.

8.2 Language

Guides users on how to change the display language of the appliance.

8.3 Maintenance

Directs users to specific sections for maintenance tasks like descaling and filter installation/replacement.

8.4 Program beverages

Explains how to customise beverage quantities and aroma settings for directly selected drinks.

8.5 Program My beverages

8.6 General

8.7 Statistics

9. MAKING COFFEE

9.1 Adjusting the coffee mill

Details how to calibrate the coffee grinder's adjustment dial for optimal coffee extraction.

9.2 Tips for a hotter coffee

Offers advice on how to achieve hotter coffee, including rinsing and temperature settings.

9.3 Making automatic recipes using coffee beans

Guides users through preparing various coffee drinks using whole coffee beans.

9.4 Temporarily varying the coffee aroma

Explains how to adjust the coffee aroma setting temporarily for automatic recipes.

9.5 Making coffee using pre-ground coffee

10. MAKING CAPPUCCINO AND HOT MILK (NOT FROTHED)

10.1 Making hot milk (not frothed)

Explains the specific procedure for preparing hot milk without froth.

10.2 Cleaning the cappuccino maker after use

Provides instructions for cleaning the cappuccino maker to prevent milk residue build-up.

11. my MENU PROGRAMMING AND SELECTING

Unprogrammed beverages

Explains the customization process for beverages not yet programmed in "my MENU".

Programmed beverages

Describes how to select and prepare beverages that have already been programmed.

12. DELIVERING HOT WATER

13. CLEANING

13.1 Cleaning the machine

Lists the main components of the machine that require regular cleaning.

13.2 Cleaning the machines internal circuit

Recommends rinsing cycles and hot water delivery for cleaning the internal circuit after periods of inactivity.

13.3 Cleaning the coffee grounds container

Instructs on emptying and cleaning the coffee grounds container when prompted or regularly.

13.4 Cleaning the drip tray and condensate tray

Details the procedure for emptying and cleaning the drip tray and condensate tray.

13.5 Cleaning the inside of the coffee machine

13.6 Cleaning the water tank

13.7 Cleaning the coffee spouts

13.8 Cleaning the pre-ground coffee funnel

13.9 Cleaning the infuser

14. DESCALING

15. SETTING WATER HARDNESS

15.1 Measuring water hardness

Describes how to use the indicator paper to determine water hardness.

15.2 Setting water hardness

Guides users on adjusting the appliance's water hardness setting via the menu.

16. WATER SOFTENER FILTER

16.1 Installing the filter

Details the steps for installing a new water softener filter.

16.2 Replacing the filter

Guides users on how to replace the water softener filter when prompted.

16.3 Removing the filter

Explains the procedure for removing the water softener filter from the appliance.

17. TECHNICAL DATA

18. DISPOSING OF THE APPLIANCE

19. DISPLAYED MESSAGES

20. TROUBLESHOOTING

21. ELECTRICAL REQUIREMENTS

Overview

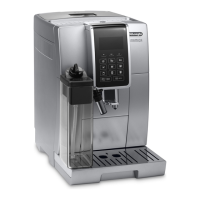
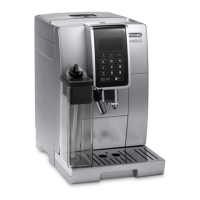
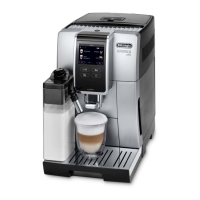
This document outlines the operation, maintenance, and troubleshooting for the De'Longhi ECAM35X.35 Bean to Cup Espresso and Cappuccino Machine.

Function Description

The ECAM35X.35 is a bean-to-cup espresso and cappuccino machine designed to prepare coffee and heat beverages automatically. It features a grinding adjustment dial (A5) to customize coffee fineness, a cappuccino maker (A20) for frothing milk, and a hot water and steam connection nozzle (A22) for various beverage preparations. The machine is equipped with a touch screen display (B1) that guides the user through various operations and settings. It can prepare a range of coffee beverages, including Espresso, Coffee, Long, Doppio+, Espresso Lungo, Ristretto, and two-cup versions of these. The "My Menu" function (B13) allows users to program and save customized beverage settings.

Usage Features

  • Turning On/Off: The appliance is turned on by pressing the power button (A23) (fig. 5) and off by pressing the same button. An automatic preheat and rinse cycle is performed each time the machine is turned on, and an automatic rinse cycle is performed when turned off after use.
  • Language Selection: Users can select their preferred language from the "Settings" menu (B5).
  • Water Tank: The water tank (A17) needs to be filled to the MAX line with fresh water (fig. 3A) for operation.
  • Coffee Preparation:
    • Coffee Beans: Fill the beans container (A3) with coffee beans (fig. 7).
    • Pre-ground Coffee: The machine can also use pre-ground coffee (fig. 10), but only one cup at a time. It's important not to add pre-ground coffee when the machine is off or to use more than one level measure (C2) to avoid damage or blockages.
    • Aroma Selection: The coffee aroma can be temporarily varied using the aroma selection button (B7).
    • Grinding Adjustment: The grinding adjustment dial (A5) (fig. 6) should only be turned when the coffee mill is in operation to adjust coffee fineness.
    • Cup Placement: Place cups under the coffee spouts (A19) (fig. 8) and lower the spouts as near as possible to the cup for a creamier coffee (fig. 9).
  • Cappuccino and Hot Milk:
    • Preparation: The cappuccino maker selection ring (A21) should be positioned downwards for "CAPPUCCINO" (fig. 11) or upwards for "HOT MILK".
    • Milk Frothing: For best results, use skimmed or partially skimmed milk at refrigerator temperature (about 5°C). The milk volume will double or triple during frothing.
  • Hot Water Delivery: Hot water can be delivered through the cappuccino maker (A20) by pressing the hot water icon (B6) (fig. 13).
  • Programming Beverages: The machine allows users to program and customize standard beverage quantities and settings through the "Program beverages" and "Program My beverages" menus.
  • Water Hardness: Water hardness can be measured using the indicator paper (C1) and set in the machine's "Settings" menu to optimize descaling frequency.
  • Water Softener Filter: Certain models include a water softener filter (C4) which can be installed, replaced, or removed as needed. The filter's date indicator disk (fig. 28) helps track its lifespan.
  • Energy Saving: An energy-saving function can be enabled or disabled to reduce energy consumption.
  • Auto-off: The auto-off (standby) time can be set to 15 or 30 minutes, or 1, 2, or 3 hours.

Maintenance Features

Regular cleaning and maintenance are crucial for the appliance's longevity and performance.

  • Internal Circuit: The machine's internal circuit should be cleaned regularly, especially if unused for 3-4 days, by performing rinse cycles and delivering hot water.
  • Coffee Grounds Container: The coffee grounds container (A11) must be emptied and cleaned when the "Empty grounds container" message appears on the display (B1), or every 72 hours after the first coffee preparation.
  • Drip Tray and Condensate Tray: The drip tray (A15) and condensate tray (A10) should be emptied and cleaned when the level indicator (A13) protrudes from the cup tray (A12) (fig. 20).
  • Water Tank: The water tank (A17) should be cleaned regularly with a damp cloth and mild washing-up liquid.
  • Coffee Spouts: The coffee spouts (A19) should be cleaned regularly with a sponge or cloth (fig. 22A), and any blockages removed with a toothpick (fig. 22B).
  • Pre-ground Coffee Funnel: The pre-ground coffee funnel (A4) should be checked regularly for blockages and cleaned with a brush if necessary.
  • Infuser: The infuser (A8) must be cleaned at least once a month. This involves removing the water tank, opening the infuser door (A7) (fig. 23), pressing the release buttons and pulling the infuser outwards (fig. 24), soaking it in water, rinsing under the tap, and using the supplied brush to remove coffee residues. It's important to only rinse with water and not use washing-up liquid. The infuser can be adjusted to the correct size if difficult to insert (fig. 25).
  • Cappuccino Maker: The cappuccino maker (A20) must be cleaned after each use to prevent milk residue build-up. This involves delivering a little hot water (fig. 13), allowing it to cool, removing it (fig. 14), moving the selection ring (A21) upwards (fig. 15), removing the connection nozzle (A22) (fig. 16), cleaning any blocked holes (fig. 17), and reassembling.
  • Inside of the Machine: The inside of the appliance should be checked monthly for dirt and cleaned with the supplied brush and a sponge, removing residues with a vacuum cleaner (fig. 21).
  • Descaling: The machine will display a "Descale" message (B1) when descaling is required. Only De'Longhi descaler should be used. The descaling process involves removing the water softener filter (if present), emptying the water tank, adding descaler and water (fig. 26), placing a container under the spouts (fig. 27), and following the on-screen instructions. The process includes multiple rinse cycles.

DeLonghi ECAM35 35 Series Specifications

General IconGeneral
Pump Pressure15 bar
Milk FrotherYes
Energy SavingYes
Adjustable Coffee DosageYes
Adjustable Water HardnessYes
Adjustable Coffee StrengthYes
Adjustable GrinderYes
ProgrammableYes
Water Tank Capacity1.8 liters
Coffee InputCoffee beans and ground coffee
Power1450 W
GrinderIntegrated steel grinder

Related product manuals