1.
DESCRIPTION
1.1
Description of the appliance (A)
A1. Rotating vent
A2. Water level indicator
A3. Castors
A4. Power cord winder
A5. Handle
A6. Power cord
A7. Removable water tank
A8. Filter housing
A9. Dust filter
A10. Coolingpad
A11. Honeycomb cooling pad
A12. Ice box/pack
1.2
Descriptionofthecontrolpanel(B)
B1. ON/OFF button: to switch the appliance ONand OFF
B2. Speed fan. Press to selected the desired speed:
MED,
MAX, MIN
B3. Cooler/Humidifying. Press to select or deselect the function
B4. Press to select the fan mode:
•
Natural : the appliance performs random ventilation
cycles at different speeds, interrupted by a few seconds of
stop
•
Sleep : the appliance runs 30 minutes at MAX speed,
then
30 minutes at MED speed: then runs at MIN speed
B5. “Swing”mode: when pressed, the grid rotates
B6. “AUTO OFF”: press to set the delayed auto off (from 1 to 24
hours):
•
When on, the symbol and the hours flash on the di-
splay for 5 seconds: when turn on steady, the auto off time
isset
•
To deactivate: press the relative button until “00” is se-
lected, then wait until the symbol and the number switch
off.
1.3
Description of the display (C)
C1. “Auto-off”display
C2. “Cooler/Humidifying”“ON”
C3. “Ionizer”“ON”(active in every mode)
C4. “Sleep”fan mode“ON”
C5. “Natural”fan mode“ON”
C6. “Auto-off”setting
C7. “Swing”“ON”
C8. “MIN”fan speed
C9. “MED”fan speed
C10. “MAX” fan speed
1.4
Descriptionofthe remotecontrol(D)
D1. ON/OFF:toswitchtheapplianceONandOFF
D2. “Swing”: when selected, the vent rotates
D3. “AUTO OFF” (see B6)
D4. Fan speed (see B2)
D5. Fan mode selection (see B4)
D6. Cooler/Humidifying. Press to select or deselect the function
2.
USING THE APPLIANCE
1.
Plug the appliance in: you will hear a beep and the applian-
ceis
ready to use;
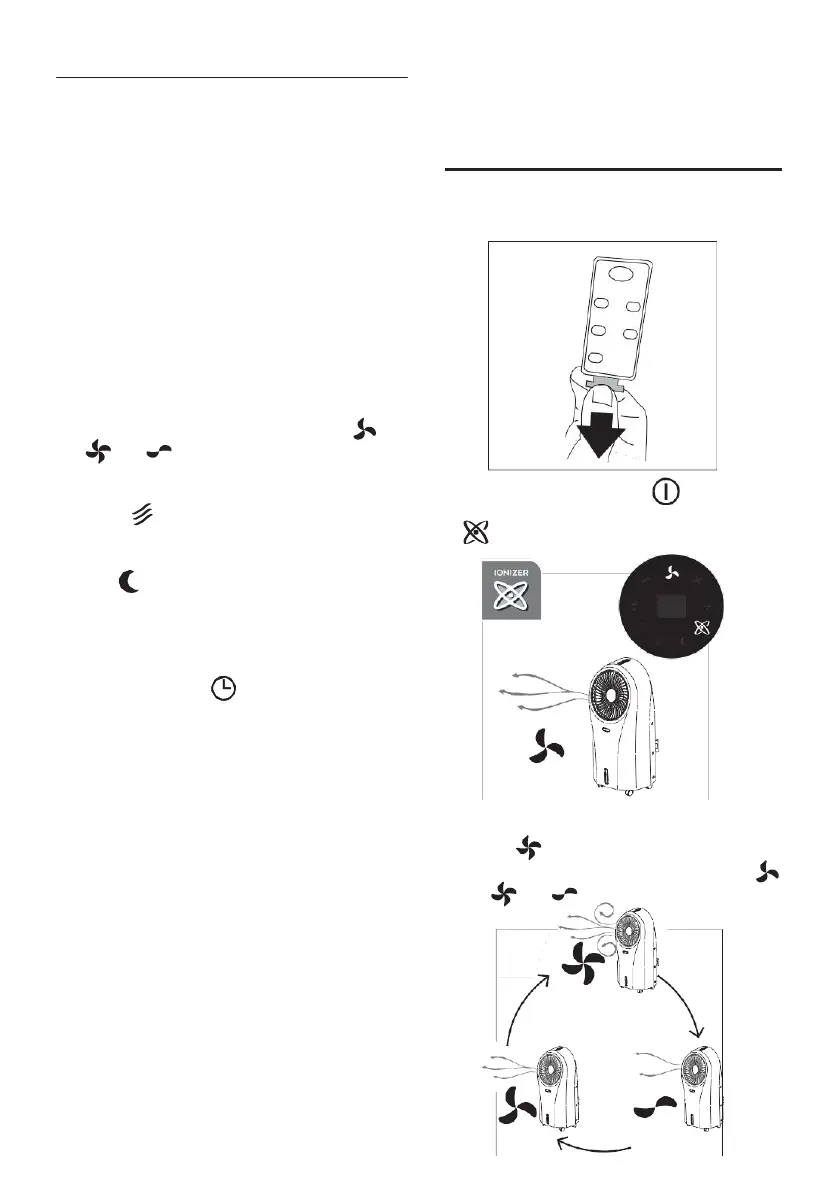
2.
Remove the plastic tab from the battery (fig. 1);
1
3.
To turn the appliance on, press the button ( B1 or D1).
The appliance turns on at MED fan speed and the ionizer
is on (fig. 2).
MED
2
2.1
Settingfanspeed
1.
Press the button (B2 or D4);
2.
When you press the button, the fan speed changes (
MED, MAX, MIN) (fig. 3).
MAX
5
MED MIN
3