7
Any other use is considered improper
and thus dangerous.
• This appliance conforms to EC Regulation
1935/2004 on materials and articles intended to come into
contact with food.
• After positioning the appliance on the work top, leave a
space of at least 5 cm between the surfaces of the appli-
ance and the side and rear walls and at least 20 cm above
the coee maker.
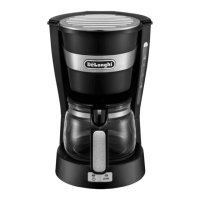
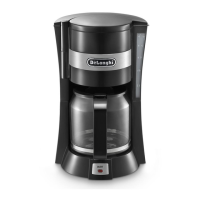
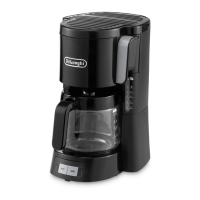
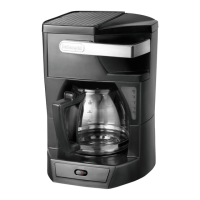
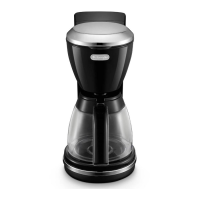
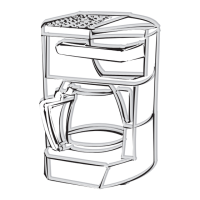
DESCRIPTION OF APPLIANCE
A. Glass jug (certain models only)
B. Thermal jug (certain models only)
C. Measure
D. Water level indicator
E. Lid
F. Water ll compartment
G. Filter holder for drip coee
H. Permanent lter (if provided) or paper lter
I. Plate (heats up in models with glass jug only)
Models with switch:
L. AROMA button
M. On/stand by button
Electronic models:
N. Display
O. /AUTO button with light
P. Set timer/clock button
Q. My aroma button
R. Descale button
S. Water tank lter
SETTING THE CLOCK CERTAIN MODELS ONLY
When turning on the appliance for the rst time, the clock will
show 12:00. To setup the clock keep pressed the Timer/clock
button (P) for more than 2s.
A single pressure of Timer/clock button (P) increase with
a step of one minute, keep pressing increase with more speed.
After 3 seconds that the user doesn’t press any button the clock
is set and appliance turn to active mode.
SETTING THE TIMER CERTAIN MODELS ONLY
If the timer is not set the default timer is 6:00.
To setup the timer press the Timer/clock button (P).
When is enable the timer setup mode the clock icon will be on.
A single pressure of Timer/clock button (P) increase with a
step of one minute, keep pressing increase with more speed. Af-
ter 3 seconds that the user doesn’t press any button the timer is
set and appliance turn to active mode, clock icon turn o.
HOW TO MAKE DRIP COFFEE
Please note: the rst time the appliance is used, all ac-
cessories and the internal circuits must be washed through by
making at least two jugs of coee without using pre-ground
coee.
• Open the lid (E) at the top and use the jug to pour clean
cold water into the water ll compartment (F) (g. 2) up
to the level indicated for the number of cups of coee you
want to make. Check the level of water in the tank through
the level window (D) (g. 3). You are recommended to use
the jug provided as a measure as the maximum capacity of
the jug and the tank are the same.
• Position the permanent lter (H) (if present) in the lter
holder (G) (g. 4). In versions without permanent lter, use
the paper lter (size 1x4).
• Place the pre-ground coee in the lter using the meas-
ure (C) provided and level evenly (g. 5). See the table for
recommended quantities. Use good quality, medium pre-
ground coee for drip coee makers.
Recommended quantities:
No. cups No. measures (*)
10
8
6
4
2
10
8
6
4
2
(*) 1 level measure = 1 tablespoon (5 g)
The quantities given in the table are indicative and should be
adapted to your personal taste and the type of coee. Never ex-
ceed the maximum quantity of 10 measures. The type of blend
has a considerable inuence on the coee you make. You should
therefore try various types of coee to nd the one best suited
to your taste.
• Models with glass jug (A): close the lid (E) at the top of
the appliance and place the closed jug on the plate (g. 6).
• Models with thermal jug (B): before placing the jug on
the plate, make sure the lid is closed (g. 7).
• Models with electronic controls: The taste of the cof-
fee can be optimized by pressing the My aroma
button (Q). This function enables a process of percolation
 Loading...