EasyManua.ls Logo

DeLonghi Pinguino Air-to-Air PAC EX130 User Manual

DeLonghi Pinguino Air-to-Air PAC EX130
8 pages
To Next Page IconTo Next Page
Page #1 background imageLoading...
Page #1 background image
12
INTRODUCTION
Thank you for choosing a De’Longhi product. Please take a few
moments to read the instructions to avoid risks or damage to the
appliance.
DESCRIPTION
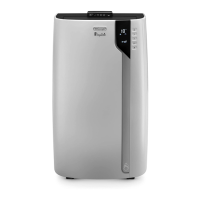
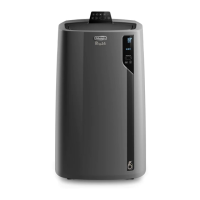
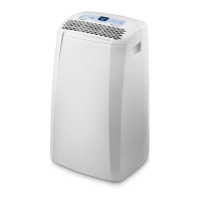
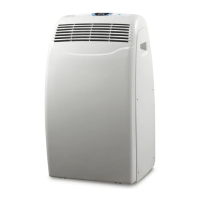
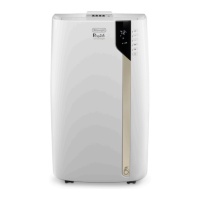
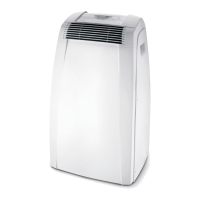
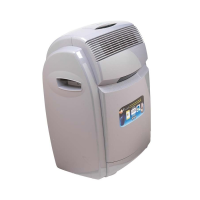
Description of the appliance (see page 3 - A)
A1 air outlet ap
A2 control panel
A3 handles
A4 castors
A5 BioSilver lter
A6 air intake grille
A7 air exhaust hose housing
A8 air intake grille
A9 power cable
A10 drainage hose with cap
A11 remote control signal receiver
A12 remote control compartment
Description of the accessories (see page 3 - B)
B1 wall ange with cap
B2 air exhaust hose
B3 hose adaptor
B4 adapter for window bracket
B5 window bracket with wing nut
B6 adapter for wall mounting/window outlet
B7 window outlet
B8 remote control
B9 window bracket cap
ELECTRICAL CONNECTION
Before plugging into the mains, check the following:
the mains voltage is the same as that indicated on the plate
on the back of the appliance;
the socket and electrical line are sized to support the load
required;
the socket is the proper type for the plug, otherwise, re-
place the socket;
the socket is connected to an ecient earthing system.
The manufacturer is not responsible in the event of non-
compliance with these injury prevention standards.
The power cable must only be replaced by specialised
technicians.
USE
The instructions below will enable you to prepare your air con-
ditioner for operation as eciently as possible. Before use, make
sure the air intake and outlet grilles are unobstructed.
Please note: This appliance is provided with an auto-evapora-
tion feature for condensate removal during cooling and dehu-
midifying modes.
AIR CONDITIONING WITHOUT INSTALLATION
CASEMENT WINDOW
If you have a casement window proceed as follows:
Fit the air exhaust hose (B2) in the relevant housing located
on the rear side of the appliance (g. 1).
Screw the window outlet (B7) and place outside the win-
dow to exhaust the hot air (g. 2).
DOUBLEHUNG WINDOW
If you have a double-hung window proceed as follows:
Insert and lock the adapter for window bracket (B4) into
the slot of the window bracket (B5) (g.3)
Place the window bracket in the window sill, and extend
the bracket fully within the window frame (g. 4).
Fix the bracket by the wing nut (g. 5) (Should the window
bracket be too large for the window the plastic can be cut
with a saw by a qualied professional).
Insert the air exhaust hose (B2) into the adapter for win-
dow bracket (B4) and rotate it as shown in g. 6.
In order to facilitate the tting of the air exhaust hose (B2)
in the relevant housing located on the rear side of the ap-
pliance, position the hose adapter s tabs (B3) in a vertical
axis as shown in g. 7 and proceed as shown in g.1.
SLIDING WINDOWS
Thanks to the locking wing nut, it’s possible to use the win-
dow bracket also for sliding windows. Position the bracket
vetically with the hole in the lower part so to allow a easier
installation of the exhaust hose.
AIR CONDITIONING WITH INSTALLATION
Fit the air exhaust hose (B2) in the relevant housing located
on the rear side of the appliance (g. 1).
Drill a hole 150 mm in an outside wall or through a window
panel. Respect the distances, dimensions and heigh of the
hole given in gure 8.

Questions and Answers:

DeLonghi Pinguino Air-to-Air PAC EX130 Specifications

General IconGeneral
Cooling Capacity13000 BTU/h
Fan Speed Settings3
Weight32 kg
TypePortable Air Conditioner
Energy Efficiency ClassA
FunctionsCooling, Dehumidifying, Fan
Remote ControlYes
Air Flow350 m³/h
Power Supply220-240 V / 50 Hz
Timer24-hour
Water Tank CapacityN/A (No-Drip Technology)

Summary

INTRODUCTION

DESCRIPTION

Description of the appliance

Lists the main components and parts of the air conditioner unit itself.

Description of the accessories

Details the various accessories provided for installation and operation of the appliance.

ELECTRICAL CONNECTION

USE

Casement window installation

Procedure for installing the exhaust hose and outlet through a casement window for effective cooling.

Double-hung window installation

Steps to fit the window bracket and exhaust hose for double-hung windows, ensuring proper exhaust.

Sliding windows installation

Guidance on using the window bracket with a locking wing nut for sliding window installations.

Air conditioning with installation

Instructions for permanent installation via a hole in an external wall or window panel.

Control Panel Overview

Control Panel Buttons and Symbols

Identifies and explains the function of each button and symbol on the appliance's control panel.

Turning the Appliance On and Off

Describes the procedure for powering the appliance on and off using the control panel.

MODES SELECTION

Air Conditioning Mode

Details how to set the appliance for cooling and dehumidifying.

Fan Mode

Instructions for using the fan-only mode and selecting airflow.

Dehumidifying Mode

Guidance on operating the appliance for humidity reduction.

Temperature and Airflow Settings

Select the Temperature Scale

How to switch between Celsius (°C) and Fahrenheit (°F) temperature displays.

Select the Air Flow

Instructions for adjusting the fan speed or airflow in different modes.

Remote Control Operation

Using the Remote Control

Guidelines for effective use and storage of the remote control.

Selecting Operating Modes

How to choose different operational modes using the remote.

Selecting Temperatures

Adjusting the desired temperature using the remote control buttons.

Selecting the Air Flow

Changing the fan speed or airflow direction with the remote.

Swing Function

Operating the flap for even air distribution.

Silent Function

Activating the silent mode for reduced operating noise.

Timer and ECO REAL FEEL

Setting the Timer

Programming delayed start-up or shut-down for the appliance.

ECO REAL FEEL Function

Activating and understanding the ECO REAL FEEL technology for optimal comfort.

Troubleshooting and Maintenance

Self-Diagnosis Error Codes

Explanation of error messages displayed and their meanings.

Tips for Correct Use

Recommendations for optimal performance and energy efficiency.

Cleaning the Cabinet

Instructions for cleaning the appliance exterior.

Cleaning the Bio Silver Air Filter

Procedure for cleaning the air filter to maintain efficiency.

End of Season Operations

Troubleshooting

Air Conditioner Not Starting

Common causes and solutions when the appliance does not turn on.

Short Operating Time

Troubleshooting for issues where the appliance only works briefly.

Lack of Cooling

Solutions for when the appliance runs but does not cool the room effectively.

Unpleasant Smell

Addressing causes and fixes for odors during operation.

Restart Delay

Explanation of the automatic delay before restarting the appliance.

Self-Diagnosis Display

Resolving issues indicated by self-diagnosis codes on the display.

Related product manuals