C.
A.
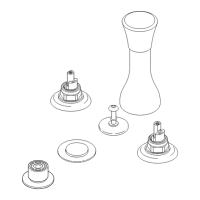
Remove stopper (1) and flange (2).
B.
Screw nut (1) all the way down.
Pushwasher(2)andgasket(3)down.
C.
Remove tailpiece (1) from body (2), add
plumber tape (3), replace tailpiece.
3
D.
Applysiliconetoundersideofflange(1).
Insert body (2) into sink. Screw flange (1)
into body (2).
E.
Pivot(1)mustfacefaucet.Pullassembly(2)
down firmly and hold in place.
DONOTTWIST.
F.
Tightennut/washer/gasket(1),cleanoff
excesssilicone(2).DONOTTWIST.
A.
B.
D.
E.
F.
G.
G.
Remove pivot nut (1). Install horizontal rod
(2) and stopper (3) as removable (4) or non-
removable(5).Handtightenpivotnut(1).
H.
Attachhorizontalrod(1)tostrap(2)using
clip (3). Install lift rod (4), tighten screw (5).
Connectassemblytodrain(6).
A.
Quiteeltapón(1)yelreborde(2).
B.
Atornillelatuerca(1)completamente
hastaabajo.Empujelaarandela/roldana
(2) y el empaque (3) hacia abajo.
C.
Quiteeltubodecola(1)delcuerpo(2),
aplique cinta plomero (3), coloque otra
vez el tubo de cola.
D.
Apliquesilicónalaparteinteriordelreborde
(1). Inserte el cuerpo (2) en el lavamanos.
Atornilleelreborde(1)enelcuerpo(2).
E.
Elpivote(1)debedeestardefrenteala
llave.Haleelensamble(2)haciaabajofirme-
menteysujételoensitio.NOLOGIRE.
F.
Aprietelatuerca/arandela/empaque(1),limp-
ieelexcesodesilicón(2).NOLOGIRE.
G.
Quitelatuercadelpivote(1).Instalela
barra horizontal (2) y el tapón (3) como
desmontable(4)ofijo(5).Aprieteamano
la tuerca del pivote (1).
H.
Unalabarrahorizontal(1)alabarrachata
(2) utilizando el gancho (3). Instale la barra
dealzar(4),aprieteeltornillo(5).Conecte
elensamblealdesagüe(6).
A.
Enlevezlabonde(1)etlacollerette(2).
B.
Serrez l’écrou (1) pour le faire descendre
complètement.Poussezlarondelle(2)et
le joint (3) vers le bas.
C.
Enlevezleraccorddroitdevidange(1)du
corps (2), appliquez du ruban de plomberie
(3), puis remettez le raccord droit en place.
D.
Appliquezducomposéàlasiliconesouslacollerette
(1). Introduisez le corps (2) dans le lavabo,
puis vissez la collerette (1) dans le corps (2).
E.
Lepivot(1)doitfairefaceaurobinet.Tirezl’ensemble
(2) vers le bas fermement et maintenez-le en place.
PRENEZGARDEDELETORDRE.
F.
Serrez l’écrou contre la rondelle et le joint (1), puis
enlevezlesurplusdecomposéàlasilicone(2).
PRENEZGARDEDETORDRELEPIVOT.
G.
Enlevezl’écroudupivot(1).Installezlatige
horizontale (2) et la bonde (3) de manière que
la bonde soit amovible (4) ou non amovible (5).
Serrezl’écrou(1)dupivotàlamain.
H.
Fixezlatigehorizontale(1)aufeuillard(2)
àl’aidedel’agrafe(3).Installezlatigede
manoeuvre(4)etserrezlavis(5).Fixez
l’ensembleaurenvoi(6).
1
2
2
3
1
2
1
2
1
2
H.
1
5
3
4
2
1
3
1
2
3
6
4
5
2
7
53917Rev.C
1