EasyManua.ls Logo

Delta 522-MPU-DST

Delta 522-MPU-DST
12 pages
To Next Page IconTo Next Page
Loading...
SILICONE
T
E
F
L
O
N
Icons
SINGLE HANDLE LAVATORY
CENTERSET FAUCETS
LLAVES MONOCONTROL
DE MONTURA DE CENTRO
PARA LAVAMANOS
ROBINETS À ENTRAXE
COURT À UNE POIGNÉE
1
Para instalación fácil de su llave Delta
usted necesitará:
LEER TODAS las instrucciones completamente
antes de empezar.
LEER TODOS los avisos, cuidados, e
información de mantenimiento.
For easy installation of your Delta
faucet you will need:
• To READ ALL the instructions completely
before beginning.
To READ ALL warnings, care, and maintenance
information.
SILICONE
T
E
F
L
O
N
Icons
Write purchased model number here.
Escriba aquí el número del modelo comprado.
Inscrivez le numéro de modèle ici.
SILICONE
T
E
F
L
O
N
Icons
SILICONE
T
E
F
L
O
N
Icons
Pour installer votre robinet Delta
facilement, vous devez:
LIRE TOUTES les instructions avant
de débuter;
LIRE TOUS les avertissements ainsi que toutes
SILICONE
You may need/Usted puede necesitar/
Articles dont vous pouvez avoir besoin:
4/8/16 Rev. O
1/8"
54195
Models/Modelos/Modèles
500-DST, 501-DST, 501M-DST, 502-DST,
520-DST, 520-A-DST, 520M-MPU-DST,
521-DST, 521-DST-A, 522-DST & 522-A-DST,
Series/Series/Seria
www.deltafaucet.com
Question and Answer IconNeed help?

Do you have a question about the Delta 522-MPU-DST and is the answer not in the manual?

Delta 522-MPU-DST Specifications

General IconGeneral
BrandDelta
Model522-MPU-DST
Faucet TypeCenterset
Handle StyleLever
Flow Rate1.2 GPM
Valve TypeCeramic Disc
Mounting TypeDeck Mount
FinishChrome
Product TypeBathroom Faucet
Hole Configuration3-Hole
Number of Handles2

Summary

Cleaning and Care Instructions

Cleaning Warnings

Specific warnings regarding the use of certain bathroom cleaners on faucet handles.

Lifetime Faucet and Finish Limited Warranty

Maintenance Procedures

Maintenance Warnings and Notes

Important warnings and notes related to faucet maintenance, including tightening nuts and cartridge disassembly.

Installation Instructions by Model Series

500-DST, 501-DST, 502-DST, 520-DST 521-DST & 522-DST Series Installation

Instructions for positioning and securing faucet for specific Delta models, including options for uneven sinks.

501 M-DST & 520 M-MPU-DST Series Installation

Instructions for positioning and securing faucet for specific Delta models, including options for uneven sinks.

Connection Types and Troubleshooting

Standard Connections

Details on 3/8" compression fittings, hot/cold color coding, and secure tightening procedures.

Custom Fit Connections

Instructions for PEX tubing, custom installations, and using RP50952 sleeves for a leak-free joint.

Potential Problems and Remedies

Guidance on common issues and their solutions during faucet installation and connection.

Plastic Sleeve Installation for Custom Fit Connections

Correct Method for Plastic Sleeve Installation

Step-by-step guide on properly installing plastic sleeves onto PEX tubing for secure connections.

Incorrect Installation of Plastic Sleeves

Illustrations and descriptions of common mistakes to avoid during plastic sleeve installation.

Metal Pop-Up Assembly Instructions

Metal Pop-Up Disassembly and Preparation

Steps for removing the stopper, flange, and tailpiece, and preparing components for assembly.

Metal Pop-Up Component Assembly

Instructions for assembling the metal pop-up, including applying silicone and securing parts.

Horizontal Rod and Lift Rod Installation

Steps for installing the horizontal rod, stopper, and lift rod to the pop-up assembly.

Pop-Up with Metal Flange and Plastic Tail Piece

Metal Flange Pop-Up Component Preparation

Instructions for removing parts, applying silicone, and installing the flange and gasket for the pop-up assembly.

Metal Flange Pop-Up Assembly Steps

Steps for securing the pop-up assembly, including tightening the brass nut and ensuring proper sealing.

Plastic Pop-Up Assembly Instructions

Plastic Pop-Up Component Preparation

Instructions for removing parts, applying silicone, and preparing the flange for the plastic pop-up assembly.

Plastic Pop-Up Assembly Steps

Steps for assembling the plastic pop-up, including securing the flange and pivot hole.

Final Checks and Flushing Procedures

Instructions for flushing water lines, checking connections for leaks, and reinstalling the aerator.

Setting The Handle Limit Stop

Understanding Handle Limit Stop Positions

Explanation of the two handle limit stop positions and their effect on water temperature.

Adjusting the Handle Limit Stop

Procedure for homeowners to adjust the handle limit stop to prevent scalding.
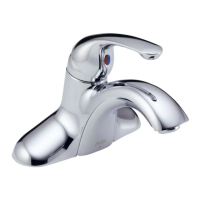
Related product manuals