Do you have a question about the Delta 9113T-DST and is the answer not in the manual?
Explains how to turn the faucet on and off by tapping the spout, base, or handle.
Details the faucet's ability to differentiate between a touch and a grab to prevent accidental activation.
Describes using the handle to adjust water temperature and volume.
Explains how water flows upon touch and stops with another tap.
Details LED color changes (blue to magenta to red) indicating water temperature.
Informs users that the faucet automatically shuts off after 4 minutes of continuous use.
States the faucet runs for up to 2 years on 6 AA batteries.
Warns about property damage and water leaks due to incorrect or unapproved part installation.
Lists parts organized into bags for specific installation steps (1&4, 2, 4, 4&5).
Instructions for installing the faucet on a sink mounted on top of the counter.
Instructions for installing the faucet on a sink mounted from underneath the counter.
Guides the user to install the faucet so the light at the base faces forward.
Provides instructions for installing the faucet with a 10-inch escutcheon plate.
Details the components included in the bag for Step 2 of the installation.
Instructions for connecting the check valves to the hot and cold water supplies.
Advises to finger-tighten the check valve connections initially.
Guides on tightening check valve connections one additional turn with a wrench.
Warns about potential property damage and leaks from incorrect check valve installation.
Explains how to identify hot (red) and cold (blue) water lines and fitting types.
Suggests looping supply lines to prevent the need for cutting them.
Instructions for tightening check valves using two wrenches to avoid over-tightening.
Instructs to close water supplies and move the handle to the full mix position.
Advises placing a bucket under the faucet outlet tube before flushing.
Details slowly opening water supplies to flush lines and prevent debris lodging.
Instructs to close water supplies and dry the faucet tube with a soft cloth.
Details the components included in the bag for Step 4 of the installation.
Illustrates the solenoid connection process with detailed side views (A, B, C).
Instructs to pull down moderately to ensure both connections have been made securely.
Advises to ensure the wire extends away from the solenoid for proper functionality.
Emphasizes not tying, twisting, or bunching wires for correct electronic operation.
Details AA (2-year life) and C (5-year life) batteries for the faucet.
Guides the user to align batteries correctly with +/- markings for proper operation.
Instructs to place the battery box on the cabinet floor or hang it on the wall.
Instructs to turn on both hot and cold water supplies.
Guides the user to turn the faucet valve on fully.
Reiterates warnings about property damage and leaks from incorrect installation.
Advises to check for leaks at specified points and retighten if necessary.
Provides details and diagrams for standard water line connections.
Provides details and diagrams for custom fitting water lines.
Detailed instructions for installing plastic sleeves for custom fit water line connections.
Step-by-step instructions for assembling the soap dispenser.
Notes on filling the dispenser bottle and basic maintenance for upkeep.
Outlines the steps to bypass the electronic solenoid for manual operation.
Lists key components like solenoid assembly, plastic sleeves, and check valves.
Lists parts related to the power supply and optional soap dispenser.
Lists various adapters and fittings available for purchase separately.
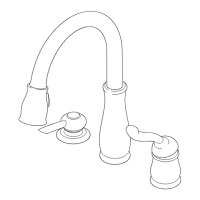
Identifies parts related to the bar spout assembly for specific models.
Identifies parts for the wand retainer and sprayer assembly.
Identifies parts for the cartridge, handle, and related hardware.
Identifies escutcheon plates and mounting hardware included.
Identifies hose assemblies and inlet gaskets.
Identifies the mounting nut assembly for installation.
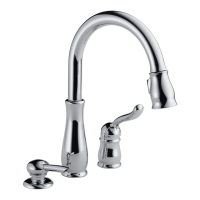
Identifies parts for spout and wand assemblies.
Identifies parts for sprayer and cartridge assemblies.
Identifies parts for handle, escutcheon, and associated hardware.
Identifies hose assembly, inlet gaskets, and mounting nut assembly.
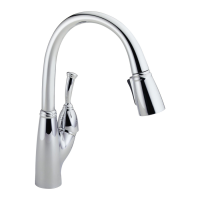
Identifies parts for spout and wand assemblies.
Identifies parts for sprayer and cartridge assemblies.
Identifies parts for handle, escutcheon, and associated hardware.
Identifies hose assembly, inlet gaskets, and mounting nut assembly.
Identifies parts for spout and wand assemblies.
Identifies parts for sprayer and cartridge assemblies.
Identifies parts for handle, escutcheon, and associated hardware.
Identifies hose assembly, inlet gaskets, and mounting nut assembly.
Guides on cleaning the spray head screen to resolve low water flow.
Provides steps to diagnose and fix leaks from the handle or spout outlet.
Explains the meaning of different LED light colors indicating faucet status.
Steps to resolve issues when no water is coming out of the spout.
Guides on checking connections and replacing batteries/spout for LED issues.
Recommends gentle cleaning methods to maintain the faucet's finish and appearance.
Describes the faucet's backflow protection system and its compliance with industry standards.
Details the warranty coverage for faucet parts and finishes.
Details the warranty coverage for electronic components and batteries.
Explains how to make warranty claims and outlines limitations.
Provides FCC compliance statements regarding potential radio frequency interference.
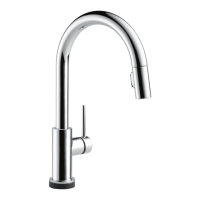
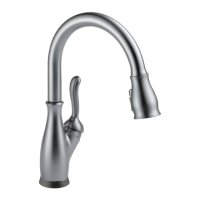
| Brand | Delta |
|---|---|
| Model | 9113T-DST |
| Finish | Chrome |
| Flow Rate | 1.8 GPM |
| Number of Holes Required | 1 or 3 |
| Handle Style | Lever |
| Touch Activation | Yes |
| Installation Type | Deck Mount |
| Number of Handles | 1 |
| ADA Compliant | Yes |
| WaterSense Certified | Yes |
| Spout Reach | 9.5 in |
| Valve Type | Diamond Seal |