3 / 24
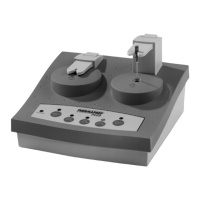
5) Push the button which corresponds to the size of the Thermafi l® endodontic obturator you wish to
heat. Then push the “start left” button. The obturator is now being heated. The heating time varies
– depending on obturator size – from 20 to 45 seconds, and is regulated automatically.
The heating times for each button are as follows:
Size Signal Time Tolerance
20 – 25 20 seconds ± 5 seconds
30 – 60 41 seconds ± 7 seconds
70 – 140 45 seconds ± 8 seconds
6) After the fi rst signal ”beep”, the obturator is ready for use. Push the obturator holder (arrow up) and
guide the holder with your fi nger. Take the obturator carefully out of the holder by pulling it towards,
making sure not to scrape the obturator on any part of the holder.
7) You may leave the obturator in the ThermaPrep Plus Oven for up to 90 seconds after the fi rst signal
“beep”. It will keep the obturator at the appropriate temperature and ready for use. The oven will
“beep” every 15 seconds to remind you that the obturator is still in the oven. After 90 seconds, the
heating element will switch off automatically.
8) As an extra safety precaution, after you’ve taken the obturator out of the holder, switch off the heating
element by pushing the start level button again. Keep in mind that you won’t be able to switch the
heating element off during the heating cycle.
9) If you want to heat more obturators, you may alternate using the left and the right holders to continue
your work effi ciently. Wait until after the signal “beeps” for the fi rst holder, then you may immediately
start to heat the other one. You will be unable to heat both sides at the same time.
10) When you’re fi nished using the oven, use the power on/off switch located at the back of the oven to
turn it off. Then unplug the oven until you’re ready to use it again.
Cleaning instructions
Before starting any cleaning procedures, disconnect the oven from the power outlet.
Clean oven after each use. Any gutta-percha remaining on the holder or in the heating chamber may be
effectively removed with Orange Solvent (generic dental solvent) on a cotton ear bud. The oven’s housing may
be cleaned with Orange Solvent.
7) Technical specifi cations
Voltage rating : 110 VAC or 220 VAC, 50/60 Hertz, range of the supply voltage + / - 10 % , fuse 2 Amps slow.
 Loading...