FAN CONTROLLER INSTALLATION
1. Choose a convenient location, preferably along the vehicles core support near the battery. Take in to consideration sensor
placement & wire routing requirements. Avoid mounting near HOT engine components or a location that would be in direct
contact with any road debris.
2. Using the fan controller as a template, mark and drill four 5/32” holes in the proper location.
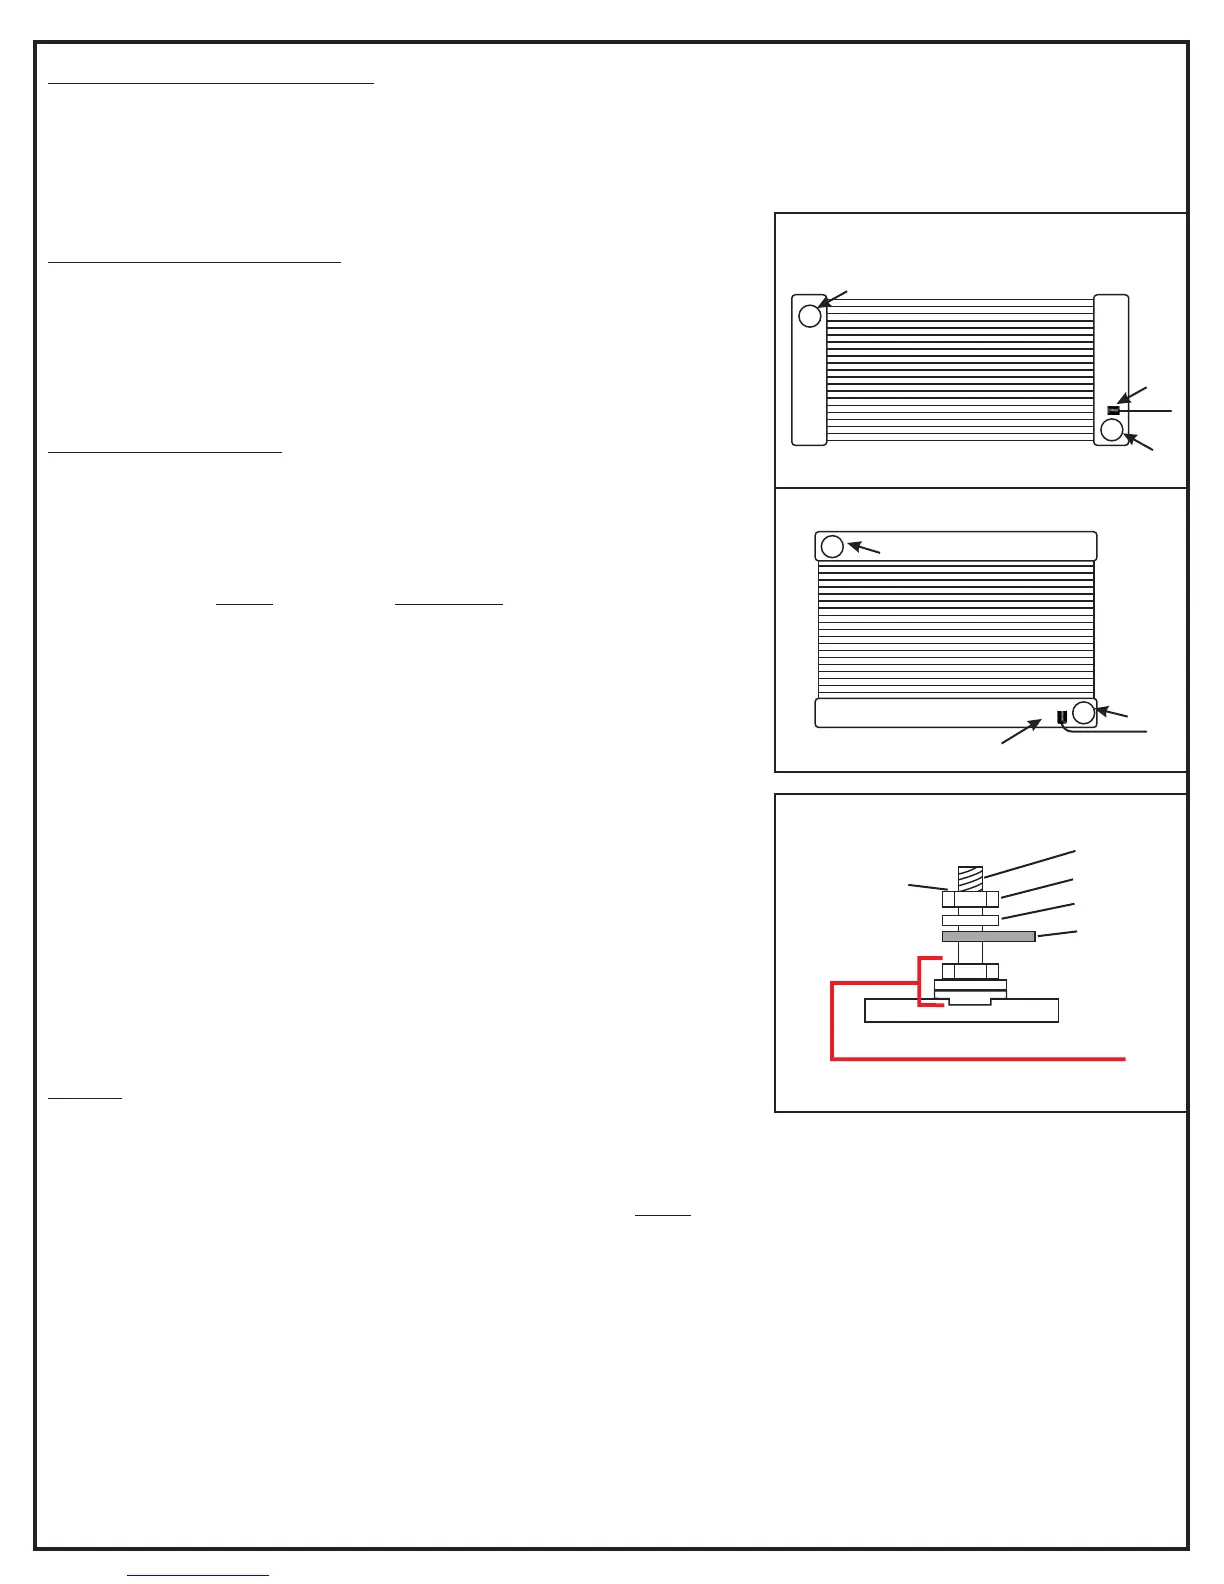
Sensor
Outlet
Inlet
Down-flow radiator
Diagram #1
Cross-flow radiator
Sensor
Inlet
Outlet
Diagram #2
Nut
Split Washer
Ring Terminal
Terminal
Do not exceed
12 inch lbs.
of torque when
tightening
terminal nuts
3. Using four #10 sheet metal screws supplied, secure the unit in place.
CIRCUIT BREAKER MOUNTING
1. Choose a convenient location for the circuit breaker that is between the fan
controller and the battery.
2. Using the circuit breaker as a template, mark and drill two 5/32” holes in the
proper locations.
3. Using the remaining two #10 sheet metal screws supplied, secure the circuit
breaker in place.
SENSOR INSTALLATION
Route the path of your sensor wires to the fan controller before mounting sensor.
If necessary, you can lengthen or shorten sensor wires using an automotive
grade 22-gauge wire.
IMPORTANT: The is designed to monitor the coolant going back infan controller
to the engine, therefore controlling the engine temperature vs. reacting to it. By
design, the sensor install on the of the radiator tank. (SeeMUST COLD SIDE
Diagram #1)
This unit uses 3M double stick tape to adhere right to the radiator tank, therefore
getting a very accurate temperature reading. The surface preparation is critical;
surface must be absolutely free of dirt, oil, peeling paint or any contaminants to
ensure a proper bond.
NOTE: The Ideal application temperature range is 70°F to 100°F (21°C to
38°C).The Minimum suggested application temperature is 50°F (10°C). At 70°F
approximately 50% of ultimate bond strength will be achieved after 20 minutes,
90% after 24 hours and 100% after 72 hours.
1. Once you have determined the location for the sensor, clean & dry the area
with alcohol, making sure there is no left over residue.
2. Remove the red tape backing from the sensor. Attach the sensor to the
desired location applying firm pressure on the sensor for at least 15 seconds.
4. Crimp the red #6 ring connector to the sensor red wire.
5. Crimp the #8 red ring connector to the black sensor wire.
6. Connect red sensor wire to the sensor "+" terminal on the fan controller.
7. Connect black sensor wire to the sensor "-" terminal on the fan controller.
WIRING
(See Quick Reference Guide on page 4)
Before starting, disconnect the negative (-) cable on the vehicles battery.
Using the electrical connectors and wire ties provided, follow the instructions below. (See Dia. #2 for proper lug stacking)
WARNING: The positive and negative wires feeding the controller be connected directly to the vehicles battery.MUST
This is very important because the controller requires a clean signal, do not connect directly to the fuse panel, starter or the
alternator. Improper installation will void the warranty.
1. Using a yellow 5/16” ring terminal & 10 AWG red wire supplied, connect one end of the red wire to the vehicles positive (+)
terminal on the battery.
2. Route the 10 AWG Red Wire now connected to the battery to the circuit breaker previously installed and cut the wire to the
appropriate length.
3. Using a yellow #10 ring terminal, connect the 10 AWG red wire to the “BAT” terminal on the circuit breaker.
4. Using a yellow #10 ring terminal, connect the auxiliary side “AUX” of the circuit breaker to another length of 10 AWG red
wire.
5. Route the red 10 AWG wire now connected to the auxiliary side of the circuit breaker to the positive (+) battery terminal on
the fan controller and connect using a yellow #8 ring terminal.
(2)Page
DO NOT REMOVE!
Preassembled with locking compound
TAMPERING WILL VOID WARRANTY
 Loading...