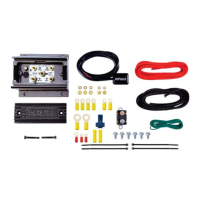
6. Using the red 10 AWG wire and a yellow #8 ring terminal, connect into the positive (+) fan terminal on the fan controller.
7. Using a yellow butt connector, connect the loose end of the red 10 AWG wire connected to the positive (+) fan terminal to
the positive (+) side of the fan(s).
8. Using a #8 yellow ring terminal, connect the 10 AWG black wire to the negative (-) terminal on the fan controller. Route the
other end of the wire to the negative terminal on the vehicles battery & connect using a 5/16” yellow ring terminal. Do not
connect to a chassis ground.
9. Using a yellow butt connector, connect the 10 AWG black wire to the negative (-) lead of the fan(s). Route the other end of
this wire to the fan (-) terminal of the fan controller & connect using #8 yellow ring terminal.
Green Wire: Override Circuit (Optional)
The green wire is designed to work in two different configurations. When used, this will allow the electric fan(s) to be turned on
regardless of the temperature of the cooling system. The fan speed will quickly ramp up to 60% and will operate between 60
and 100% as temperature increases and decreases. Using a #6 red ring terminal connect the Green wire to the A/C terminal
and select option A or B below.
Note: Use of the Override terminal is optional and not required for the controller to work properly.PWM
A. A/C Override - Using the provided, attach the green wire to a positive (+) 12V output on theblue wire tap connector A/C
compressor.
B. Manual Switch Override - Attach the green wire to the 12V output on the manual switch (not provided).
VEHICLE TESTING
1. Before you start the vehicle, make sure all wires are safely zip tied and away from any moving parts.
2. Start the vehicle.
3. If the manual override function is being used, turn on the A/C or manual switch. Electric fan(s) will ramp up to 60%.
4. Turn off the manual override or A/C function and allow the engine to warm up, fans will ramp up slowly as the vehicle warms up.
TROUBLESHOOTING
In the event the fan controller is not operating properly, perform the following tests:
1. Re-check that all wire splices and connections are secure and crimped properly, making sure wires have no movement
within the crimp.
2. Using a multimeter, verify that the battery terminal on the fan controller has a minimum of 12.6 volts.
Set the multimeter to: DC Volts
Fan controller center ground terminalBlack Lead:
Fan controller positive battery terminalRed Lead:
SYMPTOM: Fan(s) is not turning on when the override function is activated.
TEST: Using a jumper wire, with the vehicle running, connect the battery positive (+) terminal on the fan controller to the A/C
override terminal on the fan controller. This should immediately turn on the fan(s).
Pass: The override is working as designed.
Fail: If the fan(s) do not operate, THERE MUST BE A CONNECTION ISSUE, repeat tests 1 and 2 above. If you still can't get it
to activate, please call our tech team.
SYMPTOM: The fan(s) are working correctly with the override, but will not turn on with temperature.
TEST: Using a jumper wire, connect the sensor positive (+) terminal on the fan controller to the center sensor ground (-)
terminal on the fan controller. This should turn the fan(s) on immediately.
Pass: The fan controller is working as designed.
Fail: Test the sensor (See page 4)
(3)Page
ADJUSTING THE TURN-ON TEMPERATURE
1. Remove the rubber plug from the top of the fan controller
2. Using a 1/8” blade screwdriver, follow the instructions below:
If your engine is running too cool: Turn the adjustment screw CLOCKWISE in increments of 2 FULL turns, then test before
repeating.
If your engine is running too hot: Turn the adjustment screw COUNTER-CLOCKWISE in increments of 2 FULL turns, then
test before repeating.
 Loading...