battery packs include a fuel gauge
which consists of three green LED lights that
indicate the level of charge remaining in the battery
pack.
To actuate the fuel gauge, press and hold the fuel
gauge button (X). A combination of the three green
LED lights will illuminate designating the level of
charge left. When the level of charge in the battery
is below the usable limit, the fuel gauge will not
illuminate and the battery will need to be recharged.
NOTE: The fuel gauge is only an indication of the
charge left on the battery pack. It does not indicate
tool functionality and is subject to variation based
on product components, temperature and end-user
application.
Removing, Changing and/or
Replacing the Cutting Dies (Fig. 1, 3)
WARNING: Never attempt to repair
a damaged or worn cutting die. This
could weaken the die and result in a
serious injury. Discard the entire set and
replace with a new set.
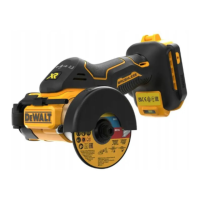
The tool is equipped with a stationary cutting die(C)
and a moving cutting die (D). Each cutting die is
fabricated with four different thread cutting sizes.
Cutting die orientation is critical when changing or
replacing the cutting dies.
1. Loosen both cutting die cap screws (K) anti-
clockwise using the hex wrench (E) provided.
2. If your desired thread cutting size is overly
worn, replace both with a new cutting die set.
3. Position the cutting dies so that both stationary
cutting die and moving cutting die are aligned
with same thread size. Ensure that the marked
cutting faces (Figure 3) face each other.
NOTE: Ensure the cutting dies are seated
against the two perpendicular surfaces of
the stationary cutting die (C) jaw and moving
cutting die (D) jawbefore tightening.
4. Tighten cutting die cap screws (J) clockwise
using the hex wrench (E).
5. Install a battery and cycle the tool to ensure
proper assembly and alignment prior to making
a cut.
Your
service organisation.
Mains Plug Replacement
(U.K. & Ireland Only)
If a new mains plug needs to be fitted:
• Safely dispose of the old plug.
• Connect the brown lead to the live terminal in
the plug.
• Connect the blue lead to the neutral terminal.
WARNING: No connection is to be
made to the earth terminal.
Follow the fitting instructions supplied with good
quality plugs. Recommended fuse: 3 A.
Using an Extension Cable
An extension cord should not be used unless
absolutely necessary. Use an approved extension
cable suitable for the power input of your charger
(see Technical Data). The minimum conductor size
is 1 mm
2
; the maximum length is 30 m.
When using a cable reel, always unwind the cable
completely.
ASSEMBLY AND ADJUSTMENTS
WARNING: To reduce the risk of
serious personal injury, turn tool
off and disconnect battery pack
before making any adjustments or
removing/installing attachments or
accessories. An accidental start-up can
cause injury.
WARNING: Use only
battery
packs and chargers.
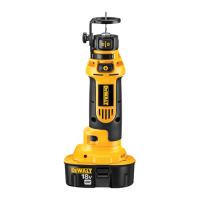
Inserting and Removing the
Battery Pack from the Tool (Fig. 2)
NOTE: Make sure your battery pack (G) is fully
charged.
TO INSTALL THE BATTERY PACK INTO THE TOOL HANDLE
1. Align the battery pack (G) with the rails inside
the tool’s handle (Fig. 2).
2. Slide it into the handle until the battery pack is
firmly seated in the tool and ensure that you
hear the lock snap into place.
 Loading...