53
ENGLISH
• Switch off the tool and rotate it 90° clockwise.
• Switch on the horizontal laser beam.
• Mark the centre of the laser beam exactly midways on the opposite wall.
• Switch off the tool.
• Measure the difference between the markings.
• If the difference between the markings is 3 mm or less, the tool is properly calibrated.
• If the difference between the markings is more than 3 mm, the tool must be serviced.
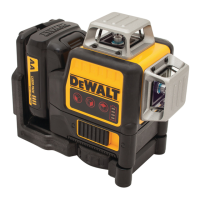
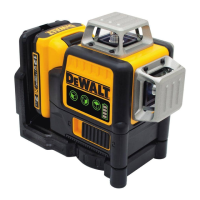
Level Check (Fig. I1, I2)
• Place the tool in an area with a wall of at least 9 m length. Mount the tool to one end of
the wall.
• Position the tool at an angle of 90° to the left.
• Switch on the horizontal laser beam.
• Mark the centre of the laser beam at one-third distance
32
and at two-third distance
33
on the wall.
• Switch off the tool.
• Mount the tool to the other end of the wall.
• Position the tool at an angle of 90° to the right.
• Switch on the horizontal laser beam.
• Switch on the tool, align the laser beam with the wall marking
33
and mark the laser
beam at two-third distance
34
on the wall.
• Switch off the tool.
• Measure the difference between the markings (
32
,
34
).
• If the difference between the markings is 6 mm or less, the tool is properly calibrated.
• If the difference between the markings is more than 6 mm, the tool must be serviced.
Plumb Check (Fig. J1, J2)
• Place the tool on the floor in an area with a ceiling of at least 2.5 m height.
• Mark a line of 1.5 m length
35
on the floor. Position the tool at one end of the floor
marking
35
.
• Switch on the vertical laser beam.
• Align the laser beam with the floor marking
35
.
• Mark the centre of the laser beam at one-third distance
36
and at two-third distance
37
on the ceiling.
• Switch off the tool. Position the tool at the other end of the floor marking
35
facing
themarking.
 Loading...