13
KR
배터리
안전
경고
:
배터리는
폭발하거나
누출될
수
있
고
,
심각한
부상
또는
화재를
야기할
수
있
습니다
.
이러한
위험을
줄이려면
:
항상
배터리
라벨
및
포장에
표시된
모든
지침
및
경고를
주의하여
따르십시오
.
배터리
단자를
단락시키지
마십시오
.
알카라인
배터리를
충전하지
마십시오
.
오래된
배터리와
새
배터리를
함께
사용하
지
마십시오
.
동일한
상표
및
유형의
새
배
터리로
한
번에
모두
교체하십시오
.
배터리
화학
성질을
혼합하지
마십시오
.
배터리를
불
속에
버리지
마십시오
.
항상
배터리는
어린이의
손이
닿지
않는
곳에
보관하십시오
.
장치를
수
개월
동안
사용하지
않을
경우
항상
배터리를
빼
놓으십시오
.
참고
:
권장
배터리가
사용되고
있는지
확
인하십시오
.
참고
:
배터리가
정확한
극성에
따라
정확
한
방식으로
끼워져
있는지
확인하십시오
.
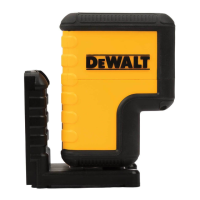
설치
(
배터리
장착
)
1.
공구
뒤쪽에
있는
배터리
함
래치의
위치를
찾
습니다
(
그림
C
#2).
2.
손가락을
사용해서
래치를
위로
당겨
잠금을
풀고
배터리
도어를
제거합니다
(
그림
D
#1
및
#2).
3.
배터리
함
안쪽에
표시된
것과
같이
각
배터리
의
-
및
+
끝의
위치를
확인하면서
두
개의
AA
배
터리를
끼웁니다
(
그림
D
#3).
4.
배터리
도어
하단에
있는
핀을
배터리
함의
노
치로
밉니다
(
그림
D
#4).
5.
제자리에
고정될
때까지
배터리
도어를
아래로
밉니다
(
그림
D
#5).
공구가
켜지면
,
배터리
용량이
디스플레이
창에
나
타납니다
(
그림
E
#1).
GB
Contents
• User Safety
• Battery Safety
• Setup (Load Batteries)
• Operation
• Warranty
• Error Codes
• Specications
Retain all sections of this manual for future reference.
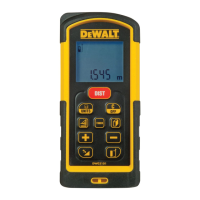
User Safety
WARNING:
Carefully read the Safety Instructions and
Product Manual before using this product. The
person responsible for the product must ensure
that all users understand and adhere to these
instructions.
WARNING:
The following label information is placed on your
laser tool to inform you of the laser class for your
convenience and safety.
DW099S
FCC ID: 2ADA6DW099S
IC: 12409A-DW099S
DW099E
The DW099E and DW099S tools emit a visible laser
beam, as shown in Figure
A
#1. The laser beam emitted
is Laser Class 2 per IEC 60825-1 and complies with 21
CFR 1040.10 and 1040.11 except for deviations pursuant
to Laser Notice No. 50, dated June 24, 2007.
WARNING:
While the laser tool is in operation, be careful not
to expose your eyes to the emitting laser beam
(red light source). Exposure to a laser beam
for an extended time period may be hazardous
to your eyes. Do not look into the beam with
optical aids.
WARNING: To reduce the risk of injury, user
must read the Product User manual, Laser
Safety manual, and Battery Safety information.
FCC Compliance
This device complies with Part 15 of the FCC Rules.
Operation is subject to the following two conditions: (1)
This device may not cause harmful interference, and
(2) this device must accept any interference received,
including interference that may cause undesired operation.
FCC Statement
This equipment has been tested and found to comply with
the limits for a Class B digital device, pursuant to part 15
of the FCC rules. These limits are designed to provide
reasonable protection against harmful interference in
a residential installation. This equipment generates, uses,
and can radiate radio frequency energy and, if not installed
and used in accordance with the instructions, may cause
harmful interference to radio communications. This device
is a portable unit. The exclusion threshold is 0.887<3.
However, there is no guarantee that interference will not
occur in a particular installation. If this equipment does
cause harmful interference to radio or television reception,
which can be determined by turning the equipment off and
on, the user is encouraged to try to correct the interference
by one or more of the following measures:
- Reorient or relocate the receiving antenna.
- Increase the separation between the equipment and
the receiver.
- Connect the equipment into an outlet on a different circuit
(not the circuit to which the receiver is connected).
- Consult the dealer or an experienced radio/TV technician
for help.
Canada, Industry Canada (IC) Notices
Class B digital circuitry of this device complies with
Canadian ICES-003. This device complies with Industry
Canada license-exempt RSS standard(s). Operation is
subject to the following two conditions: (1) this device may
not cause interference, and (2) this device must accept
any interference, including interference that may cause
undesired operation of the device.
Under Industry Canada regulations, the radio transmitter(s)
in this device may only operate using an antenna of a type
and maximum (or lesser) gain approved for the transmitter
by Industry Canada. To reduce potential radio interference
to other users, the antenna type and its gain should be
so chosen that the equivalent isotropically radiated power
(e.i.r.p.) is not more than that necessary for successful
communication.
조작
벽
또는
물체까지의
거리
측정
1.
GB
Battery Safety
WARNING: Batteries can explode or leak and
cause serious injury or re. To reduce the risk:
ALWAYS follow all instructions and warnings on
the battery label and package.
DO NOT short any battery terminals.
DO NOT charge alkaline batteries.
DO NOT mix old and new batteries. Replace all
of them at the same time with new batteries of
the same brand and type.
DO NOT mix battery chemistries.
DO NOT dispose of batteries in re.
ALWAYS keep batteries out of reach of children.
ALWAYS remove batteries if the device will not
be used for several months.
NOTE: Ensure that the recommended batteries
are used.
NOTE: Ensure the batteries are inserted in the
correct manner, with the correct polarity.
Setup (Load Batteries)
1.
Locate the battery compartment latch on the back of
the tool (Figure
C
#2).
2.
Using your finger, pull the latch up to unlock and
remove the battery door (Figure
D
#1 and #2).
3.
Insert two AAA batteries, making sure to position the -
and + ends of each battery as noted inside the battery
compartment (Figure
D
#3).
4.
Slide the pins at the bottom of the battery door into
the notches in the battery compartment
(Figure
D
#4).
5.
Push the battery door down until it snaps in place
(Figure
D
#5).
When the tool is ON, the battery level appears in the
display window (Figure
E
#1).
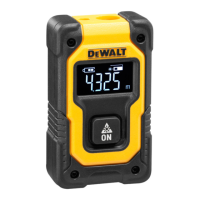
Operation
Measuring Distance to a Wall or Object
1.
Click (Figure
A
#5) to turn on the tool.
2.
The tool will measure the distance from the bottom of
the tool to the wall or object (Figure
F
#1).
To measure from the top of the tool instead of the
bottom (Figure
F
#2), hold for 2 seconds.
On the display window, the tool icon will change from
to (Figure
E
#5).
3.
Point the laser at the top of the tool (Figure
A
#1)
toward the wall or object whose distance you need to
measure (Figure
F
).
4.
Click to measure the distance from the tool to
the wall or object.
5.
At the bottom of the display window (Figure
A
#2),
view the current measurement (Figure
E
#3).
To take a new measurement, click
to move the
current measurement up to the previous line on the
display window (Figure
E
#2). Then repeat steps 2-5.
Measuring Distances Continuously
To take a series of measurements as you move around,
change to Continuous Measure mode.
1.
Click (Figure
A
#5) to turn on the tool.
2.
Point the laser at the top of the tool (Figure
A
#1)
toward the wall or object whose distance you need to
measure (Figure
F
).
3.
Click and hold for 2 seconds to turn on the
Continuous Measure mode.
4.
At the bottom of the display window (Figure
A
#2),
view the current measurement (Figure
E
#3), which
will keep changing as you move the tool.
5.
To take the current measurement (from the tool to the
wall or object) and exit Continuous Measure mode,
click
.
To take a new measurement, click
to move the
current measurement up to the previous line on the
display window. Then repeat steps 2-5.
(
그림
A
#5)
을
클릭하여
공구를
켭니다
.
2.
공구의
하단에서
벽이나
물체까지의
거리를
측
정합니다
(
그림
F
#1).
공구
하단
대신
공구
상부에서
측정하려면
(
그림
F
#2),
GB
Battery Safety
WARNING: Batteries can explode or leak and
cause serious injury or re. To reduce the risk:
ALWAYS follow all instructions and warnings on
the battery label and package.
DO NOT short any battery terminals.
DO NOT charge alkaline batteries.
DO NOT mix old and new batteries. Replace all
of them at the same time with new batteries of
the same brand and type.
DO NOT mix battery chemistries.
DO NOT dispose of batteries in re.
ALWAYS keep batteries out of reach of children.
ALWAYS remove batteries if the device will not
be used for several months.
NOTE: Ensure that the recommended batteries
are used.
NOTE: Ensure the batteries are inserted in the
correct manner, with the correct polarity.
Setup (Load Batteries)
1.
Locate the battery compartment latch on the back of
the tool (Figure
C
#2).
2.
Using your finger, pull the latch up to unlock and
remove the battery door (Figure
D
#1 and #2).
3.
Insert two AAA batteries, making sure to position the -
and + ends of each battery as noted inside the battery
compartment (Figure
D
#3).
4.
Slide the pins at the bottom of the battery door into
the notches in the battery compartment
(Figure
D
#4).
5.
Push the battery door down until it snaps in place
(Figure
D
#5).
When the tool is ON, the battery level appears in the
display window (Figure
E
#1).
Operation
Measuring Distance to a Wall or Object
1.
Click (Figure
A
#5) to turn on the tool.
2.
The tool will measure the distance from the bottom of
the tool to the wall or object (Figure
F
#1).
To measure from the top of the tool instead of the
bottom (Figure
F
#2), hold for 2 seconds.
On the display window, the tool icon will change from
to (Figure
E
#5).
3.
Point the laser at the top of the tool (Figure
A
#1)
toward the wall or object whose distance you need to
measure (Figure
F
).
4.
Click to measure the distance from the tool to
the wall or object.
5.
At the bottom of the display window (Figure
A
#2),
view the current measurement (Figure
E
#3).
To take a new measurement, click
to move the
current measurement up to the previous line on the
display window (Figure
E
#2). Then repeat steps 2-5.
Measuring Distances Continuously
To take a series of measurements as you move around,
change to Continuous Measure mode.
1.
Click (Figure
A
#5) to turn on the tool.
2.
Point the laser at the top of the tool (Figure
A
#1)
toward the wall or object whose distance you need to
measure (Figure
F
).
3.
Click and hold for 2 seconds to turn on the
Continuous Measure mode.
4.
At the bottom of the display window (Figure
A
#2),
view the current measurement (Figure
E
#3), which
will keep changing as you move the tool.
5.
To take the current measurement (from the tool to the
wall or object) and exit Continuous Measure mode,
click
.
To take a new measurement, click
to move the
current measurement up to the previous line on the
display window. Then repeat steps 2-5.
을
2
초간
잡고
있으십시오
.
디스플레이
창에서
공구
아이콘이
GB
Battery Safety
WARNING: Batteries can explode or leak and
cause serious injury or re. To reduce the risk:
ALWAYS follow all instructions and warnings on
the battery label and package.
DO NOT short any battery terminals.
DO NOT charge alkaline batteries.
DO NOT mix old and new batteries. Replace all
of them at the same time with new batteries of
the same brand and type.
DO NOT mix battery chemistries.
DO NOT dispose of batteries in re.
ALWAYS keep batteries out of reach of children.
ALWAYS remove batteries if the device will not
be used for several months.
NOTE: Ensure that the recommended batteries
are used.
NOTE: Ensure the batteries are inserted in the
correct manner, with the correct polarity.
Setup (Load Batteries)
1.
Locate the battery compartment latch on the back of
the tool (Figure
C
#2).
2.
Using your finger, pull the latch up to unlock and
remove the battery door (Figure
D
#1 and #2).
3.
Insert two AAA batteries, making sure to position the -
and + ends of each battery as noted inside the battery
compartment (Figure
D
#3).
4.
Slide the pins at the bottom of the battery door into
the notches in the battery compartment
(Figure
D
#4).
5.
Push the battery door down until it snaps in place
(Figure
D
#5).
When the tool is ON, the battery level appears in the
display window (Figure
E
#1).
Operation
Measuring Distance to a Wall or Object
1.
Click (Figure
A
#5) to turn on the tool.
2.
The tool will measure the distance from the bottom of
the tool to the wall or object (Figure
F
#1).
To measure from the top of the tool instead of the
bottom (Figure
F
#2), hold for 2 seconds.
On the display window, the tool icon will change from
to (Figure
E
#5).
3.
Point the laser at the top of the tool (Figure
A
#1)
toward the wall or object whose distance you need to
measure (Figure
F
).
4.
Click to measure the distance from the tool to
the wall or object.
5.
At the bottom of the display window (Figure
A
#2),
view the current measurement (Figure
E
#3).
To take a new measurement, click
to move the
current measurement up to the previous line on the
display window (Figure
E
#2). Then repeat steps 2-5.
Measuring Distances Continuously
To take a series of measurements as you move around,
change to Continuous Measure mode.
1.
Click (Figure
A
#5) to turn on the tool.
2.
Point the laser at the top of the tool (Figure
A
#1)
toward the wall or object whose distance you need to
measure (Figure
F
).
3.
Click and hold for 2 seconds to turn on the
Continuous Measure mode.
4.
At the bottom of the display window (Figure
A
#2),
view the current measurement (Figure
E
#3), which
will keep changing as you move the tool.
5.
To take the current measurement (from the tool to the
wall or object) and exit Continuous Measure mode,
click
.
To take a new measurement, click
to move the
current measurement up to the previous line on the
display window. Then repeat steps 2-5.
에서
GB
Battery Safety
WARNING: Batteries can explode or leak and
cause serious injury or re. To reduce the risk:
ALWAYS follow all instructions and warnings on
the battery label and package.
DO NOT short any battery terminals.
DO NOT charge alkaline batteries.
DO NOT mix old and new batteries. Replace all
of them at the same time with new batteries of
the same brand and type.
DO NOT mix battery chemistries.
DO NOT dispose of batteries in re.
ALWAYS keep batteries out of reach of children.
ALWAYS remove batteries if the device will not
be used for several months.
NOTE: Ensure that the recommended batteries
are used.
NOTE: Ensure the batteries are inserted in the
correct manner, with the correct polarity.
Setup (Load Batteries)
1.
Locate the battery compartment latch on the back of
the tool (Figure
C
#2).
2.
Using your finger, pull the latch up to unlock and
remove the battery door (Figure
D
#1 and #2).
3.
Insert two AAA batteries, making sure to position the -
and + ends of each battery as noted inside the battery
compartment (Figure
D
#3).
4.
Slide the pins at the bottom of the battery door into
the notches in the battery compartment
(Figure
D
#4).
5.
Push the battery door down until it snaps in place
(Figure
D
#5).
When the tool is ON, the battery level appears in the
display window (Figure
E
#1).
Operation
Measuring Distance to a Wall or Object
1.
Click (Figure
A
#5) to turn on the tool.
2.
The tool will measure the distance from the bottom of
the tool to the wall or object (Figure
F
#1).
To measure from the top of the tool instead of the
bottom (Figure
F
#2), hold for 2 seconds.
On the display window, the tool icon will change from
to
(Figure
E
#5).
3.
Point the laser at the top of the tool (Figure
A
#1)
toward the wall or object whose distance you need to
measure (Figure
F
).
4.
Click to measure the distance from the tool to
the wall or object.
5.
At the bottom of the display window (Figure
A
#2),
view the current measurement (Figure
E
#3).
To take a new measurement, click
to move the
current measurement up to the previous line on the
display window (Figure
E
#2). Then repeat steps 2-5.
Measuring Distances Continuously
To take a series of measurements as you move around,
change to Continuous Measure mode.
1.
Click (Figure
A
#5) to turn on the tool.
2.
Point the laser at the top of the tool (Figure
A
#1)
toward the wall or object whose distance you need to
measure (Figure
F
).
3.
Click and hold for 2 seconds to turn on the
Continuous Measure mode.
4.
At the bottom of the display window (Figure
A
#2),
view the current measurement (Figure
E
#3), which
will keep changing as you move the tool.
5.
To take the current measurement (from the tool to the
wall or object) and exit Continuous Measure mode,
click
.
To take a new measurement, click
to move the
current measurement up to the previous line on the
display window. Then repeat steps 2-5.
로
변경됩니다
(
그림
E
#5).
3.
공구
(
그림
A
#1)
상단에서
레이저가
측정해야
하는
거리에
있는
벽이나
물체
쪽을
향하도록
합니다
(
그림
F
).
4.
공구에서
벽이나
물체까지의
거리를
측정하려
면
GB
Battery Safety
WARNING: Batteries can explode or leak and
cause serious injury or re. To reduce the risk:
ALWAYS follow all instructions and warnings on
the battery label and package.
DO NOT short any battery terminals.
DO NOT charge alkaline batteries.
DO NOT mix old and new batteries. Replace all
of them at the same time with new batteries of
the same brand and type.
DO NOT mix battery chemistries.
DO NOT dispose of batteries in re.
ALWAYS keep batteries out of reach of children.
ALWAYS remove batteries if the device will not
be used for several months.
NOTE: Ensure that the recommended batteries
are used.
NOTE: Ensure the batteries are inserted in the
correct manner, with the correct polarity.
Setup (Load Batteries)
1.
Locate the battery compartment latch on the back of
the tool (Figure
C
#2).
2.
Using your finger, pull the latch up to unlock and
remove the battery door (Figure
D
#1 and #2).
3.
Insert two AAA batteries, making sure to position the -
and + ends of each battery as noted inside the battery
compartment (Figure
D
#3).
4.
Slide the pins at the bottom of the battery door into
the notches in the battery compartment
(Figure
D
#4).
5.
Push the battery door down until it snaps in place
(Figure
D
#5).
When the tool is ON, the battery level appears in the
display window (Figure
E
#1).
Operation
Measuring Distance to a Wall or Object
1.
Click (Figure
A
#5) to turn on the tool.
2.
The tool will measure the distance from the bottom of
the tool to the wall or object (Figure
F
#1).
To measure from the top of the tool instead of the
bottom (Figure
F
#2), hold for 2 seconds.
On the display window, the tool icon will change from
to (Figure
E
#5).
3.
Point the laser at the top of the tool (Figure
A
#1)
toward the wall or object whose distance you need to
measure (Figure
F
).
4.
Click to measure the distance from the tool to
the wall or object.
5.
At the bottom of the display window (Figure
A
#2),
view the current measurement (Figure
E
#3).
To take a new measurement, click
to move the
current measurement up to the previous line on the
display window (Figure
E
#2). Then repeat steps 2-5.
Measuring Distances Continuously
To take a series of measurements as you move around,
change to Continuous Measure mode.
1.
Click (Figure
A
#5) to turn on the tool.
2.
Point the laser at the top of the tool (Figure
A
#1)
toward the wall or object whose distance you need to
measure (Figure
F
).
3.
Click and hold for 2 seconds to turn on the
Continuous Measure mode.
4.
At the bottom of the display window (Figure
A
#2),
view the current measurement (Figure
E
#3), which
will keep changing as you move the tool.
5.
To take the current measurement (from the tool to the
wall or object) and exit Continuous Measure mode,
click
.
To take a new measurement, click
to move the
current measurement up to the previous line on the
display window. Then repeat steps 2-5.
를
클릭합니다
.
5.
디스플레이
창
하단에
(
그림
A
#2),
현재
측정
을
표시합니다
(
그림
E
#3).
새로운
측정을
하려면
,
GB
Battery Safety
WARNING: Batteries can explode or leak and
cause serious injury or re. To reduce the risk:
ALWAYS follow all instructions and warnings on
the battery label and package.
DO NOT short any battery terminals.
DO NOT charge alkaline batteries.
DO NOT mix old and new batteries. Replace all
of them at the same time with new batteries of
the same brand and type.
DO NOT mix battery chemistries.
DO NOT dispose of batteries in re.
ALWAYS keep batteries out of reach of children.
ALWAYS remove batteries if the device will not
be used for several months.
NOTE: Ensure that the recommended batteries
are used.
NOTE: Ensure the batteries are inserted in the
correct manner, with the correct polarity.
Setup (Load Batteries)
1.
Locate the battery compartment latch on the back of
the tool (Figure
C
#2).
2.
Using your finger, pull the latch up to unlock and
remove the battery door (Figure
D
#1 and #2).
3.
Insert two AAA batteries, making sure to position the -
and + ends of each battery as noted inside the battery
compartment (Figure
D
#3).
4.
Slide the pins at the bottom of the battery door into
the notches in the battery compartment
(Figure
D
#4).
5.
Push the battery door down until it snaps in place
(Figure
D
#5).
When the tool is ON, the battery level appears in the
display window (Figure
E
#1).
Operation
Measuring Distance to a Wall or Object
1.
Click (Figure
A
#5) to turn on the tool.
2.
The tool will measure the distance from the bottom of
the tool to the wall or object (Figure
F
#1).
To measure from the top of the tool instead of the
bottom (Figure
F
#2), hold for 2 seconds.
On the display window, the tool icon will change from
to (Figure
E
#5).
3.
Point the laser at the top of the tool (Figure
A
#1)
toward the wall or object whose distance you need to
measure (Figure
F
).
4.
Click to measure the distance from the tool to
the wall or object.
5.
At the bottom of the display window (Figure
A
#2),
view the current measurement (Figure
E
#3).
To take a new measurement, click
to move the
current measurement up to the previous line on the
display window (Figure
E
#2). Then repeat steps 2-5.
Measuring Distances Continuously
To take a series of measurements as you move around,
change to Continuous Measure mode.
1.
Click (Figure
A
#5) to turn on the tool.
2.
Point the laser at the top of the tool (Figure
A
#1)
toward the wall or object whose distance you need to
measure (Figure
F
).
3.
Click and hold for 2 seconds to turn on the
Continuous Measure mode.
4.
At the bottom of the display window (Figure
A
#2),
view the current measurement (Figure
E
#3), which
will keep changing as you move the tool.
5.
To take the current measurement (from the tool to the
wall or object) and exit Continuous Measure mode,
click
.
To take a new measurement, click
to move the
current measurement up to the previous line on the
display window. Then repeat steps 2-5.
를
클릭해서
현재
측
정을
디스플레이
창의
이전
라인으로
이동시킵니
다
(
그림
E
#2).
그런
다음
2-5
단계를
반복합니다
.
연속해서
거리
측정하기
돌아다니면서
연속해서
측정을
하려면
연속
측정
모드로
변경합니다
.
1.
GB
Battery Safety
WARNING: Batteries can explode or leak and
cause serious injury or re. To reduce the risk:
ALWAYS follow all instructions and warnings on
the battery label and package.
DO NOT short any battery terminals.
DO NOT charge alkaline batteries.
DO NOT mix old and new batteries. Replace all
of them at the same time with new batteries of
the same brand and type.
DO NOT mix battery chemistries.
DO NOT dispose of batteries in re.
ALWAYS keep batteries out of reach of children.
ALWAYS remove batteries if the device will not
be used for several months.
NOTE: Ensure that the recommended batteries
are used.
NOTE: Ensure the batteries are inserted in the
correct manner, with the correct polarity.
Setup (Load Batteries)
1.
Locate the battery compartment latch on the back of
the tool (Figure
C
#2).
2.
Using your finger, pull the latch up to unlock and
remove the battery door (Figure
D
#1 and #2).
3.
Insert two AAA batteries, making sure to position the -
and + ends of each battery as noted inside the battery
compartment (Figure
D
#3).
4.
Slide the pins at the bottom of the battery door into
the notches in the battery compartment
(Figure
D
#4).
5.
Push the battery door down until it snaps in place
(Figure
D
#5).
When the tool is ON, the battery level appears in the
display window (Figure
E
#1).
Operation
Measuring Distance to a Wall or Object
1.
Click (Figure
A
#5) to turn on the tool.
2.
The tool will measure the distance from the bottom of
the tool to the wall or object (Figure
F
#1).
To measure from the top of the tool instead of the
bottom (Figure
F
#2), hold for 2 seconds.
On the display window, the tool icon will change from
to (Figure
E
#5).
3.
Point the laser at the top of the tool (Figure
A
#1)
toward the wall or object whose distance you need to
measure (Figure
F
).
4.
Click to measure the distance from the tool to
the wall or object.
5.
At the bottom of the display window (Figure
A
#2),
view the current measurement (Figure
E
#3).
To take a new measurement, click
to move the
current measurement up to the previous line on the
display window (Figure
E
#2). Then repeat steps 2-5.
Measuring Distances Continuously
To take a series of measurements as you move around,
change to Continuous Measure mode.
1.
Click (Figure
A
#5) to turn on the tool.
2.
Point the laser at the top of the tool (Figure
A
#1)
toward the wall or object whose distance you need to
measure (Figure
F
).
3.
Click and hold for 2 seconds to turn on the
Continuous Measure mode.
4.
At the bottom of the display window (Figure
A
#2),
view the current measurement (Figure
E
#3), which
will keep changing as you move the tool.
5.
To take the current measurement (from the tool to the
wall or object) and exit Continuous Measure mode,
click
.
To take a new measurement, click
to move the
current measurement up to the previous line on the
display window. Then repeat steps 2-5.
(
그림
A
#5)
을
클릭하여
공구를
켭니다
.
2.
공구
(
그림
A
#1)
위쪽에서
레이저가
측정해야
하는
거리에
있는
벽이나
물체
쪽을
향하도록
합니다
(
그림
F
).
3.
GB
Battery Safety
WARNING: Batteries can explode or leak and
cause serious injury or re. To reduce the risk:
ALWAYS follow all instructions and warnings on
the battery label and package.
DO NOT short any battery terminals.
DO NOT charge alkaline batteries.
DO NOT mix old and new batteries. Replace all
of them at the same time with new batteries of
the same brand and type.
DO NOT mix battery chemistries.
DO NOT dispose of batteries in re.
ALWAYS keep batteries out of reach of children.
ALWAYS remove batteries if the device will not
be used for several months.
NOTE: Ensure that the recommended batteries
are used.
NOTE: Ensure the batteries are inserted in the
correct manner, with the correct polarity.
Setup (Load Batteries)
1.
Locate the battery compartment latch on the back of
the tool (Figure
C
#2).
2.
Using your finger, pull the latch up to unlock and
remove the battery door (Figure
D
#1 and #2).
3.
Insert two AAA batteries, making sure to position the -
and + ends of each battery as noted inside the battery
compartment (Figure
D
#3).
4.
Slide the pins at the bottom of the battery door into
the notches in the battery compartment
(Figure
D
#4).
5.
Push the battery door down until it snaps in place
(Figure
D
#5).
When the tool is ON, the battery level appears in the
display window (Figure
E
#1).
Operation
Measuring Distance to a Wall or Object
1.
Click (Figure
A
#5) to turn on the tool.
2.
The tool will measure the distance from the bottom of
the tool to the wall or object (Figure
F
#1).
To measure from the top of the tool instead of the
bottom (Figure
F
#2), hold for 2 seconds.
On the display window, the tool icon will change from
to (Figure
E
#5).
3.
Point the laser at the top of the tool (Figure
A
#1)
toward the wall or object whose distance you need to
measure (Figure
F
).
4.
Click to measure the distance from the tool to
the wall or object.
5.
At the bottom of the display window (Figure
A
#2),
view the current measurement (Figure
E
#3).
To take a new measurement, click
to move the
current measurement up to the previous line on the
display window (Figure
E
#2). Then repeat steps 2-5.
Measuring Distances Continuously
To take a series of measurements as you move around,
change to Continuous Measure mode.
1.
Click (Figure
A
#5) to turn on the tool.
2.
Point the laser at the top of the tool (Figure
A
#1)
toward the wall or object whose distance you need to
measure (Figure
F
).
3.
Click and hold for 2 seconds to turn on the
Continuous Measure mode.
4.
At the bottom of the display window (Figure
A
#2),
view the current measurement (Figure
E
#3), which
will keep changing as you move the tool.
5.
To take the current measurement (from the tool to the
wall or object) and exit Continuous Measure mode,
click
.
To take a new measurement, click
to move the
current measurement up to the previous line on the
display window. Then repeat steps 2-5.
를
클릭하고
2
초간
잡아서
연속
측정
모
드를
켭니다
.
4.
디스플레이
창
하단에서
(
그림
A
#2),
현재
측
정을
보고
(
그림
E
#3),
공구를
이동함에
따라
계속해서
변경합니다
.
5.
현재
측정을
하려면
(
공구에서
벽이나
물체까
지
)
연속
측정
모드를
종료하고
GB
Battery Safety
WARNING: Batteries can explode or leak and
cause serious injury or re. To reduce the risk:
ALWAYS follow all instructions and warnings on
the battery label and package.
DO NOT short any battery terminals.
DO NOT charge alkaline batteries.
DO NOT mix old and new batteries. Replace all
of them at the same time with new batteries of
the same brand and type.
DO NOT mix battery chemistries.
DO NOT dispose of batteries in re.
ALWAYS keep batteries out of reach of children.
ALWAYS remove batteries if the device will not
be used for several months.
NOTE: Ensure that the recommended batteries
are used.
NOTE: Ensure the batteries are inserted in the
correct manner, with the correct polarity.
Setup (Load Batteries)
1.
Locate the battery compartment latch on the back of
the tool (Figure
C
#2).
2.
Using your finger, pull the latch up to unlock and
remove the battery door (Figure
D
#1 and #2).
3.
Insert two AAA batteries, making sure to position the -
and + ends of each battery as noted inside the battery
compartment (Figure
D
#3).
4.
Slide the pins at the bottom of the battery door into
the notches in the battery compartment
(Figure
D
#4).
5.
Push the battery door down until it snaps in place
(Figure
D
#5).
When the tool is ON, the battery level appears in the
display window (Figure
E
#1).
Operation
Measuring Distance to a Wall or Object
1.
Click (Figure
A
#5) to turn on the tool.
2.
The tool will measure the distance from the bottom of
the tool to the wall or object (Figure
F
#1).
To measure from the top of the tool instead of the
bottom (Figure
F
#2), hold for 2 seconds.
On the display window, the tool icon will change from
to (Figure
E
#5).
3.
Point the laser at the top of the tool (Figure
A
#1)
toward the wall or object whose distance you need to
measure (Figure
F
).
4.
Click to measure the distance from the tool to
the wall or object.
5.
At the bottom of the display window (Figure
A
#2),
view the current measurement (Figure
E
#3).
To take a new measurement, click
to move the
current measurement up to the previous line on the
display window (Figure
E
#2). Then repeat steps 2-5.
Measuring Distances Continuously
To take a series of measurements as you move around,
change to Continuous Measure mode.
1.
Click (Figure
A
#5) to turn on the tool.
2.
Point the laser at the top of the tool (Figure
A
#1)
toward the wall or object whose distance you need to
measure (Figure
F
).
3.
Click and hold for 2 seconds to turn on the
Continuous Measure mode.
4.
At the bottom of the display window (Figure
A
#2),
view the current measurement (Figure
E
#3), which
will keep changing as you move the tool.
5.
To take the current measurement (from the tool to the
wall or object) and exit Continuous Measure mode,
click
.
To take a new measurement, click
to move the
current measurement up to the previous line on the
display window. Then repeat steps 2-5.
을
클릭
합니다
.
새로운
측정을
하려면
,
GB
Battery Safety
WARNING: Batteries can explode or leak and
cause serious injury or re. To reduce the risk:
ALWAYS follow all instructions and warnings on
the battery label and package.
DO NOT short any battery terminals.
DO NOT charge alkaline batteries.
DO NOT mix old and new batteries. Replace all
of them at the same time with new batteries of
the same brand and type.
DO NOT mix battery chemistries.
DO NOT dispose of batteries in re.
ALWAYS keep batteries out of reach of children.
ALWAYS remove batteries if the device will not
be used for several months.
NOTE: Ensure that the recommended batteries
are used.
NOTE: Ensure the batteries are inserted in the
correct manner, with the correct polarity.
Setup (Load Batteries)
1.
Locate the battery compartment latch on the back of
the tool (Figure
C
#2).
2.
Using your finger, pull the latch up to unlock and
remove the battery door (Figure
D
#1 and #2).
3.
Insert two AAA batteries, making sure to position the -
and + ends of each battery as noted inside the battery
compartment (Figure
D
#3).
4.
Slide the pins at the bottom of the battery door into
the notches in the battery compartment
(Figure
D
#4).
5.
Push the battery door down until it snaps in place
(Figure
D
#5).
When the tool is ON, the battery level appears in the
display window (Figure
E
#1).
Operation
Measuring Distance to a Wall or Object
1.
Click (Figure
A
#5) to turn on the tool.
2.
The tool will measure the distance from the bottom of
the tool to the wall or object (Figure
F
#1).
To measure from the top of the tool instead of the
bottom (Figure
F
#2), hold for 2 seconds.
On the display window, the tool icon will change from
to (Figure
E
#5).
3.
Point the laser at the top of the tool (Figure
A
#1)
toward the wall or object whose distance you need to
measure (Figure
F
).
4.
Click to measure the distance from the tool to
the wall or object.
5.
At the bottom of the display window (Figure
A
#2),
view the current measurement (Figure
E
#3).
To take a new measurement, click
to move the
current measurement up to the previous line on the
display window (Figure
E
#2). Then repeat steps 2-5.
Measuring Distances Continuously
To take a series of measurements as you move around,
change to Continuous Measure mode.
1.
Click (Figure
A
#5) to turn on the tool.
2.
Point the laser at the top of the tool (Figure
A
#1)
toward the wall or object whose distance you need to
measure (Figure
F
).
3.
Click and hold for 2 seconds to turn on the
Continuous Measure mode.
4.
At the bottom of the display window (Figure
A
#2),
view the current measurement (Figure
E
#3), which
will keep changing as you move the tool.
5.
To take the current measurement (from the tool to the
wall or object) and exit Continuous Measure mode,
click
.
To take a new measurement, click
to move the
current measurement up to the previous line on the
display window. Then repeat steps 2-5.
를
클릭해서
현재
측
정을
디스플레이
창의
이전
라인으로
이동시킵니
다
.
그런
다음
2-5
단계를
반복합니다
.
 Loading...