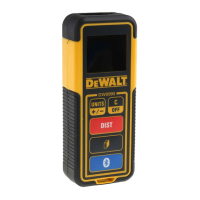
7
E
E
Measuring Area
You can measure the area of a wall, floor, or object.
1.
Click (Figure
A
#5) to turn on the tool.
2.
The tool will measure the distance from the bottom of
the tool to the wall or object (Figure
F
#1).
To measure from the top of the tool instead of the
bottom (Figure
F
#2), hold for 2 seconds.
On the display window, the tool icon will change from
to (Figure
E
#5).
3.
Click to show on the display window
(Figure
E
#4).
4.
Measure the width.
• Point the top of the tool at one side of the target
(wall, floor, or object).
• Position the tool at one end of the target and point
the laser dot across the width. (Figure
G
#1 shows
where to position the tool if you are measuring from
the bottom of the tool.)
• Click
to display the width measurement at
the top of the display window.
5.
Measure the length.
• Position the tool at one end of the target and
point the laser dot across the length. (Figure
G
#2 shows where to position the tool if you are
measuring from the bottom of the tool.)
• Click
to display the length measurement on
the second line of the display window.
6.
View the Area measurement at the bottom of the
display window (Figure
E
#3).
Measuring Volume
You can measure the volume of a room or object.
1.
Click (Figure
A
#5) to turn on the tool.
2.
The tool will measure the distance from the bottom of
the tool to the wall or object (Figure
F
#1).
To measure from the top of the tool instead of the
bottom (Figure
F
#2), hold for 2 seconds.
On the display window, the tool icon will change from
to (Figure
E
#5).
3.
Click twice to show on the display window
(Figure
E
#4).
4.
Measure the width.
• Point the top of the tool at one side of the target
(room or object).
• Position the tool at one end of the target and point
the laser dot across the width. (Figure
H
#1 shows
where to position the tool if you are measuring from
the bottom of the tool.)
• Click
to display the width measurement at
the top of the display window.
5.
Measure the length.
• Position the tool at one end of the target and
point the laser dot across the length. (Figure
H
#2 shows where to position the tool if you are
measuring from the bottom of the tool.)
• Click
to display the length measurement on
the second line of the display window.
6.
Measure the height.
• Positon the tool at one end of the target and
point the laser dot across the height. (Figure
H
#3 shows where to position the tool if you are
measuring from the bottom of the tool).
• Click
to display the height measurement on
the third line of the display window.
7.
View the Volume measurement at the bottom of the
display window (Figure
E
#3).
Adding Measurements
You can add two measurements to get a total
measurement of the two distances.
1.
Click (Figure
A
#5) to turn on the tool.
2.
The tool will measure the distance from the bottom of
the tool to the wall or object (Figure
F
#1).
To measure from the top of the tool instead of the
bottom (Figure
F
#2), hold for 2 seconds.
On the display window, the tool icon will change from
to (Figure
E
#5).
3.
Point the laser at the top of the tool (Figure
A
#1)
toward the wall or object whose distance you need to
measure.
4.
Click to measure the distance from the tool to
the wall or object.
 Loading...