7
ENGLISH
WARNING: Some dust created by power sanding, sawing, grinding, drilling, and other
construction activities contains chemicals known to cause cancer, birth defects or other
reproductive harm. Some examples of these chemicals are:
• lead from lead-based paints,
• crystalline silica from bricks and cement and other masonry products, and
• arsenic and chromium from chemically-treatedlumber.
Your risk from these exposures varies, depending on how often you do this type of work. To reduce
your exposure to these chemicals: work in a well ventilated area, and work with approved safety
equipment, such as those dust masks that are specially designed to filter out microscopicparticles.
• Avoid prolonged contact with dust from power sanding, sawing, grinding, drilling,
and other construction activities. Wear protective clothing and wash exposed areas with
soap and water. Allowing dust to get into your mouth, eyes, or lay on the skin may promote
absorption of harmfulchemicals.
WARNING: Use of this tool can generate and/or disperse dust, which may cause serious
and permanent respiratory or other injury. Always use approved respiratory protection
appropriate for the dustexposure.
Residual Risks
The following risks are inherent to the use of saws:
• Injuries caused by touching the rotatingparts.
In spite of the application of the relevant safety regulations and the implementation of safety
devices, certain residual risks cannot be avoided. These are:
• Impairment ofhearing.
• Risk of accidents caused by the uncovered parts of the rotating sawblade.
• Risk of injury when changing theblade.
• Risk of squeezing fingers when opening theguards.
• Health hazards caused by breathing dust developed when sawing wood, especially oak,
beech andMDF.
The following factors increase the risk of breathing problems:
• No dust extractor connected when sawingwood.
• Insufficient dust extraction caused by uncleaned exhaustfilters.
Electrical Safety
The electric motor has been designed for one voltage only. Always check that the power
supply corresponds to the voltage on the ratingplate.
Your
tool is double insulated in accordance
with EN60745; therefore no earth wire isrequired.
WARNING: We recommend the use of a residual current device with a residual current
rating of 30mA orless.
WARNING: 115 V units have to be operated via a fail-safe isolating transformer with an
earth screen between the primary and secondarywinding.
If the supply cord is damaged, it must be replaced by a specially prepared cord available
through the
serviceorganisation.
Mains Plug Replacement
(U.K. & Ireland Only)
If a new mains plug needs to be fitted:
• Safely dispose of the oldplug.
• Connect the brown lead to the live terminal in theplug.
• Connect the blue lead to the neutralterminal.
WARNING: No connection is to be made to the earthterminal.
Follow the fitting instructions supplied with good quality plugs. Recommended fuse: 13A.
Using an Extension Cable
If an extension cable is required, use an approved 3–core extension cable suitable for the
power input of this tool (see Technical Data).The minimum conductor size is 1.5 mm
2
; the
maximum length is 30m.
When using a cable reel, always unwind the cablecompletely.
Package Contents
The package contains:
1 Mitre saw
1 6 mm hex wrench
1 Saw blade
1 Dustbag
1 Material clamp
1 Instruction manual
• Check for damage to the tool, parts or accessories which may have occurred duringtransport.
• Take the time to thoroughly read and understand this manual prior tooperation.
Markings on Tool
The following pictograms are shown on the tool:
Read instruction manual beforeuse.
Wear earprotection.
Wear eyeprotection.
Keep hands away fromblade.
Visible radiation. Do not stare intolight.
Date Code Position (Fig. A)
The date code
35
, which also includes the year of manufacture, is printed into thehousing.
Example:
2018 XX XX
Year of Manufacture
Description (Fig. A)
WARNING: Never modify the power tool or any part of it. Damage or personal injury
couldresult.
1
Trigger switch
2
Operating handle
3
Mounting holes
4
Lower guard
5
Mitre lock knob
6
Mitre detent latch
7
Mitre scale
8
Mitre scale screws
9
Hand indentations
10
Sliding fence
11
Bevel lock knob
12
Dust port
13
Carrying handle
14
Fence lock knob
15
Clamp mounting holes
16
6 mm hex wrench
17
Head lock knob
18
Base fence
19
Vertical material clamp
20
Mitre detent override
Intended Use
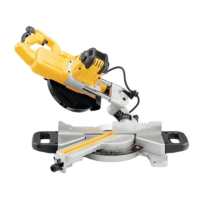
Your
DWS713 compound mitre saw has been designed for professional wood
cuttingapplications. When using the appropriate saw blades, sawing aluminium profiles and
plastic is alsopossible.
DO NOT use under wet conditions or in the presence of flammable liquids orgases.
This mitre saw is a professional powertool.
DO NOT let children come into contact with the tool. Supervision is required when
inexperienced operators use thistool.
• Young children and the infirm. This appliance is not intended for use by young children
or infirm persons withoutsupervision.
• This product is not intended for use by persons (including children) suffering from
diminished physical, sensory or mental abilities; lack of experience, knowledge or skills
unless they are supervised by a person responsible for their safety. Children should never
be left alone with thisproduct.
Specifications
Drive
230 Volt motor
1600 Watts
5000 RPM
Cut helical gears with roller and ball bearings
Carbide tooth blade
Automatic electric brake
Familiarization (Fig. A, B)
Your mitre saw is fully assembled in the carton. Open the box and lift the saw out by the
convenient carrying handle
13
, as shown in FigureB.
Place the saw on a smooth, flat surface such as a workbench or strongtable.
Examine Figure A to become familiar with the saw and its various parts. The section on
adjustments will refer to these terms and you must know what and where the partsare.
CAUTION: Pinch Hazard. To reduce the risk of injury, keep thumb underneath the handle
when pulling the handle down. The lower guard will move up as the handle is pulled
down which could cause pinching.The handle is placed close to the guard for specialcuts.
Press down lightly on the operating handle
2
and loosen the head lock knob
17
. Gently
release the downward pressure and allow the arm to rise to its full height. Use the lock down
pin when carrying the saw from one place to another. Always use the carrying handle
13
to
transport the saw or the hand indentations
9
shown in FigureA.
Bench Mounting (Fig. A)
Mounting holes
3
are provided in all four feet to facilitate bench mounting, as shown in
FigureA. (Two different sized holes are provided to accommodate different sizes of screws.
Use either hole, it is not necessary to use both.) Always mount your saw firmly to prevent
movement. To enhance the tool’s portability, it can be mounted to a piece of 12.7 mm or
thicker plywood which can then be clamped to your work support or moved to other job sites
andreclamped.
NOTE: If you elect to mount your saw to a piece of plywood, make sure that the mounting
screws don’t protrude from the bottom of the wood. The plywood must sit flush on the work
support. When clamping the saw to any work surface, clamp only on the clamping bosses
where the mounting screw holes are located. Clamping at any other point will surely interfere
with the proper operation of thesaw.

 Loading...