If you have questions or comments, contact us.
Pour toute question ou tout commentaire, nous contacter.
Si tiene dudas o comentarios, contáctenos.
1-844-377-8451 • www.dewalt.com
INSTRUCTION MANUAL
GUIDE D’UTILISATION
MANUAL DE INSTRUCCIONES
INSTRUCTIVO DE OPERACIÓN, CENTROS DE SERVICIO Y PÓLIZA
DE GARANTÍA. ADVERTENCIA: LÉASE ESTE INSTRUCTIVO ANTES
DE USAR EL PRODUCTO.
DXMF21011
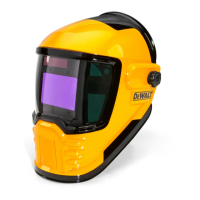
Large Window Auto-Darkening Welding Helmet
Masque De Soudeur Panoramique Auto-Obsurcissant
Casco De Soldadura De Oscurecimiento Automático Con Ventana Grande
Copyright © 2021 DEWALT.
DEWA LT
®
and the DEWALT Logo are trademarks of the DEWALT Industrial Tool Co., or an afliate thereof
and are used under license. The yellow/black color scheme is a trademark for DEWALT
power tools & accessories.
JS PRODUCTS | 6445 MONTESSOURI STREET, LAS VEGAS, NV 89113
SAVE THESE INSTRUCTIONS
TECHNICAL SPECIFICATIONS
IF YOU HAVE ANY QUESTIONS OR COMMENTS ABOUT THIS OR ANY DEWALT TOOL,
CALL US TOLL FREE AT: 1-844-377-8451
WARNING! Read and understand all instructions. This manual contains
important safety and operating instructions. Please read this manual carefully
before assembling this storage rack and save it for reference.
Technical Specifications
Auto-Darkening Viewing Area 3.86" x 2.44"
Cartridge Size 4.53" x 4.53"
Light State DIN 4
Dark State DIN 5-8 / 9-13
Grind Mode Yes
Arc Sensor 4
UV/IR Protection Up to DIN 16
Switching Time 1/15,000 s
Sensitivity Control Digital (5 settings)
Delay Control Digital (0.1-1.0 s)
Power Supply 1x CR2450 Li Battery, solar assist
TIG AMP Rating DC ≥ 5, AC ≥ 5
Operating Temperature 23˚F to 131˚F
Storing Temperature -4˚F to 158˚F
Weight 1.55 lb (730 g)
(FEB 21) Part No. 41603 DXMF21011 Copyright © 2021, DEWALT
WARNINGS
• Important safety information enclosed. Read this manual before using this product. Failure to observe
the following warnings could result in injury.
• Arc rays can injure eyes and burn skin. Use proper eye, ear, respiratory and body protection. Welding
helmets alone do not provide unlimited protection.
• Never place this helmet and auto-darkening filter on a hot surface.
• Do not use this helmet while working with or around explosive or corrosive liquids.
• This auto-darkening helmet is not suitable for laser welding and oxyacetylene.
• Do not weld while in the overhead position while using this welding helmet and auto-darkening filter.
• Danger of explosion if battery is incorrectly replaced. WARNING: DO NOT INGEST BATTERY;
CHEMICAL BURN HAZARD. This product contains a coin/button cell battery. If the coin/button
cell battery is swallowed it can cause severe internal burns in just 2 hours and can cause death.
• Keep new and used batteries away from children. If the battery compartment does not close securely,
stop using the product and keep away from children.
• If you think batteries might have been swallowed or placed inside any part of the body, seek immediate
medical attention.
• If the coin cell battery comes in contact with the skin, immediately wash area with mild soap and water.
If coin cell battery liquid gets into the eye, rinse water over the open eye for 15 minutes or until irritation
ceases. If medical attention is needed, the battery electrolyte is composed of organic solvent and
lithium salts.
• Do not incenerate or dispose of tool together with household waste material! Tool that has reached
the end of its life must be collected separately and returned to an environmentally compatible
recycling facility.
Definitions: Safety Guidelines
The definitions below describe the level of severity for each signal word. Please
read the manual and pay attention to these symbols.
Indicates a potentially hazardous situation which, if not avoided, could
result in death or serious injury.
WARNING:
Indicates a potentially hazardous situation which, if not avoided, may
result in minor or moderate injury.
CAUTION:
(Used without word) Indicates a safety related message.
Indicates a practice not related to personal injury which, if not avoided,
may result in property damage.
NOTICE:
SAFETY INSTRUCTIONS
• Before welding, always inspect the helmet and auto-darkening filter to be sure they are fitted properly
and in good condition.
• Keep the sensors, solar cells, and filter lens clean. See MAINTENANCE for details on CLEANING
AND STORAGE.
• Inspect the auto-darkening filter lens frequently and replace any scratched, cracked or pitted filter lens
or protective lens.
PARTS LIST
No. Description Qty.
1 Frame
1
2 Front Protective Lens (41603-FPL)
1
3 Auto-Darkening Filter (41603-ADF)
1
4 Inner Protective Lens (41603-IPL-5PK)
5
5 Welding Helmet
1
6 Right Lens
1
7 Left Lens
1
8 Sweat Band
1
9 Headgear (41603-HDGR)
1
OPERATION
Headgear Adjustment
1. Adjust the headgear diameter with the twist knob on the back. Twist clockwise to tighten and
counter-clockwise to loosen.
2. Adjust the height by sliding the strap to the appropriate size and snapping the pin into the hole to lock
securely in place.
3. To adjust the viewing angle, loosen the knobs on both sides of the helmet and change angle locker
to the desired tilt position (there are 5 positions with the helmet set in the middle by default.) After
achieving the desired angle, tighten the knobs until they are snug. The helmet should still swing up, but
should not drift downward when in place for welding.
4. To adjust the distance between the user’s face and auto-darkening filter, loosen the knobs on both
sides of the helmet until the headband can move back and forth freely. Reposition the headband at one
of the 3 slots as desired (there are 3 positions with the helmet set in the middle by default). This should
be done one side at a time and both sides should be located at the same position for proper
auto-darkening filter operation.
1
2
3
4
5
7
6
8
9
Mode Control
• There are 3 modes available with the “MODE” button: “GRIND”, “WELD”, and “CUT.
- Selecting “GRIND” mode will be suitable for grinding applications.
- Selecting “WELD” mode will be suitable for welding applications; shades DIN 9-13 will be available.
- Selecting “CUT” mode will be suitable for cutting applications; shades DIN 5-8 will be available.
Shade Control
• Select the mode most suitable for your application. When the appropriate mode is selected, either
“WELD” or “CUT,” press the “SHADE” button to cycle through the shades. Select the shade that is
most suitable for your application.