22 1/2"
29 1/2
"
LOCKNUT
BOLT
26"
LOCKNUT
BOLT
23"
27"
LOCKNUT
POLE CAP
PLUG
2
"
26 5/8
"
50 1/2
"
PORTABLE PIPE
SELF TAPPING HEX-HEAD
SCREW and WASHER
(on back of pipe,
in two places)
SELF TAPPING
SCREW and WASHER
(on back of pipe)
21
"
2"
grade
LOCK
LOCKING
COLLAR
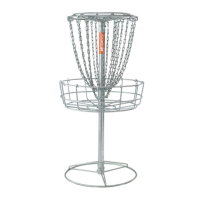
DGA Mach 2™ Permanent Disc Golf Basket Specification Sheet
The Mach II Permanent Disc Pole Hole disc golf basket is an excellent portable target for home, schools, colleges or
any recreational setting. With the inground installation kit the Mach II is also perfect for entry level disc golf courses.
PORTABLE BASE - 3/8” steel rod, welded and hot-dipped galvanized.
6" Sleeve, bolt, nylon insert locknut and hex head tec screw.
PORTABLE BASE ASSEMBLY INSTRUCTIONS - Place the base on level
ground and insert the short pole into the base with the swedged end
facing up. Line up the pole’s three bottom bolt holes with the three bolt
holes on the base. Push a long bolt through both the base and pole bolt
holes and tighten with a locking nut.
POLE (50 1/2” total length) - Two 1 1/2” I.D., 1 15/16” O.D. hot-dipped
galvanized pipe, drilled. One long pole with cap, one swedged short pole.
POLES - The short pole fits into the base with the swedged end facing up.
The longer pole with the cap side up fits onto the short pole’s swedged
end. The bolt holes on both poles line up and attach with the basket.
TRAPPER BASKET ASSEMBLY - 3/8” steel rod, welded and hot-dipped
galvanized. 6" Sleeve, bolt, hex head nut, nylon insert locknut and hex
head tec screw.
TRAPPER BASKET ASSEMBLY INSTRUCTIONS - Lift the trapper basket up
onto the top of the pole. Slide the trapper basket down past the middle
of the pole and line up the three trapper basket bolt holes with the holes
on the poles. Push a long bolt th
rough the trapper basket and the pole’s
bolt holes. Tighten the long bolt with a locking nut.
CHAIN ASSEMBLY - Welded and hot-dipped galvanized. 12 outer sliding
links and chains, 6 inner pipe protectors and chains. All 18 chains
assembled with heavy duty "S" hooks to allow freer movement of chains.
6" Sleeve , bolt, hex head nut, nylon insert locknut and hex head tec screw.
Rod Assembly - 3/8”. steel rod.
pole. Align holes in collar with holes at top of pole. Fasten with bolt and
nylon insert locknut.
18
"
CONCRETE & RIVER ROCK
15”
grade
LOCK
GRAVEL
2
"
12 "
18 "
IN-GROUND INSTALLATION KIT
(Sold Separately)
With the locking tab towards top of collar align
holes in locking collar with holes in pole and
fasten with bolt, head nut and nylon insert
locknut.
Once fastened, the pole can be placed and locked
in anchor.
Anchor
Collar
Basket pole bolted to Collar and locked
to in-ground anchor.
*Note: The LOCKING TAB should always be
pointing at the tee.
DGA | The Founding Company of Disc Golf
DiscGolf.com 831-722-6037