Do you have a question about the DIBSIES CREATIVE WONDERS TOY BOX and is the answer not in the manual?
Assemble on a soft, non-slip surface like carpet or a padded mat.
Ensure lid supports are correctly attached to prevent finger injuries and allow free lid movement.
Certain assembly steps require assistance from an additional person.
Inspect for damaged parts, loose joints, or sharp edges. Contact support for replacement parts.
Warning: choking hazards from small parts. Not for children under three. Adult assembly required.
Ensure a Phillips screwdriver is available. Avoid using power tools to prevent panel damage.
Combine panels B, C, E, and F, noting the need for two people for this stage.
Insert dowels into panels F and E, align Part B, and secure with screws.
Align and secure Part G (bottom panel) with screws, noting some holes are for later steps.
Prepare Part H (lid) with pivot pins and attach it to the assembly.
Insert dowels and align Part A, then secure it with screws and to Part G.
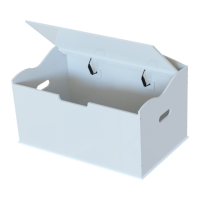
Align and secure Part K lid supports using Part L screws on both sides.
Ensure the lid opens and closes properly before using the toy box.
This document is an assembly manual for the "Creative Wonders Toy Box" from Dibsies Personalization Station. It provides detailed instructions for assembling the toy box, along with important safety warnings and a parts checklist.
The Creative Wonders Toy Box is a storage unit designed for toys, featuring a lid with special safety supports. Its primary function is to provide a safe and organized space for children's toys, while also preventing injuries during opening and closing of the lid. The toy box is intended for use in a child's play area or bedroom.
The manual does not explicitly list technical specifications such as dimensions, weight capacity, or material composition. However, it implies certain design features:
The manual does not detail specific maintenance features for the assembled toy box, but it does include important pre-assembly and ongoing safety checks:
The manual is structured to guide the user through a step-by-step assembly process, starting with pre-assembly checks, a parts checklist, and then detailed instructions for attaching each panel and component, including the critical lid supports. An accompanying assembly video is also provided for visual guidance.
| Brand | DIBSIES |
|---|---|
| Model | CREATIVE WONDERS TOY BOX |
| Category | Indoor Furnishing |
| Language | English |