Do you have a question about the Digi 1st T-5020 and is the answer not in the manual?
Run two different intervals in sequence, repeatable up to 199 times.
Run a pacer and an interval alternatively, repeatable up to 199 times.
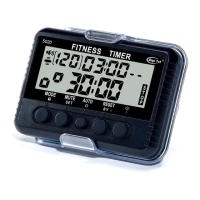
Shows sound/vibration status, speed, interval times, and mode indicator.
Example of setting and running workout/rest intervals for a set number of rounds.
Example of setting and running pace/interval for rounds.
Steps to set rounds, first/second interval times for timer mode.
Steps to set rounds, pacer frequency, and interval times.
Configure sound volume, vibration, and alarm length.
Turn display off, auto-off, and reboot the device.
Lock device to prevent changes and replace the battery.
Notes on holster, waterproof, care, and support contact.
This document describes a Fitness Interval Timer with Pacer, a versatile device designed to assist with various workout routines by providing both interval timing and pacer functionalities.
The device operates in two primary modes: Interval Timer Mode and Interval Pacer Mode.
In Interval Timer Mode, the device allows users to run two different intervals in sequence, which can be repeated up to 199 times. This mode is ideal for structured workouts that involve alternating periods of activity and rest.
The display clearly shows the number of times the intervals repeat, the second interval duration for rest (in minutes:seconds), and the first interval/pacer duration for workout (in minutes:seconds). A status indicator shows whether the device is paused ("STOP"), in standby ("STOP" flashing), or running (blank). The mode indicator is blank for Interval Timer Mode.
To start or stop the timer, users press button E. When the timer is stopped, pressing button D resets it to the original setting. Upon completion of the workout (when the round count reaches 0), an alarm will sound for 30 seconds. Any button press will stop the alarm and return the device to its original setting.
When the timer is not running (indicated by a "STOP" sign showing or flashing), users can hold button B for 3 seconds to enter setup mode. In this mode, numbers will flash for 5 seconds, prompting the user to make selections. If the numbers stop flashing, the user must restart the setup process. The setup sequence involves:
When the timer is on standby (fully reset with the "STOP" sign flashing), pressing button C allows users to enter or exit Single Interval Mode. In this mode, the second interval display on the upper row will show "AU," indicating that the first interval will repeat itself for the set number of rounds.
In Interval Pacer Mode, the device runs a pacer (ranging from 10 to 240 beeps per minute) and an interval alternatively in sequence. This sequence can also be repeated up to 199 times. A pace counter tracks up to 9,999 counts. This mode is beneficial for maintaining a consistent pace during activities.
The display shows the number of rounds, the pacer count, and the pacer frequency (in setup mode). The mode indicator displays "PC" for Interval Pacer Mode.
To start or stop the pacer, users press button E. When the pacer is stopped, pressing button D resets it to the original setting. Similar to Interval Timer Mode, an alarm sounds for 30 seconds when the workout ends (round count reaches 0), and any button press stops the alarm. Users can press button B to turn the pacer beeps on or off while the pacer is running.
When the pacer is not running (indicated by a "STOP" sign showing or flashing), users hold button B for 3 seconds to enter setup mode. Numbers will flash for 5 seconds, and if they stop flashing, the setup process must be restarted. The setup sequence involves:
When the pacer is on standby (fully reset with the "STOP" sign flashing), pressing button C allows users to enter or exit Single Pacer Mode. In this mode, the second interval on the upper row will display "AU," meaning the first interval will repeat itself for the set number of rounds.
To power on the device, a new AAA battery must be installed (battery not included in the package).
To switch between Interval Timer Mode and Interval Pacer Mode, ensure the display is fully reset and on standby (flashing "STOP"). Then, press button A.
Volume/Vibration/Alarm Duration: When the timer is not running (indicated by a "STOP" sign), users can hold button D for 3 seconds to enter setup mode for these settings. Numbers will flash for 5 seconds, and if they stop, the setup must be restarted. The setup sequence involves:
To turn off the display, hold button C for 3 seconds. The display will automatically go blank if no activity is detected for 2 hours. Pressing any button will turn the display back on.
A reboot button is located on the back of the device. Users must first remove the plastic holster. If the unit is not functioning correctly or has crashed, pressing the reboot button with a pen will restart the device.
To lock or unlock the device, hold button A for 3 seconds. An icon will appear or disappear on the display to indicate the lock status. This feature prevents accidental modifications.
To replace the battery, remove the battery cover from the back of the device (the plastic holster must be removed first if used). To preserve settings, avoid pressing any buttons while changing the battery. Ensure the old battery is replaced with a new AAA battery within 20 seconds.
The device comes with a sturdy plastic holster for secure holding. It is not waterproof and should be kept away from liquids. Users are advised to handle the device carefully and avoid dropping it or exposing it to shock. For any comments, questions, or concerns, users can contact support via email.
| Motor Power | 2.0 HP |
|---|---|
| Display | LCD |
| Foldable | Yes |
| Type | Treadmill |
| Incline | Manual, 3 levels |
| Programs | 12 Pre-set Programs |