EasyManua.ls Logo

Digital Home System Foscam FI8910W User Manual

Digital Home System Foscam FI8910W
2 pages
To Next Page IconTo Next Page
Page #1 background imageLoading...
Page #1 background image
Integration Manual with Vera 3 / Lite UI7
Foscam FI8910W
CATALOGUE NO: DHS-CAM-IN-FOS-910WH
Specifications are subject to change without further notice
The information in this document is subject to change without notice.
Digital Home Systems Pty Ltd (DHS) does not make any representa-
tions or warranties (implied or otherwise) regarding the accuracy and
completeness of this document and shall in no event be liable for any
loss of profit or any damage, including but not limited to special,
incidental, consequential, or other damage.
TRADEMARKS
Z-Wave and Z-Wave Plus are registered trademarks of Sigma Designs
and its subsidiaries in the United States and other countries. Other
trademarks and registered trademarks are the property of their re-
spective owners or companies.
DHS One (1) Year Limited Warranty
Digital Home Systems Pty Ltd warrants this DHS branded hardware
product against defects in materials and workmanship under normal
use for period of one (1) year from the date of retails purchase by the
original end user purchaser (‘Warranty Period’).
Terms and conditions
To see complete terms and conditions browse to http://
www.digitalhomesystems.com.au/documentation/
DHS_Terms_and_conditions.pdf
caera_full_screen,camera_archive_snapshot,
camera_up,camera_down,camera_left,
camera_right,camera_preset
4 Modifying Advanced Settings
Click on the camera “Settings” and select “Advanced
Settings” at the bottom of the page.
In the Camera parameters tab view, type
“I_FoscamPTZ.xml” (without the quotes) in impl_file
section.
Switch to the “Variables” tab and add extra command
onto the “Commands” window.
Change “ReversePan” and “ReverseTilt” from 0 to 1.
Click on the “Back” button to return to the “Settings”
screen.
Save your settings.
Its takes a minute for Vera to go through its settings.
Camera “Live” view should have a navigation arrow and
pre-set buttons.
Question and Answer IconNeed help?

Do you have a question about the Digital Home System Foscam FI8910W and is the answer not in the manual?

Digital Home System Foscam FI8910W Specifications

General IconGeneral
ModelFI8910W
CategoryIP Camera
Display Resolution640 x 480
f2.4
Field of View67°
Minimum Illumination0.5 Lux
Night VisionYes
Wireless Standard802.11b/g
WirelessYes
AudioTwo-way audio
Operating Temperature-10°C to 50°C
Mobile SupportYes
Image Sensor1/4" Color CMOS
Resolution640x480
Lens3.6mm
Viewing Angle67°
Infrared ModeAutomatic
Infrared Distance8m
Pan/Tilt AnglePan: 300°, Tilt: 120°
ConnectivityWi-Fi, Ethernet
Wireless SecurityWEP, WPA, WPA2
Ethernet10/100Mbps
Video FormatMJPEG
Supported ProtocolTCP/IP, HTTP, SMTP, FTP, DHCP, DDNS, UPnP
Supported ProtocolsHTTP, FTP
Power SupplyDC 5V/2A
Operating Humidity20% ~ 85% non-condensing
Compatible OSWindows, Mac

Summary

Modifying Advanced Settings

Configure Camera Parameters

Enter 'I_FoscamPTZ.xml' in the impl_file section of camera parameters.

Save and Apply Settings

Save settings and allow Vera time to apply them.

Add Camera Commands

Switch to Variables tab and add commands like 'camera_full_screen'.

Adjust Pan/Tilt and Navigate

Modify 'ReversePan'/'ReverseTilt' to 1 and return to Settings.

Installing Foscam Plugin

Initial Camera Setup

Enable camera pre-sets and motion detection in Foscam interface.

Download and Install Plugin

Search and install 'Foscam IP Camera' plugin via Vera's Apps.

Confirm Plugin Installation

Verify non-H.264 plugin version 2.6 is installed and exit setup.

Adding Foscam to Vera

Add as Generic IP Camera

Add camera manually as Generic IP Camera in Vera's devices.

Manual Camera Installation

Proceed through manual camera installation wizard to advanced setup.

Pairing Foscam Camera

Device Naming and Type

Name the camera and select 'Other IP camera' type.

Enter Camera IP Address

Input camera's IP address and paste the JPG snapshot URL.

Enter Credentials and Connect

Provide credentials, click 'Next', and handle authentication prompts.
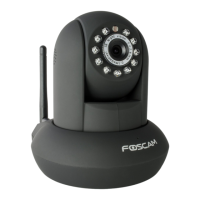