EasyManua.ls Logo

Digitus SoHo DN-19 U-S-1 Series User Manual

Digitus SoHo DN-19 U-S-1 Series
2 pages
Go to English
To Next Page IconTo Next Page
Page #1 background imageLoading...
Page #1 background image
Montageanleitung für SOHO 19“-Wandgehäuse
DN-19 xx-U-S-1
- Nutzen Sie zuerst die Rückwand als Hilfe zur Markierung an welcher Stelle der Wand Sie Ihr Gehäuse installieren möchten. Bringen Sie die Dübel an.
- Platzieren Sie den unteren Rahmen (1) auf Ihrem Montagetisch.
- Platzieren Sie die Plastikstopfen (10) in den Löchern auf der Seite, an der die Türaufhängung gewünscht ist und die Moosgummistopfen (11) auf der Seite des Türschlosses.
- Montieren Sie die Seitenteile (2) auf dem unteren Rahmen mit jeweils 2 Stück M5x10-Schrauben.
- Montieren Sie die Rückwand (3) auf dem unteren Rahmen mit jeweils 2 Stück M5x10-Schrauben.
- Montieren Sie den oberen Rahmen (4) auf den Seitenteilen und der Rückwand mit jeweils 2 Stück M5x10-Schrauben.
- Montieren Sie die 19“-Profilschienen (5) an den Seitenteilen mit jeweils 2 Stück M5x10-Schrauben.
- Bringen Sie die Scharniere (6) so an der Glastür (8) an, dass die Dichtungen (9) mittig stehen und ziehen Sie die Schrauben fest.
- Lösen Sie das obere Scharnier (6) und platzieren Sie die oberen und unteren Pins in den Rahmen und ziehen Sie es erneut fest.
- Montieren Sie den Kabeleinlass mit Bürstenleiste (7) am oberen Rahmen an der vorgesehenen Stelle.
Question and Answer IconNeed help?

Do you have a question about the Digitus SoHo DN-19 U-S-1 Series and is the answer not in the manual?

Digitus SoHo DN-19 U-S-1 Series Specifications

General IconGeneral
BrandDigitus
ModelSoHo DN-19 U-S-1 Series
CategoryEnclosure
LanguageEnglish

Summary

SoHo 19" Wall Mounting Cabinet Assembly

Wall Marking and Dowel Installation

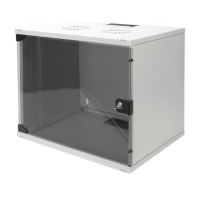
Use the rear panel for wall marking, drill holes, and mount dowels.

Lower Frame Placement

Place the lower frame on the assembly table.

Door Hinging and Lock Side Preparation

Insert plastic plugs for door hinging and rubber plugs for lock side.

Side Panel Mounting

Attach side panels to the lower frame using M5x10 screws.

Rear Panel Mounting

Mount the rear panel to the lower frame using M5x10 screws.

Upper Frame Installation

Mount the upper frame to side and rear panels with M5x19 screws.

19" Profile Rail Attachment

Attach 19" profile rails to the side panels with M5x19 screws.

Hinge Attachment to Glass Door

Attach hinges to the glass door, ensuring gaskets are centered.

Hinge Pin Adjustment

Loosen upper hinge, place pins in frame, and retighten.

Cable Brush Entry Installation

Place the cable brush entry onto the upper frame.

Related product manuals