Do you have a question about the Digoo DG-8647 and is the answer not in the manual?
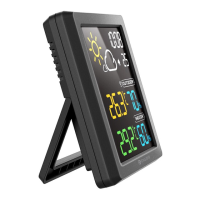
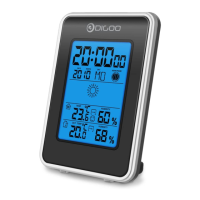
Overview of the display unit's features including weather forecast icons, time, alarm, outdoor signal strength, and temperature/humidity displays.
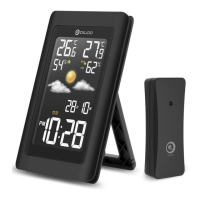
Overview of the outdoor sensor's features including integrated hang hole and battery compartment.
Recommendations for battery usage, avoiding mixing old/new or different types, and using lithium batteries for outdoor sensors in cold conditions.
Details on the device's default time, weather forecast, temperature unit, and alarm settings upon initial use or reset.
Instructions for using the MODE button to enter setting mode, switch between time and alarm display.
Usage of the UP button for increasing settings, fast adjustment, viewing MAX/MIN data, and clearing MAX/MIN records.
Usage of the DOWN button for decreasing settings, fast adjustment, switching temperature units, and clearing data/searching RF.
Operation of the SNZ/LIGHT button to activate snooze function or control the backlight.
Step-by-step guide for manually setting the hour and minute using the MODE, UP, and DOWN buttons.
Procedure for setting the alarm time, turning it on/off, and understanding the snooze function for alarms.
Specifies the operational ranges and display behavior for indoor and outdoor temperature and humidity measurements.
Details the accuracy specifications for both temperature and humidity measurements under different conditions.
Instructions on how to switch between Celsius and Fahrenheit units using the DOWN button.
Guide on how to view and clear the maximum and minimum recorded temperature and humidity values.
Information on how to control the display backlight brightness when powered by the USB line.
Explanation of the low battery indicator and the importance of immediate battery replacement.
Description of the icons used for weather forecasting and their accuracy limitations.
Guidelines for optimal placement of the display unit to ensure accurate measurements and performance.
Recommendations for placing the outdoor sensor outside for accurate weather observation, considering shade and airflow.
The DG-8647 Weather Station Clock is a device designed to provide users with weather forecasts, time display, and indoor/outdoor temperature and humidity readings. It consists of a main display unit and a wireless outdoor sensor, connected via a USB line for power and data transmission.
The display unit features an LCD screen that shows various information at a glance. It provides an icon-based weather forecast, predicting conditions for the next 12-24 hours based on changes in outdoor temperature and humidity. The forecast icons include Sunny, Partly Sunny, Cloudy, Rainy, and Snowy. The device also displays the current time, with options for 12-hour or 24-hour format. Alarm and snooze icons are present, indicating when the alarm function is active.
For temperature and humidity, the display unit shows both outdoor and indoor readings. The outdoor sensor's signal strength is indicated, ensuring reliable data transmission. The outdoor temperature and humidity are displayed prominently, alongside the indoor temperature and humidity.
The device includes an alarm clock function with a snooze feature. When the alarm sounds, it begins with a short beep and continues with multiple short beeps if not silenced. The snooze function can be activated by pressing the SNZ/LIGHT button, providing an additional 5 minutes of sleep.
The weather station is designed for user-friendly operation through its four main control buttons: MODE, UP, DOWN, and SNZ/LIGHT.
To manually set the time, users press and hold the MODE button until the hour display flashes. The UP or DOWN buttons are then used to adjust the hour. Pressing MODE again confirms the hour and allows adjustment of the minutes using the UP or DOWN buttons. Another press of MODE confirms the minute setting and exits the time setting mode. The device automatically exits setting mode if no buttons are pressed for 20 seconds.
Setting the alarm follows a similar process. In normal display mode, pressing MODE enters alarm mode. Holding MODE for 3 seconds initiates alarm time setting, with the alarm hour blinking. The UP or DOWN buttons adjust the alarm hour, and MODE confirms it, moving to minute adjustment. After setting minutes, MODE is pressed again to exit. To turn the alarm ON or OFF, users enter alarm mode and use the UP or DOWN buttons. A specific symbol next to the seconds display indicates when the alarm is ON.
The DOWN button allows users to switch between Celsius (°C) and Fahrenheit (°F) temperature units at any time, except when other settings are being configured.
Users can check the maximum and minimum recorded temperature and humidity by pressing the UP button. To clear these records, the UP button should be held for 2 seconds while the MAX or MIN temperature/humidity is displayed.
When the display unit is powered by the USB line, the backlight remains continuously on. The SNZ/LIGHT button can be used to adjust the brightness of the backlight between ON/OFF.
For optimal performance and accuracy, both the display unit and the outdoor sensor require careful placement. The display unit should be placed in a dry area, free from dirt and dust, and can stand upright on a tabletop or countertop. It should be kept away from direct sunlight, heat sources, and vents to ensure accurate temperature measurements.
The outdoor sensor must be placed outside to monitor outdoor conditions. While water-resistant, it should be protected from direct weather elements and direct sunshine. The ideal location is 4 to 8 feet above the ground, in permanent shade, with good air circulation.
Both units must be within 99 feet (30 meters) of each other. To maximize wireless range and prevent interference, they should be placed away from large metallic items, thick walls, metal surfaces, and other objects that might limit wireless communication. Additionally, both units should be at least 3 feet (1 meter) away from electronic devices such as TVs, computers, microwaves, and radios.
The device recommends using high-quality batteries for optimal product performance. Heavy-duty or rechargeable batteries are not recommended. For the outdoor sensor, lithium batteries are suggested in low-temperature conditions, as cold temperatures can impair alkaline battery function. It is crucial not to mix old and new batteries, or different types of batteries (alkaline, standard, rechargeable). The battery in the display unit primarily serves as a backup; the main power supply should be the USB line.
If a low battery indicator appears on the LCD for either the outdoor sensor or the display unit, users should promptly change the batteries to prevent disruptions in communication between the devices.
Upon initial setup or after a reset, the device defaults to:
| Type | Weather Station |
|---|---|
| Model | DG-8647 |
| Display Type | LCD |
| Indoor Humidity Range | 20% to 95% |
| Outdoor Humidity Range | 20% to 95% |
| Wireless Transmission Frequency | 433 MHz |
| Indoor Temperature Range | 0°C to 50°C (32°F to 122°F) |
| Outdoor Temperature Range | -20°C to 60°C (-4°F to 140°F) |
| Power Source | Batteries |
| Features | Calendar, Time, Alarm |
| Wireless Transmission Range | 100 meters |