Figure 2
B
E
F
G
H
I
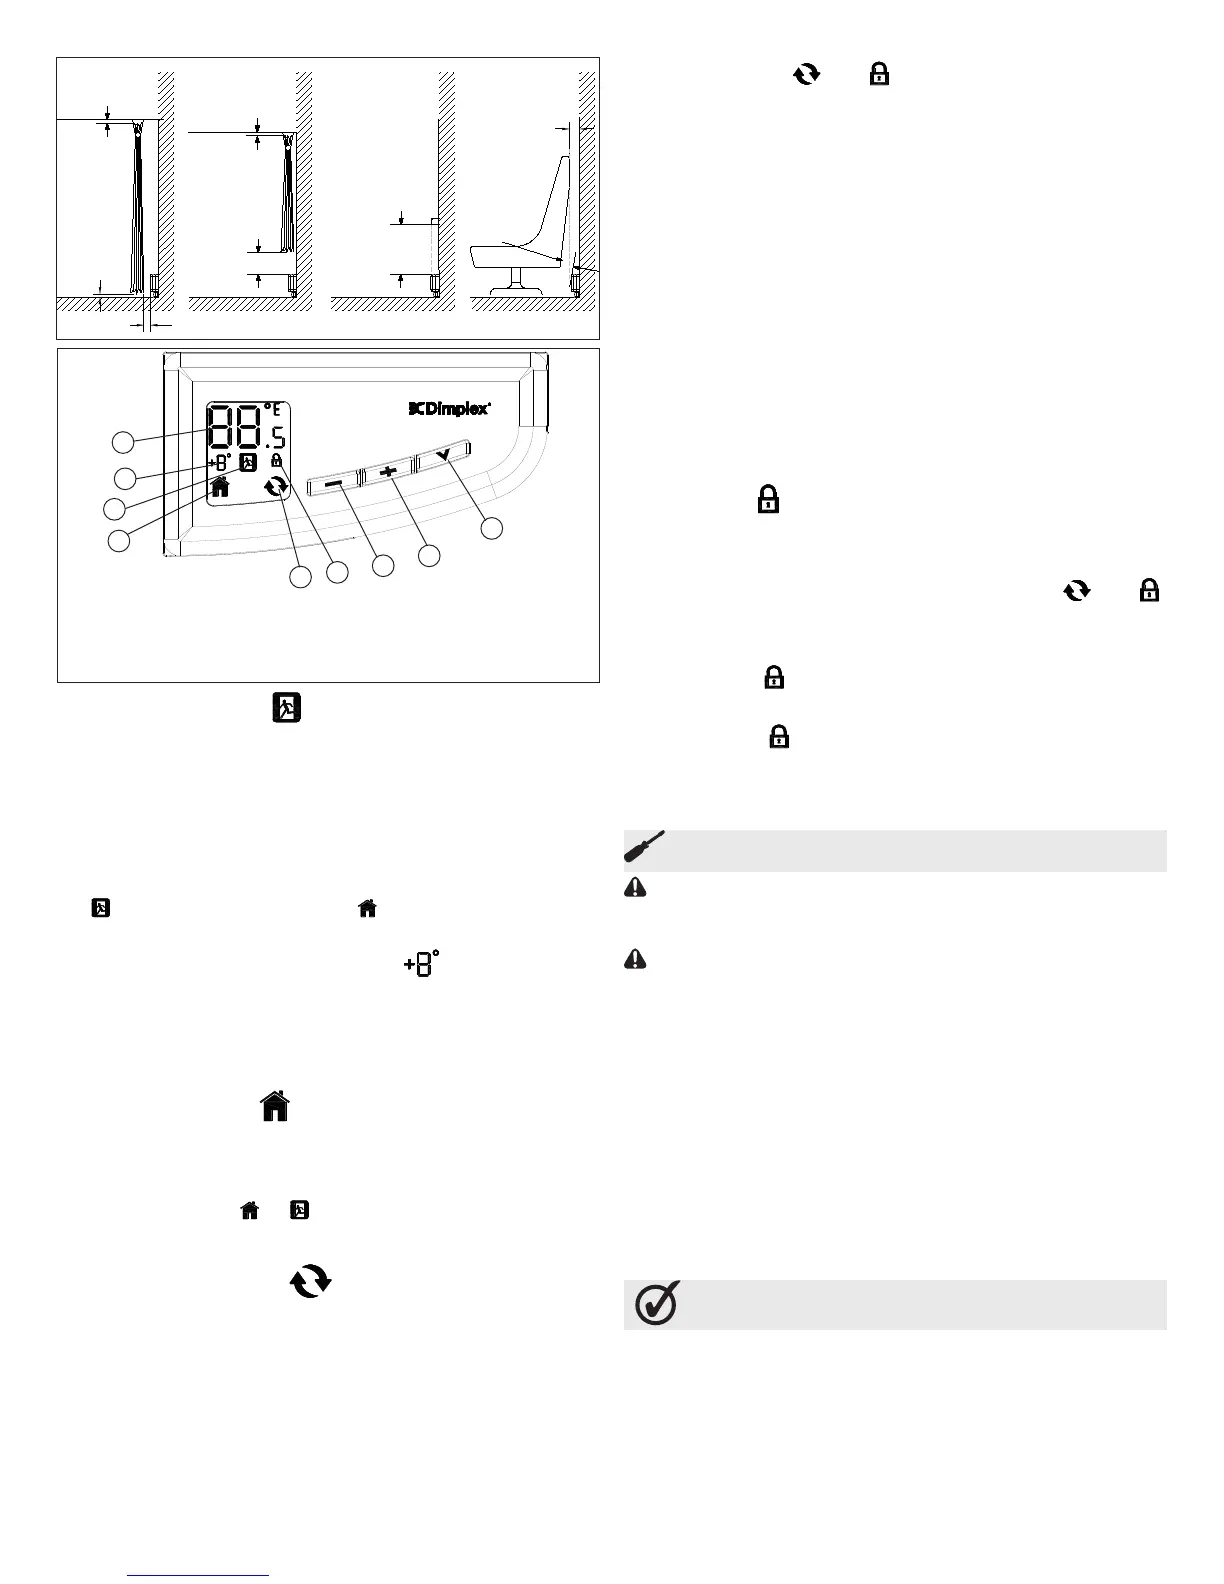
A - Setting/Temperature Display
B - Economy Setting Icon
C - Set Back Temperature Setting
D - Comfort Setting Icon
E - Synchronized Icon
F - Lock Icon
G - Decrease Button
H - Increase Button
I - Menu Button
A
C
D
B. Economy Setting
The Economy Setting can be used to change the Setpoint
Temperature for a variable period of time. By pressing the V
the Economy Setting will be enabled - signied by the icon
ashing. After the Set Back Temperature has been set, the
icon will become solid after three seconds and the Set Back
Temperature will be enabled.
To return back to the Comfort Setting press the V button and
the icon will disappear and the icon will appear.
C. Set Back Temperature Setting
The Set Back Temperature Setting is used during periods
when the Economy setting feature is active. This temperature
adjustment can be set by pressing the V followed by the
+ or -.
D. Comfort Setting
The Comfort Setting icon will be displayed when the heater
is in normal operation based on the Setpoint Temperature for
the room.
!
NOTE: Either the or icon will always be visible, de-
pendent on the setting being used.
E. Synchronized Icon
The LPC features CONNEX
TM
, a wireless technology that
works with Dimplex single and multi-zone CONNEX
TM
controllers to provide simple whole home connectivity and
comfort. CONNEX
TM
controllers are available to control one
or multiple LPC’s or PCH’s within a 50’ (15 m) radius. In
order for the controller to have this function the LPC and the
controller will need to be synchronized. To do this:
1. On the LPC heater press and hold the V button for 3 sec-
Figure 1
A B C D
Min.
1.5" (3.8 cm)
Min.
1.5" (3.8 cm)
Min.
1.5" (3.8cm)
Min.
3" (7.6 cm)
Min.
3" (7.6 cm)
Min.
3" (7.6 cm)
Min.
6" (15.3 cm)
Min.
See Item 4 & 5
for Dimension
Maintenance
CAUTION: Before removing the front cover for cleaning,
make certain the power has been turned off at the circuit
breaker panel, to prevent electric shock.
CAUTION: To avoid burns, allow adequate time for the el-
ement and body casing to cool before attempting to work
on the linear convector.
The LPC series contain no moving parts. Since the appliance
contains no moving parts, little maintenance is required be-
yond vacuum cleaning. It is however essential that the linear
convector is not operated with an accumulation of dust or
dirt on the element, as this can cause a build up of heat and
eventual damage. For this reason the linear convector must
be inspected regularly, depending upon conditions and at
least at yearly intervals. Once cleaning is complete replace
the front cover and restore power.
!
NOTE: The user can perform cleaning ONLY. All other
servicing should be performed by qualied service personnel.
onds, both the and icons will begin to ash.
2. Press the - , + and then V, on the LPC heater.
3. Within 10 seconds press any button once on the CON-
NEX
TM
controller.
!
NOTE: There is a 3 second delay between pressing the
last button on the CONNEX
TM
controller and the LPC heater.
!
NOTE: To desynchronize a LPC heater from the synchro-
nized CONNEX
TM
controller, on the LPC heater:
1. Press and hold the V for 3 seconds.
2. Press the V, + and then -.
Nothing needs to be done to the CONNEX
TM
controller.
Dimplex single and multi-zone CONNEX
TM
controllers are
sold separately and are available for purchase from your
authorized Dimplex dealer.
To nd your local Dimplex dealer, visit www.dimplex.com.
F. Lock Icon
The Linear Proportional Convector Heater has a Button Lock
feature, to prevent settings from accidentally being changed.
1. Press and hold the V for 3 seconds. Both the and
Icons will begin to ash.
2. To Enable: Within 5 seconds press +, then -, then +,
then -. The
icon will now be visible.
To Disable: Within 5 seconds press -, then +, then -,
then +. The
icon will not be visible.
!
NOTE: The LPC can be locked in either the Comfort or
Economy Setting. Ensure that the desired icons are present
when locking is complete.
3
The Manufacturer warrants the Linear Proportional Convec-
tor and components of the enclosed product against any
defect in material or workmanship for a period of one year
from the date of purchase, with the exception of the elements
which are warranted to be free from defect in material and
workmanship for ten years. In full satisfaction of any claims
under this Warranty the Manufacturer will repair or replace
without charge, in its factory or in the eld as it alone may de-
Warranty

 Loading...