Do you have a question about the Discovery Kids WOODEN WORK BENCH and is the answer not in the manual?
| Brand | Discovery Kids |
|---|---|
| Model | WOODEN WORK BENCH |
| Category | Tool Storage |
| Language | English |
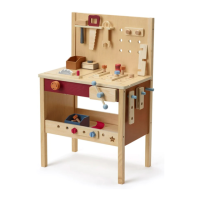
Attach sides (C-1 & C-2) to ends (B) using screws (X) and bolts (Y), then slide shelf (A) into slots and attach the other end (B).
Attach legs (E) (F) (G) (H) to the bench ends (B) using screws (I) and bolts (J).
Attach upper sides (K-1, K-2), back piece (L), and supports (N-1, N-2, M-1, M-2) using screws and bolts.
Attach top pieces (0) and (P) using screws (Q), ensuring recessed holes face up and (0) is in front.
Attach the long piece (R) to the short piece (S) using a screw (T).
Slide the assembled back support piece (R+S) into the designated back slots.
Attach the tool shelf (U) using screws (Q), ensuring recessed holes face up.
Attach the back panel (V) using screws (T), ensuring recessed holes face out.
Attach the vise (W) to the work bench using screws (Q).
Tighten all screws, then use tools like hammer, screwdriver, and vise for play. Store tools on shelves.
