Do you have a question about the Docking Drawer Blade Series and is the answer not in the manual?
Critical warnings for safe installation, emphasizing power off and dry indoor use.
Lists required tools and initial steps for outlet installation.
Specific information for ETL Listed products in Canada using an Interlock Box.
Ensures sufficient drawer width and depth clearance for the outlet installation.
Instructions on using the provided template to mark and cut the drawer box.
Details on drilling pilot holes and using a jigsaw to create the necessary cutout.
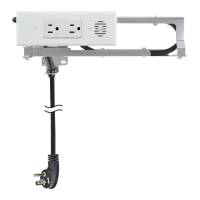
Securing the receptacle box into the cutouts using mounting screws.
Aligning and securing the rear bracket for smooth drawer operation.
Installing the final cover plate onto the installed receptacle box.
Connecting the Docking Drawer power cord to the in-cabinet electrical supply.
Explanation of the 120°F interlocking thermostat and how to reset it.
The provided document is an installation manual for the Docking Drawer Blade Series, which includes the Blade Duo and Blade models. These devices are in-drawer electrical outlets designed to provide power within a drawer, offering a convenient and clutter-free solution for charging devices or powering small appliances.
The Docking Drawer Blade Series provides electrical outlets inside a drawer. This allows users to power or charge devices discreetly within a drawer, keeping countertops and surfaces clear of cords and chargers. The system includes a receptacle box that mounts within the drawer box and an arm mechanism that extends and retracts as the drawer opens and closes, ensuring the power cord remains safely managed. The Blade Duo models offer two outlets, while the Blade models offer one.
The installation process involves several steps:
The estimated time required for installation is 30 minutes, and necessary tools include a jigsaw, drill, measuring tape, screwdriver, square, pencil, and the cutout template.
| Brand | Docking Drawer |
|---|---|
| Model | Blade Series |
| Category | Accessories |
| Language | English |