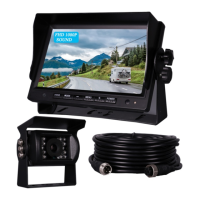
This document is a user manual for a 1080P Backup Camera Kit, designed to assist with vehicle reversing and parking. The system provides additional rear-view vision and is suitable for heavy-duty vehicles such as RVs, motorhomes, large trucks, travel trailers, and box trucks. It meets FCC/CE standards.
Function Description:
The kit includes a monitor and a camera. The camera features a built-in microphone, and the monitor has a built-in speaker, allowing for video sound during driving or parking. The system offers multi-function and multi-channel signal input, equipped with an independent green reversing trigger line. The centralized power cord connects to the vehicle's fuse box, simplifying installation by eliminating the need to disassemble and install the tail lamp. The system can be configured to activate only when the vehicle is in reverse or for continuous viewing.
Important Technical Specifications:
Camera:
- Image Sensor: 1/3" Color CMOS
- TV System: NTSC (1080P/30fps)
- Effective Pixels: 1920(H)x1080(V)
- Horizontal Sync Frequency: 33.750KHz
- Vertical Sync Frequency: 30Hz
- Electronic Shutter: 1/30~1/60 Seconds
- Scanning System: Progressive Scanning
- Sync System: Internal
- Resolution: 1080P
- Video Output: AHD, 1.0Vp-p, 75Ohm
- White Balance: Auto
- Power Supply: DC12V
- Waterproof Rating: IP69K
- Viewing Angle: 120°
- Audio: Yes
- Minimum Illumination: 0 Lux with IR ON
- Night Vision Distance: 8-10m
- Image Mode: Mirror image
- SMART IR-CUT: Yes
- Operating Temperature: -30~70°C, RH90% MAX
- Storage Temperature: -40~80°C, RH90% MAX
Monitor:
- LCD Size: 7” LCD color monitor with digital IPS Panel
- Resolution: 1024x3(RGB)x600
- Brightness: 550cd/m2
- Contrast: 600:1
- View Angle: U/D:85°; L/R:85°
- Power Supply: DC9-36V
- Power Consumption: about 6W
- Support Audio Input Channel: CH1, CH2
- Built-in Loud Speaker: Yes (1W)
- Screen Mode: 16:9
- Support Video System: 1080P/720P/CVBS auto detection
- OSD Menu, Remote Control: Mirror/Normal Flip Image, Guideline ON/OFF, Brightness, Contrast, Color, Volume
- Outline Dimension: 4.6"(H)x7"(L)*8.2"(D)
Extension Cable:
- Length: 50ft
- Feature 1: Pure copper wire
- Feature 2: Double shielding: tinfoil wrap up and copper wire winding
Usage Features:
The system is designed for ease of use with both manual buttons on the monitor and a remote control.
- Monitor Buttons:
- V1/V2 button: Switches between cameras (CH1 and CH2).
- MODE button: Rotates the image (flip image/normal/mirror image setting).
- - button: Decreases value/down arrow.
- MENU button: Accesses settings for volume, brightness, etc.
- + button: Increases value/up arrow.
- POWER button: Turns the unit on/off and sets to standby.
- Power Indicator: Shows normal/standby mode.
- Remote Control: Offers similar functions to the monitor buttons, including Power, Video select, Left arrow (Positive/increase), Menu, Right arrow (Negative/decrease), and Mode select (rotate flip image/normal/mirror image setting).
- Menu Navigation: The MENU button allows access to various settings by pressing it multiple times:
- 1 press: Brightness adjust mode (0-40, default 20).
- 2 presses: Contrast adjust mode (0-40, default 20).
- 3 presses: Color adjust mode (0-40, default 20).
- 4 presses: Language adjust mode (English, Français, etc., default English).
- 5 presses: Default setting mode (adjusts brightness, contrast, color, volume, ruler setting).
- 6 presses: Volume adjust mode (0-40, default 20).
- 7 presses: RLUD adjust mode (normal/mirror flip rotate image) (1,2,3,4 options to rotate/flip each camera image individually horizontally and vertically, affecting both CH1 and CH2). This allows for correct image orientation for front/rear cameras.
- 8 presses: VCOM adjust mode (0-40, default 20).
- 9 presses: Ruler setting adjust mode (parking guideline) (valid for CH2 only).
- 10 presses: Version check mode.
- Parking Guideline Setting: Same as "Menu button press 9 times."
- Mirror Image Setting: Same as "Menu button press 7 times."
Maintenance Features:
The manual emphasizes pre-installation testing and careful installation to ensure proper functionality and longevity.
- Pre-installation Test: It is recommended to test all components before installation to ensure they are working correctly. This involves checking for missing components, connecting the power cable to the monitor (12-32V) to verify display functionality, and then connecting the camera to the monitor to confirm image display.
- Installation Precautions:
- Measure borehole sizes and check for cables/wiring before drilling.
- Keep cables away from hot or moving parts and electrical noisy components.
- Securely clamp all wires to prevent damage during vehicle use.
- Power Connection: It is recommended to connect the power to an ignition-switched accessory power source (ACC+) via the fuse box to prevent battery drain, rather than directly to the battery.
- Troubleshooting: The manual provides a troubleshooting section for common issues:
- Monitor not powering up: Check fuse, 12V+ connection, ground connection, and voltage range (12-32V).
- No signal/blue screen: Perform a hard reset (unplug all cables for 1 minute), check camera connection tightness, verify camera cable is plugged into the correct port, and ensure the red positive trigger is connected to 12V+.
- No image on screen: Verify camera is on the correct input, cable connection to monitor and camera, and test with a known working camera/cable.
- No audio on camera: Verify volume setting, confirm the chosen camera has audio function, and check if the extension cable has an audio wire.
- Wrong normal/mirror image setting: Verify RLUD (normal/mirror flip rotate image) setting for rear/front/side cameras.
- No parking guideline on camera: Verify ruler setting is on, ensure the chosen camera is CH2 (invalid for CH1), and confirm the green reverse trigger wire is properly connected to the backup light or beeper wire, and the vehicle is in reverse.