54
DO924DV
ES
· Deje que el aparato repose 2 horas antes de encenderlo. Esto permite que el refrigerante
se asiente.
· Deje el aparato después de la instalación 6 horas antes de encenderlo. Así se puede asentar
el refrigerante.
CAMBIO DE DIRECCIÓN DE LA PUERTA
El congelador tiene una puerta reversible. Si quiere trasladar las bisagras de la puerta hacia el
otro lado, le recomendamos que se ponga en contacto con un taller de reparación autorizado
para llevar a cabo el trabajo. Antes de cambiar la dirección de giro, compruebe que el enchufe
se ha desconectado de la toma de corriente y que el aparato está vacío.
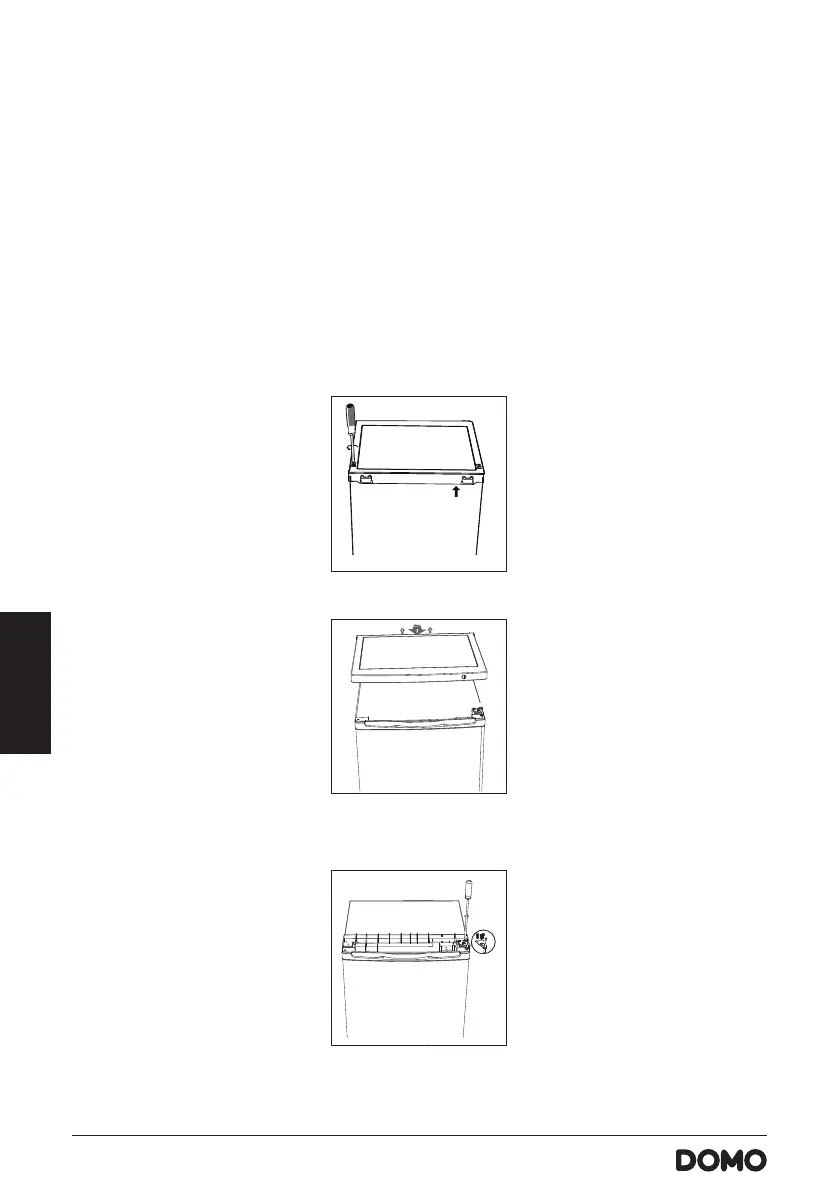
1. Retire los tornillos de la parte posterior de la cubierta superior.
Reverse Door
Tool required: Philips screwdriver, Flat bladed screwdriver, Hexagonal spanner.
Ensure the unit is unplugged and empty.
To take the door off, it is necessary to tilt the unit backwards. You should rest the unit on something solid
so that it will not slip during the door reversing process.
All parts removed must be saved to do the reinstallation of the door.
Do not lay the unit flat as this may damage the coolant system.
It' s better that 2 people handle the unit during assembly.
1. Remove two screws at rear side of top cover.
2. Remove top cover and thermostat knob, then place it aside.
3. Unscrew top hinge and then remove door and place it on a soft pad to
avoid scratch.
4. Unscrew bottom hinge. Then remove the adjustable feet from both
side.
7
unscrew
2. Retire la tapa superior y el regulador de temperatura del congelador.
Reverse Door
Tool required: Philips screwdriver, Flat bladed screwdriver, Hexagonal spanner.
Ensure the unit is unplugged and empty.
To take the door off, it is necessary to tilt the unit backwards. You should rest the unit on something solid
so that it will not slip during the door reversing process.
All parts removed must be saved to do the reinstallation of the door.
Do not lay the unit flat as this may damage the coolant system.
It' s better that 2 people handle the unit during assembly.
1. Remove two screws at rear side of top cover.
2. Remove top cover and thermostat knob, then place it aside.
3. Unscrew top hinge and then remove door and place it on a soft pad to
avoid scratch.
4. Unscrew bottom hinge. Then remove the adjustable feet from both
side.
7
unscrew
3. Retire los tornillos y, a continuación, retire la bisagra superior que mantiene la puerta en
su lugar. Levante la puerta y colóquela sobre una supercie suave para evitar arañazos.
Reverse Door
Tool required: Philips screwdriver, Flat bladed screwdriver, Hexagonal spanner.
Ensure the unit is unplugged and empty.
To take the door off, it is necessary to tilt the unit backwards. You should rest the unit on something solid
so that it will not slip during the door reversing process.
All parts removed must be saved to do the reinstallation of the door.
Do not lay the unit flat as this may damage the coolant system.
It' s better that 2 people handle the unit during assembly.
1. Remove two screws at rear side of top cover.
2. Remove top cover and thermostat knob, then place it aside.
3. Unscrew top hinge and then remove door and place it on a soft pad to
avoid scratch.
4. Unscrew bottom hinge. Then remove the adjustable feet from both
side.
7
unscrew
4. Retire el tornillo inferior, el soporte de la bisagra y la pata de ajuste en la parte inferior del
aparato.
 Loading...