EasyManua.ls Logo

Donco kids 780 User Manual

Donco kids 780
8 pages
To Next Page IconTo Next Page
Page #1 background imageLoading...
Page #1 background image
7 0 LOW LOFT BED8 CIRCLES
ASSEMBLY INSTRUCTIONS
Thank you for purchasing this quality product. Be sure to check all packing
material carefully for small parts which may have come loose inside the
carton during shipment. Separate, identify and count all parts and hardware.
Compare with the parts list to be sure all parts are present.
"DO NOT TIGHTEN SCREWS UNTIL COMPLETELY ASSEMBLED"
IMPORTANT:
PLEASE READ INSTRUCTION BEFORE STARTING THE ASSEMBLY
* Use of power tool to assemble this
product will invalidate any claim and
damage this product making unsafe !!!
* Please assemble on a clean soft
surface to avoid damage.
!
Tools Required
(Not included)
+
2:00 h
1
2
3
4
5
6
7
8
9
10
11
12
(Not included)
OPTIONAL COMPONENTS
REVERSIBLE SOPTION
3 DRAWERS CHEST CIRCLES
2 CIRCLESDRAWERS CHEST
BOOKCASE
Fort , Texas 76140Worth
All manuals and user guides at all-guides.com
all-guides.com
Question and Answer IconNeed help?

Do you have a question about the Donco kids 780 and is the answer not in the manual?

Donco kids 780 Specifications

General IconGeneral
BrandDonco kids
Model780
CategoryBaby & Toddler Furniture
LanguageEnglish

Summary

Assembly Instructions

Product Overview and Options

Details reversible options and available optional components for the loft bed.

Important Pre-Assembly Guidelines

Essential pre-assembly instructions, including tool usage and surface protection recommendations.

Parts and Hardware Identification

Lists all included parts and hardware with identification illustrations for assembly.

Step-by-Step Assembly Process

Step 01: Initial Frame Setup

Assembling the initial frame components using wood dowels and screws.

Step 02: Attaching Side Panels

Connecting the side panels (parts 3, 4, 5) to the frame using screws.

Step 03: Securing Crossbeams and Rails

Attaching crossbeams and support rails using specific hardware like screws and half moons.

Step 04: Installing Slat Supports

Mounting the supports for the bed slats using screws.

Step 05: Attaching Main Bed Structure

Connecting the main bed structure to the assembled frame using screws.

Step 06: Ladder Assembly and Attachment

Assembling the ladder and attaching it to the bed structure with protectors.

Step 07: Finalizing Frame Reinforcement

Reinforcing the bed frame with screws and specific hardware for stability.

Step 08: Slat Installation and Safety

Installing bed slats with specific spacing and adhering to mattress height warnings.

Optional Configurations

Bed Only Configuration

Illustrates the basic loft bed configuration without any additional components.

Bed with Tent Fabric

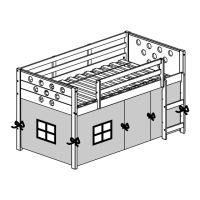
Shows the loft bed configured with optional tent fabric for enclosure.

Bed with Case Components

Displays the loft bed assembled with optional chest drawers and bookcase units.