THE NEXT GENERATION CAR SEAT / ISOFIX BASE
16
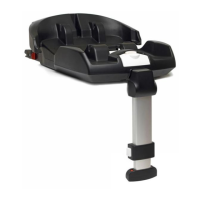
Step 1: Unfold the support leg (#10)
Step 2: Make sure the ISOFIX Connectors (#5) are sticking out
to the maximum from the Doona ISOFIX main body. In case
they are not, lift the body slider button (#2) with one hand, and
push the support leg with the other hand towards the body until
the ISOFIX Connectors (#5) are exposed and reach maximum
length.
Step 3: Place the Doona ISOFIX Base with the ISOFIX Connectors
(#5) facing the back of the vehicle›s seat. Align the ISOFIX
Connectors (#5) with the vehicle ISOFIX low anchors (#11).
Push the Doona ISOFIX Base from the top of the support leg
until the base clicks and locks with both connectors.
Step 4: Slide the Doona ISOFIX Base body, until it reaches the
back of the seat, and is rmly in place.
Step 5: Adjust the support leg (#10) by pressing the Leg
adjustment button (#7) and extending it until it rests rmly on
the oor of the vehicle. Make sure the color of support leg color
indicator (#8) changes from red to green.
IMPORTANT! Always use the support leg (#10) to ensure the safe use
of the Doona ISOFIX Base.
IMPORTANT! The support leg (#10) must never be suspended in mid-air
or supported by other objects.
IMPORTANT! Under no circumstances should this product be used if
the support leg color indicator (#8) remains red.
Note: When the support leg (#10) rests rmly on the oor of the
vehicle and the support leg color indicator (#8) is green, assure that
the gap between the Doona ISOFIX Base body and the vehicle
seat is minimal.