EasyManua.ls Logo

Doosl W13-M - User Manual

Doosl W13-M
22 pages
Print Icon
To Next Page IconTo Next Page
Loading...
Doosl Mini Video Projector
User Manual
W13-M
Question and Answer IconNeed help?

Do you have a question about the Doosl W13-M and is the answer not in the manual?

Summary

Safety Warnings

Product Overview

Control Buttons

On/of, Arrow Keys, OK, Set Up, Return buttons for navigation.

Image Adjustment Controls

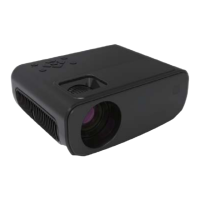
Focusing Ring and Keystone Correction for image quality.

Model Identification

Indicates the specific model of the projector.

Connectivity Ports

Power and Data Ports

DC Power Socket and USB Port for connections.

Audio;Video Ports

HDMI Port, AV Port, and Headphone Jack for media.

Remote Control Functions

Basic Operation

Power, Play/Pause, Forward/Backward, Mute controls.

Navigation and Menu Access

Arrow Keys, OK, Menu, Return for interface control.

Input Source and Volume

Select input sources and adjust audio volume.

Starting the Projector

Power Connection and Standby

Connect the adapter and turn on power to enter standby.

Initiating Power On

Press the power button on the projector or remote.

Focus and Image Correction

Focusing Ring Adjustment

Adjusts the sharpness of the projected image.

Keystone Correction

Corrects trapezoidal distortion for a rectangular image.

Connecting Devices

Signal Source Selection

Access menu via remote to select input source.

Wireless Connection (iOS;Android)

Network Settings

Access network settings and select Wi-Fi.

Selecting Home Network

Choose your wireless network from the list.

Password Entry

Enter the password to connect to the Wi-Fi network.

Connection Confirmation

Check network name in the upper corner for successful connection.

Device Mirroring (Airplay;Miracast)

iOS Device Connection

Select 'Airplay' for iPhone, iPad, iPod touch mirroring.

Android Device Connection

Select 'Miracast' for Android mobile/pad mirroring.

Screen Mirroring Setup

Network Verification

Ensure devices are on the same network as the projector.

iOS Screen Mirroring

Use Control Center and tap 'Screen Mirroring' on iOS devices.

Android Screen Sharing

Use phone's control center for 'Wireless Projection' etc.

Wireless Connection Guide

Fast Path Connection

Quick steps for projector and device connection.

Supported Devices

Lists compatible iOS and Android devices; excludes laptops.

HDMI Device Connection

HDMI Cable Connection

Connect projector and laptop using HDMI cable.

Input Source and Display Mode

Select HDMI input and 'Duplicate' display mode on laptop.

Laptop Output Keys

Key combinations for different laptop brands to output display.

Smartphone Connection

iOS Smartphone Connection

Use Lightning to HDMI adapter for iOS device connection.

Android Smartphone Connection

Use Micro USB/Type-C to HDMI adapter for Android devices.

Smartphone Connection Notes

Adapter Information

Adapters are not included; check compatibility.

HDMI Input Source

Ensure HDMI is selected as the input source.

Dolby Sound Limitation

Projector does not support Dolby sound; disable on device.

USB Drive Connection

Playing Files from USB

Select Movie, Photo, or Music from USB drive.

USB PPT Format Note

Projector is not compatible with PPT files from USB.

AV Video Device Connection

AV Cable Connection

Use the 3-in-1 cable to connect AV devices.

AV Signal Channel

Select 'AV' as the media signal channel.

Audio Device Connection

3.5 mm Audio Output

Connect earphones or audio devices via 3.5mm jack.

Projector Settings Menu

Accessing Settings

Use 'Menu' button on remote to enter the settings menu.

Setting Categories

Adjust PICTURE, SOUND, TIME, and OPTION properties.

Picture Settings Configuration

Image Modes and Color

Picture Mode (Standard, Soft, User, Vivid) and Color Temperature.

Aspect Ratio and Noise Reduction

Set Aspect Ratio (Auto/4:3/16:9) and Noise Reduction.

Projection and HDMI Settings

Adjust Projection Direction and HDMI Mode (PC/AV).

Display Size Adjustment

Reduce the projection size from 75% to 100%.

Sound Settings Configuration

Sound Mode Selection

Select sound mode: User, Standard, Music, Movie, Sports.

Audio Balance Adjustment

Balance sound between left and right speaker channels.

Auto Volume Control

Enable or disable intelligent volume adjustment.

Time Settings Configuration

Sleep Timer Setup

Set projector to shut off automatically after a duration.

Option Settings Configuration

OSD Language Selection

Set the display language for the operation interface.

Restore Factory Defaults

Reset projector settings to factory default.

Blending and Duration

Adjust menu transparency and display duration.

Software Update

Update projector software via USB.

Troubleshooting Common Issues

No Display with Audio

Check video format, encryption, lamp, and HDMI cable.

Troubleshooting HDMI Input

Try an alternative HDMI cable if input source is HDMI.

Image Orientation Troubleshooting

Flipping Image

Use 'FLIP' key or Menu-Picture-Projection Direction.

Display Dot Issues

Small Dots on Display

Contact support for cleaning video if dots persist.

Image Clarity and Shape

Blurry or Out-of-Shape Image

Adjust focus ring, keystone, or screen distance.

Remote Control Unresponsive

Remote Operation Checks

Ensure line of sight, no obstruction, and fresh batteries.

FCC Warning Statement

Overview

This document describes the Doosl Mini Video Projector, model W13-M, a compact device designed for various video projection needs.

Function Description:

The Doosl Mini Video Projector serves as a versatile display solution, capable of projecting video, images, and music from multiple sources. It is designed for both wired and wireless connections, making it suitable for home entertainment, presentations, and other personal viewing experiences. The projector features built-in controls and comes with a remote control for convenient operation.

Important Technical Specifications:

While specific numerical specifications like resolution, brightness, or contrast ratio are not provided in the manual, the projector supports various input methods and offers adjustable display settings.

  • Connectivity:
    • DC Power Socket
    • USB1 Port
    • HDMI Port
    • 3.5mm Headphone Jack
    • AV Port
    • Wireless (Wi-Fi) for iOS and Android devices (Airplay, Miracast)
  • Power: Uses a DC power adapter.
  • Display Modes: Supports various picture modes (Standard, Soft, User, Vivid), color temperatures (Medium, Warm, User, Cool), and aspect ratios (Auto, 4:3, 16:9).
  • Sound Modes: Offers sound modes such as User, Standard, Music, Movie, and Sports.
  • Projection Direction: Adjustable for Front/Rear on Desk and Front/Rear on Ceiling.
  • Display Size Reduction: Adjustable from 75% to 100%.

Usage Features:

The projector is designed for ease of use with both on-device controls and a remote control.

Starting the Projector:

  1. Connect the projector to the DC power adapter and turn on the adapter's power supply. The power indicator light on the projector will illuminate, indicating standby mode.
  2. Press the "On/Off" button on the projector or the remote control to start.

Controls:

  • On-device controls: On/Off, Arrow Keys, OK, Model, Set Up, Return, Focusing Ring, Keystone Correction.
  • Remote Control: Power, Mute, Play/Pause, Forward, Backward, Move Left/Right/Up/Down, OK, Input Source, Menu, Return, Volume Down/Up.

Focusing and Keystone Correction:

  • Focusing Ring: Used to adjust the clarity of the projected image.
  • Keystone Correction: Corrects trapezoidal distortion that may occur when the projector is placed at an angle.

Connecting Devices:

Wireless Connection (for iOS and Android devices):

  • Setup:
    1. On the remote control, select "Signal source" and then choose "MCAST" > "Network settings".
    2. Select "Wireless" and choose your home wireless network.
    3. Enter the password to connect.
    4. Once connected, your home wireless network name will appear in the upper right corner of the projection screen.
  • iOS Devices (Airplay):
    1. After connecting to Wi-Fi, select "Airplay" from the MCAST menu.
    2. On your iOS device, open Control Center and tap "Screen Mirroring".
    3. Select "W13-M" from the list of devices.
  • Android Devices (Miracast):
    1. After connecting to Wi-Fi, select "Miracast" from the MCAST menu.
    2. On your Android device, slide down from the top to enter the control center.
    3. Click on "WirelessProjection" / "Multi-screen" / "Screen sharing" (names may vary by phone model).
    4. Select "W13-M" from the list of devices.
  • Compatibility: Wireless connection is suitable for iPhone, iPad, Android smartphones, and tablets, but not for laptops.

HDMI Connection:

  • Setup:
    1. Turn on your laptop and the projector.
    2. Connect one end of the HDMI cable (included) to your laptop's HDMI port.
    3. Connect the other end to any available HDMI port on the projector.
    4. Press the "Input Source" button on the remote control.
    5. Select "HDMI" as the input source.
    6. On your laptop, press "WIN+P" and select "Duplicate" to mirror your display.
  • Laptop Output Keys: The manual provides a table of function keys (Fn+F#) for various laptop brands to change display modes (e.g., Lenovo Fn+F3, Dell Fn+F8, HP Fn+F4, Asus Fn+F8, etc.).
  • Windows 7+: For Windows 7 and above, simply press "WIN+P" and select "Duplicate." If this fails, update your computer's graphics driver.

Smartphone Connection (Wired):

  • For iOS devices: Use a Lightning to HDMI/USB adapter (not included) to connect your iOS device to the projector.
  • For Android devices: Use a Micro USB/Type C to HDMI/USB adapter (not included) to connect your Android device to the projector.
  • Important Notes for Wired Smartphone Connection:
    • Adapters are not included.
    • Ensure HDMI is selected as the input source.
    • Adapter compatibility may vary with different smartphone models.
    • Many Micro USB/Type C/Lightning to HDMI cables do not support streaming from apps like Netflix, Hulu, or Amazon Prime Video due to copyright protection. This is a limitation of the cable/app, not the projector.
    • The projector does not support Dolby sound. If playing Dolby sound videos (e.g., from Amazon Fire Stick, Netflix, Blu-ray movies), turn off Dolby sound on your device or app to avoid audio issues. (Settings > Display & Sounds > Audio > Dolby Digital Output > Surround Sound (OFF)).

USB Drive Connection:

  • Insert a USB drive into the USB1 port.
  • Select "Movie" on the main menu to play videos.
  • Select "Photo" or "Music" on the main menu to play pictures or music.
  • Note: The projector's chip is not compatible with PPT files stored on a USB stick. For PPT presentations, store them on a laptop or DVD player and connect via HDMI.

AV Video Devices Connection:

  • Use the included 3-in-1 video cable to connect to the AV port.
  • Select "AV" as the media signal channel.

3.5mm Audio Devices Connection:

  • Connect 3.5mm earphones or other wired audio devices to the 3.5mm Headphone Jack.

Projector Settings:

Access settings by pressing the "Menu" button on the remote or projector.

  • Picture Settings:
    • Picture Mode: Standard, Soft, User, Vivid.
    • Color Temperature: Medium, Warm, User, Cool.
    • Aspect Ratio: Auto, 4:3, 16:9.
    • Noise Reduction: Off, Low, Middle, High, Default.
    • Projection Direction: Front/Rear on Desk, Front/Rear on Ceiling.
    • HDMI Mode: PC/AV.
    • Reduce Display Size: 75%-100%.
  • Sound Settings:
    • Sound Mode: User, Standard, Music, Movie, Sports.
    • Balance: Adjusts left/right channel balance (-50 to 50).
    • Auto Volume: On/Off (intelligently adjusts volume).
  • Time Settings:
    • Sleep Timer: Off, 10min, 20min, 30min, etc. (shuts off projector after a set time).
  • Option Settings:
    • OSD Language: English, French, Italian, Spanish, etc.
    • Restore Factory Default: Resets projector to factory settings.
    • Blending: Off, Low, Middle, High (adjusts menu interface transparency).
    • OSD Duration: Off, 5Sec, 10Sec, 15Sec (adjusts how long the menu interface stays on screen).
    • Blue Screen: On/Off.
    • Software Update (USB): Updates the projector's software version.

Maintenance Features:

Troubleshooting:

The manual provides solutions for common issues:

  • Audio available, but no display:
    • Video format not supported.
    • Video or media player has encryption.
    • Projector lamp is defective (contact Amazon Seller Support for replacement).
    • Try a different HDMI cable if using HDMI input.
  • Image is upside down:
    • Use the "FLIP" key on the remote.
    • Go to Menu > Picture > Projection Direction to adjust.
  • Small dots on display:
    • May be caused during installation or shipping. Contact Seller Support for a cleaning video.
  • Image is blurry or out of shape:
    • Adjust the focusing ring and keystone correction.
    • Ensure the projector and screen/wall are at an effective distance.
  • Remote is unresponsive:
    • Point the remote directly at the IR receiver.
    • Do not cover the IR receiver.
    • Try new AAA batteries.

Safety Warnings:

  • Do not look directly into the projector light.
  • Do not touch the projector lens.
  • The mains adapter is the disconnect device and should remain readily operable. Disconnect the mains plug completely to disconnect the apparatus from the mains.
  • Unauthorized changes or modifications to the unit may void user authority to operate the equipment.
  • Fluorescent lighting may cause interference with the remote; move the unit away if erratic behavior occurs.
  • Shock hazard – Do Not Open.
  • Caution and marking information is on the rear or bottom of the apparatus.
  • To reduce fire/electric shock risk, do not expose the apparatus to rain, moisture, dripping, or splashing.
  • Do not place objects filled with liquids (e.g., vases) on the apparatus.

FCC Compliance:

The device complies with Part 15 of the FCC Rules, ensuring it does not cause harmful interference and accepts received interference. Any changes not approved by the responsible party could void user authority. The equipment is tested to comply with Class B digital device limits and should be installed and operated with a minimum distance of 20cm between the radiator and your body.

Doosl W13-M Specifications

General IconGeneral
BrandDoosl
ModelW13-M
CategoryProjector
LanguageEnglish