EasyManua.ls Logo

Doro 2424 - User Manual

Doro 2424
14 pages
Print Icon
To Next Page IconTo Next Page
Loading...
www.doro.com
Insert SD card (optional)
GB
Locate the SD card holder
and gently slide the card
in the holder.
Note! The circuit
boards (metal part) on
the cards must not be
scratched or bent. Try
not to touch the circuits with your ngers.
Use only compable memory cards with
this device. Compable card type: microSD,
microSDHC. Incompable cards may damage
the card itself, the device and corrupt any
data stored on the card.

Insert the baery by
sliding it into the baery
compartment with the
circuits facing up to the
le. Replace the baery
cover.
3. CALLS
Make a call
1. Enter the phone number. Delete with Clear.
2. Press to dial. Press Abort to cancel
the call.
3. Press to end the call.
Note! For internaonal calls, always use +
before the country code for best operaon.
Press
*
twice for the internaonal prex +.
Call from the phonebook
1. Press Name to open the phonebook.
2. Use / to scroll through the
phonebook, or quick search by pressing the
key corresponding to the rst leer of the
name.
3. Press  â Call, alternavely, press
to dial the selected entry, or press
Back to return to standby.
4. PHONEBOOK
The Phonebook can store 300 entries with 1
phone numbers in each entry.
Add a contact
1. Press Menu â Phonebook â
-New contact- â OK.
2. Enter a Name for the contact, see “Enter
text. Delete with Clear.
3. Use / to select Number and
enter the phone number.
4. When done, press Save.
Doro 2424
Quick Start Guide
1. Speaker
2. Scroll buons
3. Le selecon buon
4. Call key
5. Speed dial A
6. Speed dial B
7. Internaonal prex/
symbols/
*
/8
8. Right selecon
buon
9. End call /
Power on/
10. Camera key
11. Microphone
12. Silent /
Input method/
#
/9
13. Torch/Camera ash
14. Headset socket
15. Torch key
16. Charging cradle
connectors
17. External display
18. Camera lens
19. Lanyard hold
20. Assistance buon
21. Volume
22. Loudspeaker
23. Charging socket
1. GET STARTED


Be careful not to damage
your ngernails when
you remove the baery
cover. Do not bend or
twist the baery cover
excessively as it may be
damaged.
Insert SIM card (required)
Remove the baery if it
is already installed. Slide
the card under the metal
part, with the gold-col-
oured circuit board facing
down. The cut-o corner
of the card helps you to
place the card, correct placement is indicated
in the compartment.
Note! This device accepts micro SIM or 3FF
SIM card. Use of incompable SIM cards
may damage the card or the device, and may
corrupt data stored on the card.
Charge the phone
CAUTION
Only use baeries, charger and accessories
that have been approved for use with
this parcular model. Connecng other
accessories may be dangerous and may
invalidate the phone’s type approval and
guarantee.
When the baery is running low, is
displayed and a warning signal is heard.
Connect the mains adapter to the wall
socket and to the charging socket y.
Tip: Don’t forget to remove the protecve
plasc lm from the display.
2. GET TO KNOW YOUR PHONE
Turn the phone on and off
1. Press and hold the red buon on the
phone to turn it on/o. Conrm with Yes to
power o.
2. If the SIM card is valid but protected with a
PIN code (Personal Idencaon Number),
PIN is displayed. Enter the PIN code and
press OK. Delete with Clear.
Note! If PIN and PUK codes were not provided
with your SIM card, please contact your
service provider.
 shows the number of PIN aempts
le. When no more aempts remain, PIN
blocked is displayed. The SIM card must now
be unlocked with the PUK code (Personal
Unblocking Key).
1. Enter the PUK code and conrm with OK.
2. Enter a new PIN code and conrm with OK.
3. Re-enter the new PIN code and conrm
with OK.
Start-up wizard
When starng the telephone for the rst me,
you can use the start-up wizard to set some
basic sengs.
Tip: You can run the start-up wizard later if
you want.

In this document the arrow (â) indicates next
acon in the step-by-step instrucons.
To conrm an acon in the phone, press OK.
To select an item, scroll vercally or highlight
the item using / and then press OK.
To scroll horisontally, use
*
(8 ) or
#
( 9).
Enter text
Press a numerical key repeatedly unl the
desired character is shown. Wait a few
seconds before entering the next character.
Press
*
for a list of special characters.
Select the desired character with /
and press OK to enter it.
Use / to move the cursor within the
text.
Press
#
to cycle upper case, lower case and
numerals.
Change language, time and date
The default language is determined by the SIM
card.
Receive a call
1. Press to answer, or press Silent to
switch o the ring signal and then Reject
(busy signal).
Alternately, press to reject the call
directly.
2. Press to end the call.
Volume control
Use / to adjust the sound volume
during a call. The volume level is indicated on
the display.
Silent
Silent is a xed prole with keypad tone,
message tone and ring tone disabled, while
vibraon, tasks and alarm are unchanged.
Press and hold
#
to acvate and to
deacvate silent.
Call options
During a call the so keys ( ) give access to
addional funcons.
Speed dial
Use
2
9
to speed dial an entry from standby.
Press and hold the corresponding buon to
dial.
Add speed dial numbers
1. Press Menu â Phonebook â.
2. Use / to scroll through the
phonebook, or quick search by pressing the
key corresponding to the rst leer of the
name.
3. â  â â
Speed dial â Set number.
4. Select
2
â Edit and select an entry from
the phonebook.
5. Press OK to conrm.
6. Repeat to add speed dial entries for buons
2
9
.
SOS calls
As long as the phone is switched on, it is always
possible to place an SOS call by entering the
main local emergency number for your present
locaon followed by .

Received, missed, and dialled calls are saved in
a combined call log. 20 calls of each type can
be stored in the log. For mulple calls related
to the same number, only the most recent call
is saved.
1. Press .
2. Use / to scroll through the call log.
= Received call
= Dialled call
= Missed call
3. Press to dial, or .

In the event of a trauma, it is crical to have
this informaon as early as possible to increase
the chances of survival. Add ICE contact to
improve your own safety. First responders
can access addional informaon such as
medicaon and next of kin from your phone in
case of an emergency. All elds are oponal,
but the more informaon provided the beer.
Press Menu â Phonebook â ICE.
1. Use / to scroll the list of entries.
2. Press Edit to add or edit informaon in each
entry. Delete with Clear.
3. Press Save when done.
5. ASSISTANCE BUTTON
The assistance buon allows easy access to
contact your predened help numbers should
you need help. Make sure that the assistance
funcon is acvated before use and make all
necessary conguraons.Test the applicaon
thoroughly.
Make an assistance call
1. When help is needed, press and hold the
assistance buon for 3 seconds, or press it
twice within 1 second.
The assistance call begins aer a delay of
5 seconds. In this me you can prevent a
possible false alarm by pressing .
2. An assistance text message (SMS) is sent to
all recipients. The rst recipient in the list
is dialled. If the call is not answered within
25 seconds, the next number is dialled.
Dialling is repeated 3 mes or unl the call
is answered, or unl is pressed.
CAUTION
When an assistance call is acvated the phone
is pre-set to handsfree mode. Do not hold
the device near your ear when the handsfree
mode is in use, because the volume may be
extremely loud.
Settings
Press Menu â  â Assistance.
6. MESSAGES
Create and send text messages
1. Press Menu â Messages â Write
message.
2. Write your message.
3. Then press  â To.
4. Select a recipient with Add from Phonebook.
Alternavely, select Enter number to add
recipient manually and press OK.
5. You can modify the recipients by selecng
one and press  â Edit/Delete/
Delete all.
6. When done, press  â Send.
Create and send picture messages
Both you and the recipient must have sub-
scripons that support picture message. The
sengs for picture message are supplied by
your service provider and can be sent to you
automacally via text message.Press Menu â
Messages â MMS.
1. Write your message.
2. Press  â Add picture:
 to select a le.
Note! To keep best picture quality, send only
one picture per message.
You can also Add sound, Add video, and
Preview MMS using the  menu.
3. Press  â Add subject and enter
your subject, then press Done.
4. Press  â To and select select a
recipient with Add from Phonebook.
Alternavely, select Enter recipient to add
recipient manually and press OK.
5. When done, press  â Send.
Settings
Press Menu â Messages â Messages â
SMS / MMS.
English
Note! All illustraons are for illustrave
purposes only and may not accurately depict
the actual device. This guide is for reference
only. The actual device and the items supplied,
including but not limited to the colour, size,
and screen layout, may vary depending on
the soware and accessories available in your
region or oered by your service provider.
Supplied accessories provide the best
performance with your phone. Your local Doro
dealer provides addional accessories.
A B
1
8
9
10
6
11
12
20
22
23
16
3
4
5
7
2
15
14
19
21
13
17
18
Question and Answer IconNeed help?

Do you have a question about the Doro 2424 and is the answer not in the manual?

Summary

1. GET STARTED

SIM Card, Memory Card, and Battery Installation

Instructions for installing SIM, memory cards, and battery in the device.

Charge the Phone

2. GET TO KNOW YOUR PHONE

Turning the Phone On and Off

Steps to power the phone on, off, and manage PIN codes.

3. CALLS

SOS Calls

4. PHONEBOOK

ICE (In Case of Emergency)

5. ASSISTANCE BUTTON

Making an Assistance Call

How to use the dedicated button to initiate an assistance or emergency call.

6. MESSAGES

8. BLUETOOTH

10. ADDITIONAL FUNCTIONS

Reset Settings

Restoring phone settings to default values without deleting data.

Reset All

Performing a full factory reset, deleting all user data and settings.

11. TROUBLESHOOTING

12. SAFETY INSTRUCTIONS

Protect Your Hearing

Emergency Calls

13. CARE AND MAINTENANCE

16. TECHNICAL DATA

Specific Absorption Rate (SAR)

Details on the device's compliance with radio wave exposure safety limits.

Overview

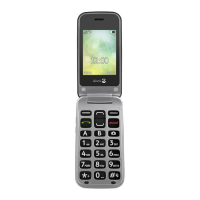
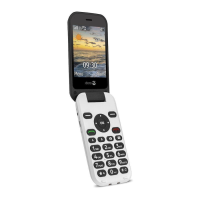
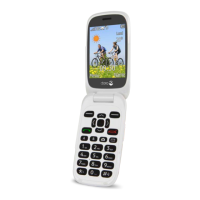
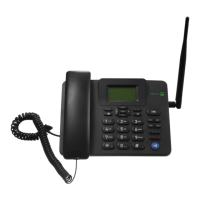
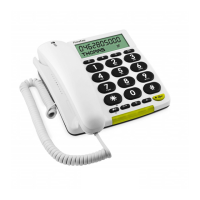
The Doro 2424 is a user-friendly mobile phone designed for ease of use, featuring a clamshell design and a range of functions for communication and daily tasks. It includes a speaker, scroll buttons, left and right selection buttons, call and end call/power on/off keys, speed dial buttons (A and B), a camera key, and a microphone. For convenience, it also has a torch/camera flash, headset socket, torch key, charging cradle connectors, external display, camera lens, lanyard hold, assistance button, volume controls, loudspeaker, and a charging socket.

Getting Started

To begin using the Doro 2424, you first need to install the SIM card, memory card (optional), and battery.

  • Removing the Battery Cover: Carefully remove the battery cover to avoid damage. Do not bend or twist it excessively.
  • Inserting the SIM Card (Required): If a battery is installed, remove it first. Slide the SIM card under the metal part with the gold-colored circuit board facing down. The cut-off corner guides correct placement. The device accepts micro SIM or 3FF SIM cards. Using incompatible SIM cards may damage the card or device and corrupt data.
  • Inserting the SD Card (Optional): Locate the SD card holder and gently slide the card in. Ensure the circuit boards (metal part) on the cards are not scratched or bent, and avoid touching them with your fingers. Use only compatible memory cards (microSD, microSDHC) to prevent damage or data corruption.
  • Inserting the Battery: Slide the battery into the compartment with the circuits facing up to the left, then replace the battery cover.

Charging the Phone

Always use batteries, chargers, and accessories approved for this model to avoid danger and maintain your warranty. When the battery is low, a warning signal will sound, and an icon will be displayed. Connect the mains adapter to a wall socket and the charging socket. Remember to remove any protective plastic film from the display.

Turning the Phone On and Off

Press and hold the red button to turn the phone on or off. Confirm with "Yes" to power off. If your SIM card is PIN-protected, "PIN" will be displayed. Enter the PIN code and press "OK." Use "Clear" to delete incorrect entries. If PIN and PUK codes were not provided, contact your service provider. If too many incorrect PIN attempts are made, "PIN blocked" will appear. You will then need to enter the PUK code, confirm with "OK," enter a new PIN, confirm, and re-enter the new PIN to confirm again.

Start-up Wizard

When starting the phone for the first time, a start-up wizard can guide you through basic settings. You can also run this wizard later.

Step-by-step Instructions

In the manual, an arrow (→) indicates the next action. Press "OK" to confirm actions. To select an item, scroll vertically using the scroll buttons or highlight it, then press "OK." To scroll horizontally, use the * or # buttons.

Entering Text

Press a numerical key repeatedly until the desired character appears, waiting a few seconds before entering the next. Press the * button for special characters, select with the scroll buttons, and press "OK." Use the scroll buttons to move the cursor. Press # to cycle between upper case, lower case, and numerals.

Changing Language, Time, and Date

The default language is determined by the SIM card.

Calls

  • Making a Call: Enter the phone number, use "Clear" to delete. Press the green call key to dial, or "Abort" to cancel. Press the red end call key to end the call. For international calls, always use + before the country code; press * twice for the international prefix +.
  • Calling from the Phonebook: Press "Name" to open the phonebook. Use the scroll buttons to navigate or quick search by pressing the key corresponding to the first letter of the name. Press "Options" → "Call," or the green call key to dial. Press "Back" to return to standby.
  • Receiving a Call: Press the green call key to answer, or "Silent" to mute the ring signal, then "Reject" (busy signal). Alternatively, press the red end call key to reject directly. Press the red end call key to end the call.
  • Volume Control: Use the scroll buttons during a call to adjust the volume, which is indicated on the display.
  • Silent Profile: Silent mode disables keypad tone, message tone, and ring tone, while vibration, tasks, and alarms remain active. Press and hold # to activate or deactivate silent mode.
  • Call Options: During a call, the soft keys provide access to additional functions.

Speed Dial

Use keys 2-9 for speed dial from standby. Press and hold the corresponding button to dial.

  • Adding Speed Dial Numbers: Go to "Menu" → "Phonebook" → "Options" → "Phonebook settings" → "Speed dial" → "Set number." Select a speed dial slot (2-9), then "Edit" and choose an entry from the phonebook. Press "OK" to confirm. Repeat for other speed dial entries.

SOS Calls

When the phone is on, you can always make an SOS call by entering the local emergency number followed by the green call key.

Assistance Button

The assistance button provides easy access to predefined help numbers. Ensure the function is activated and configured, then test it thoroughly.

  • Making an Assistance Call: Press and hold the assistance button for 3 seconds, or press it twice within 1 second. The call starts after a 5-second delay, during which you can press the red end call key to prevent a false alarm. An assistance text message (SMS) is sent to all recipients. The first recipient is dialled; if unanswered within 25 seconds, the next number is dialled. Dialling repeats 3 times or until the call is answered or the red end call key is pressed.
  • Caution: When an assistance call is activated, the phone is pre-set to handsfree mode. Do not hold the device near your ear, as the volume can be extremely loud.
  • Settings: Go to "Menu" → "Settings" → "Assistance."

ICE (In Case of Emergency)

In an emergency, ICE information can be critical. Add ICE contacts to improve safety. First responders can access medical information and next of kin. All fields are optional, but more information is better.

  • Adding ICE Information: Go to "Menu" → "Phonebook" → "ICE." Use the scroll buttons to navigate entries. Press "Edit" to add or modify information. Delete with "Clear." Press "Save" when done.

Messages

  • Creating and Sending Text Messages: Go to "Menu" → "Messages" → "Write message." Write your message. Press "Options" → "To." Select a recipient from the Phonebook or "Enter number" manually. Press "OK." Modify recipients by selecting one and pressing "Options" → "Edit/Delete/Delete all." When done, press "Options" → "Send."
  • Creating and Sending Picture Messages: Both you and the recipient need subscriptions supporting picture messages. Settings are usually supplied by your service provider. Go to "Menu" → "Messages" → "MMS." Write your message. Press "Options" → "Add picture" → "My pictures" to select a file. For best quality, send only one picture per message. You can also add sound, video, and preview MMS via the "Options" menu. Press "Options" → "Add subject" and enter your subject, then "Done." Press "Options" → "To" and select a recipient from the Phonebook or "Enter recipient" manually. Press "OK." When done, press "Options" → "Send."
  • Settings: Go to "Menu" → "Messages" → "Messages" → "SMS / MMS."

Camera (Take Photos)

Press the shortcut button or "Menu" → "Camera." Press the camera key to take a photo. Press "Options" for more settings. Press "Back" to return to standby.

  • Camera Settings: Go to "Menu" → "Camera" → "Options."

Bluetooth®

Connect wirelessly to other Bluetooth® compatible devices like headsets or other phones.

  • Important: Turn off "Activate" or "Visibility" when not using Bluetooth® to avoid pairing with unknown devices.
  • Activating Bluetooth®: Go to "Menu" → "Settings" → "Connectivity" → "Bluetooth." Press "Function on/off" → "On" to activate.
  • Searching for Devices: Go to "Menu" → "Settings" → "Connectivity" → "Bluetooth" → "My device." Press "Search new." Select a device from the list and press "Bond" to connect. If Bluetooth® is not enabled, press "Yes" to activate. Press "OK" to confirm.

Sound & Display

  • Tone Setup: Go to "Menu" → "Settings" → "Sound" → "Tone setup" → "Ringtone." Use the scroll buttons to select a melody; it will play. Press "OK" to confirm or "Back" to discard changes.
  • LCD Backlight: Customize display settings. Go to "Menu" → "Settings" → "Phone setup" → "LCD backlight." Set "Brightness" (1-5) using * (down) and # (up); 3 is default. Set "Time" (5-60 seconds) using * (down) and # (up). Press "OK" to confirm.

Additional Functions

  • Alarm: Go to "Menu" → "Organiser" → "Alarm" → "On." Enter the alarm time and press "OK." Choose "Single" for a one-time alarm or "Repeated" for a recurring alarm. Scroll through days and press "On" or "Off" to enable/disable. Press "OK." When the alarm sounds, press "Stop" to turn it off or "Snooze" to repeat after 9 minutes. The alarm works even if the phone is off. Do not power on if wireless phone use is prohibited or causes interference.
  • Torch: Slide up the torch key to turn it on, slide down to turn it off.

Reset Settings

  • Reset Phone Settings: Go to "Menu" → "Settings." Select "Reset settings" to revert phone settings to default. Enter the phone code (default: 1234) and press "OK."
  • Reset All: Go to "Menu" → "Organiser" → "File manager" → "Highlight phone" → "Options" → "Details." Select "Reset all" to delete phone settings and content (contacts, number lists, messages – SIM memory is unaffected). Enter the phone code (default: 1234) and press "OK."

Troubleshooting

The manual provides a troubleshooting section for common issues such as the phone not switching on (low battery, incorrect installation), charging failures (damaged battery/charger, temperature, incorrect connection), PIN code not accepted (wrong PIN, too many attempts), SIM card errors (damaged, incorrectly installed, dirty/damp), network connection failures (invalid SIM, no coverage), and inability to add contacts (phonebook full). It also addresses issues with functions not supported or subscribed from the network. For most issues, the solution involves checking connections, reinstalling components, or contacting the service provider.

Safety Instructions

  • Warning: The unit contains small parts; keep it out of reach of children. The mains adapter is the disconnect device and should be easily accessible.
  • Network Services and Costs: The device is approved for GSM 900/1800 MHz networks and requires a service provider subscription. Using network services may incur costs.
  • Operating Environment: Follow local rules and laws. Turn off the unit where prohibited or where it may cause interference/hazards. Use the unit in its normal user position.
  • Magnetic Parts: The unit is magnetic and can attract metal objects. Keep credit cards and other magnetic media away to prevent data erasure.
  • Medical Units: Radio signals can interfere with insufficiently protected medical equipment. Consult a doctor or manufacturer. Comply with notices to turn off the unit in healthcare facilities.
  • Implanted Medical Devices: Maintain a minimum separation of 15 cm between the wireless device and medical devices. Do not carry the device in a breast pocket. Hold the device to the ear opposite the medical device. Turn off the phone immediately if interference is suspected.
  • Areas with Explosion Risk: Turn off the unit in areas with explosion risk (e.g., filling stations, chemical factories, blasting sites, areas with flammable materials). Sparks can cause explosions or fires.
  • Li-ion Battery: Contains a Li-ion battery. Improper handling poses a risk of fire and burns.
  • Battery Warning: Danger of explosion if incorrectly replaced. Do not disassemble, crush, puncture, short external contacts, expose to temperatures above 60°C (140°F), or dispose of in fire or water. Recycle or dispose of used batteries according to local regulations.
  • Protecting Your Hearing: Excessive exposure to loud sounds can cause hearing damage. Loud sounds while driving can distract you. Listen at a moderate level and do not hold the device near your ear when the loudspeaker is in use.
  • Emergency Calls: Mobile phones rely on radio signals, networks, and user-programmed functions, so connection cannot be guaranteed in all circumstances. Do not rely solely on a mobile phone for critical calls.
  • Vehicles: Radio signals can affect electronic systems in vehicles. Consult the manufacturer for information. Do not keep or transport flammable liquids, gases, or explosives with the unit. For vehicles with airbags, remember that airbags deploy with considerable force. Do not place objects in the airbag deployment area. It is prohibited to use the unit in flight. Turn off the unit before boarding a plane.

Care and Maintenance

Treat your unit with care to maintain the warranty.

  • Moisture Protection: Protect from moisture. If wet, remove the battery and dry completely before replacing it.
  • Dust and Dirt: Do not use or keep in dusty, dirty environments.
  • Temperature: Avoid warm or cold places. High temperatures reduce lifespan and damage batteries. Cold temperatures can cause condensation damage when warming up.
  • Opening the Unit: Do not try to open the unit in any way other than indicated.
  • Physical Impact: Do not drop, knock, or shake the unit.
  • Cleaning: Do not use strong chemicals.
  • Service: If the phone is not working, contact the place of purchase for service. Keep your receipt or invoice.

Doro 2424 Specifications

General IconGeneral
Display diagonal2.4 \
External displayYes
Display resolution320 x 240 pixels
RAM capacity8 MB
Compatible memory cardsMicroSD (TransFlash)
Rear camera resolution (numeric)3 MP
TypeSenior phone
Product colorRed
Market positioningElderly phone
Form factorClamshell
PersonalizationWallpaper
Phonebook capacity300 entries
Personal info management (PIM)Alarm clock, Calculator, Calendar
Bluetooth version3.0+HS
Ringer typePolyphonic
Polyphonic rings quantity10
Multimedia Messaging Service (MMS)Multimedia Messaging Service (MMS) is a standard way to send messages that include multimedia content to and from a mobile phone over a cellular network
Subscription typeNo subscription
Headphone connectivity3.5 mm
Talk time (2G)8 h
Battery capacity800 mAh
Standby time (2G)285 h
Standby time (3G)- h
Body SAR (EU)1.31 W/kg
Head SAR (EU)0.625 W/kg
WAP-
Data networkGPRS, GSM
SIM card typeMicroSIM
SIM card capabilitySingle SIM
2G bands (primary SIM)900, 1800 MHz
Weight and Dimensions IconWeight and Dimensions
Depth18.5 mm
Width52 mm
Height103 mm
Weight92 g

Related product manuals