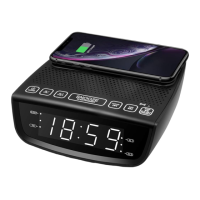
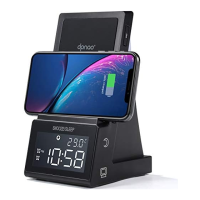
This document describes the dpnao YW-017, a multi-functional device that serves as a wireless player, FM radio, alarm clock, and wireless charger.
Function Description
The YW-017 combines several essential features into one compact unit:
- Wireless Player: Supports Bluetooth (BT) connectivity for streaming audio wirelessly from mobile devices or tablets.
- FM Radio: Allows users to listen to FM radio stations, with the ability to scan, manually tune, and preset up to 20 stations for easy access.
- Alarm Clock: Features two independent alarms (AL1 and AL2) with options to wake up to a beeping sound or FM radio. It also includes a snooze function for temporary alarm delay.
- Wireless Charging: Provides a wireless charging area on the top surface for compatible smartphones.
- USB Charging: Includes a USB charging port (DC5V, 1000mA) for charging external devices via a USB cable.
- AUX In: An auxiliary input port allows connection to external audio devices via a 3.5mm audio cable.
- Clock Display: Displays the current time in either 12-hour or 24-hour format, with adjustable display brightness (High, Low, Off).
Important Technical Specifications
- Model: YW-017
- Power Source: Uses an included AC adapter (Input: 100-240V 50/60 Hz, Output: DC 9V, 2000mA).
- Battery Backup: Requires 2 x 'AAA' size (UM-4 or LR-03) batteries (not included) for clock time and alarm setting backup. Note that batteries do not power the main unit.
- Wireless Charging: Fast Charging (9W).
- USB Charging Output: DC5V, 1000mA.
- Loud Speakers Spec: 28 mm, 2 Watt, 8 Ohm.
- FM Antenna: Integrated wire antenna for FM reception.
- FCC ID: 2AOW9-YW-017.
Usage Features
Power and Mode Selection:
- Long press the POWER button to enter clock mode.
- Repeatedly press the MODE button to cycle through sound sources: BT (Wireless), RADIO (FM), AUX In (Audio In / Line In).
Volume Control:
- Use the VOL+ and VOL- buttons to adjust the audio volume.
Clock Setting:
- In clock mode, hold the CLK SET button until "12-hr" or "24-hr" blinks. Use the HOUR and MIN buttons to select the format, then press CLK SET to confirm.
- Use the HOUR and MIN buttons to set the current hour and minute, then press CLK SET to save.
Alarm Setting (AL1/AL2):
- In clock mode, hold the AL1 (or AL2) button until the alarm digit blinks.
- Use the HOUR and MIN buttons to set the desired alarm time.
- Press the AL1 (or AL2) button to confirm.
- Use the SKIP buttons to select the wake-up option (Alarm sound or FM Radio).
- Press AL1 (or AL2) again to confirm and save settings.
- Ensure the corresponding alarm icon (AL1 or AL2) is lit for the alarm to be active.
Stopping Alarms:
- When an alarm sounds, press the AL OFF button to stop it immediately. The alarm will automatically repeat the next day.
- To deactivate an alarm permanently, press the AL1 (or AL2) button repeatedly until its indicator light turns off.
Snooze Function:
- When an alarm sounds, press the SNOOZE button to delay the alarm for 9 minutes. This can be repeated.
Sleep Function:
- While listening to Radio, BT, or AUX mode, press the SLEEP button. The SLEEP indicator will light, and the display will show "15" (minutes).
- Repeatedly press the SLEEP button to cycle through sleep times (15, 30, 45, 60 minutes).
- To cancel, press SLEEP repeatedly until "OFF" is displayed, then wait 3 seconds.
FM Radio Operation:
- Automatic Scan: In RADIO mode, press and hold the PRESET button for 5 seconds to scan and save stations.
- Manual Scan: In RADIO mode, press and hold the SKIP buttons to search for stations automatically forward or backward. Press the SKIP buttons briefly to manually search.
- Presets: Tune to a desired station, hold PRESET until "P01" blinks, use SKIP buttons to select a preset location, then press PRESET to confirm. Up to 20 stations can be preset.
- Recall Presets: Press PRESET once, then use SKIP buttons to navigate through saved presets.
- Antenna: Fully extend the wire antenna and adjust its position for optimal reception.
Bluetooth (Wireless) Operation:
- In BT (Wireless) mode, "bt" will flash on the display, indicating pairing mode.
- On your device, select "YW-017" from the Bluetooth settings.
- A chime will sound, and "bt" will become solid on the display upon successful pairing.
- Use the PLAY/PAUSE button or SKIP buttons on the unit or external device to control music playback.
- If unpaired, press and hold the PAIR button for 3 seconds to re-enter pairing mode.
AUX In Operation:
- In AUX mode, connect an audio cable from your external device's audio out/line out/phone out jack to the AUX IN port on the YW-017.
- Ensure the external device's power is on.
Wireless Charging:
- Place a compatible smartphone on the WIRELESS CHARGING AREA.
- The WIRELESS CHARGING Indicator will light up. If it doesn't, reposition the phone.
- Remove the phone when fully charged.
- For effective charging, remove protective cases from the phone.
USB Charging:
- Connect a USB cable (not included) from the USB CHARGING Port on the unit to your external device.
- The device will begin charging. Disconnect when fully charged.
Dimmer Function:
- In clock mode, press and hold the DIMMER button repeatedly to set display brightness to High, Low, or Off.
- If the display is off, pressing any button will temporarily turn it on at Low brightness for 10 seconds.
Factory Reset:
- Long press the PLAY button for 5 seconds when the unit first powers up.
Maintenance Features
- Battery Replacement: When replacing backup batteries, ensure correct polarity (+/-) as shown in the diagram.
- Battery Type: Use only specified 'AAA' alkaline batteries for best performance. Do not mix old and new, or different types of batteries (alkaline, carbon-zinc, rechargeable).
- Battery Storage: Remove batteries if the unit will not be used for an extended period.
- Battery Safety: Do not attempt to recharge non-rechargeable batteries, dispose of batteries in fire, or allow them to leak or explode.
- USB Charging Precautions: Do not connect the unit's USB charging port to computer USB sockets or other USB chargers.
- Antenna Care: For weak FM reception, fully extend and adjust the wire antenna.