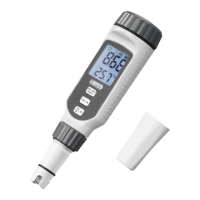
This document describes the Dr.meter PH Meter, model PH838, a cost-effective pH testing solution designed for both household and laboratory use. It is capable of reliably testing the pH balance of various liquids, including drinking water, pools, aquariums, foods, RO systems, spas, and hydroponics. The device is designed for ease of use, requiring users to simply remove a protective cap and immerse the electrode into the solution to be measured. For calibration, the meter comes with 6.86 and 4.01 pH buffers, and detailed instructions are provided within the manual.
Function Description
The Dr.meter PH Meter primarily functions as a pH meter, providing accurate readings of the pH value of a solution. It also measures and displays the environmental temperature. The device features an LCD display that shows the pH value, temperature, and various operational indicators such as timing, power, data retention, calibration status, and temperature unit.
Usage Features
The meter is equipped with several user-friendly features to enhance its functionality and ease of operation:
- ON/OFF Button / Data Retention: This button serves multiple purposes. A single press turns the device on. Pressing it again locks the current reading on the display, which is useful for recording stable measurements. To turn off the device, the button must be pressed and held.
- Calibration / Value Increase Button (CAL/▲): This button is crucial for calibration and adjusting values. In measuring mode, pressing and holding this button for 3 seconds initiates the calibration process. During calibration, it is used to increase values. Pressing and holding it during calibration allows for a quick increase in values.
- Backlight / Value Decrease Button (▼): This button controls the display backlight and adjusts values during calibration. A press of this button turns the backlight on or off, improving visibility in different lighting conditions. In calibration mode, it is used to decrease values, with a press and hold function for quick value decrease.
- pH Value Display: The main display area shows the measured pH value of the solution.
- Temperature Display: Below the pH value, the display shows the environmental temperature, providing additional context for the measurement.
- Electrode Probe: This is the sensing component that is immersed in the solution to take measurements. It is protected by a cap when not in use.
Operation Instructions:
Before initial use, users need to open the battery cap and install the batteries. If the electrode has been changed, or if it has been a month since the last calibration, the instrument must be recalibrated.
3-Point Calibration: The meter supports a 3-point calibration process for accuracy.
- Initiation: In measuring mode, press and hold the CAL/▲ button for 3 seconds.
- First Point (pH 4.00): The LCD will flash "CAL 1" and display "4.00". The electrode should be rinsed with distilled water and then immersed in a pH 4.00 solution. Once the reading stabilizes, "PAS" will appear, indicating successful calibration for the first point. The device then automatically proceeds to the second point.
- Second Point (pH 6.86): "CAL 2" will flash, and "6.86" will appear. Rinse the electrode and immerse it in a pH 6.86 solution. After stabilization, "PAS" will confirm success, and the device moves to the third point.
- Third Point (pH 9.18): "CAL 3" will flash, and "9.18" will appear. Rinse the electrode and immerse it in a pH 9.18 solution. Upon stabilization, "PAS" will indicate complete calibration, and the device returns to measuring mode.
- Manual Adjustment: If a buffer value doesn't match the preset value, it can be manually corrected using the CAL/▲ or ▼ buttons.
- Error Indication: If "Err" appears during calibration, it means the calibration failed, likely because the standard buffer solution is outside the calibration range.
Measuring Mode: This is the default mode when the device is turned on. It continuously displays the pH value and environmental temperature.
Battery Indicator: An icon in the right corner of the LCD display indicates when the battery needs to be changed. For long-term storage, it is recommended to remove the batteries.
Auto Off Function: The device has an auto-off feature to conserve battery life.
- Activation: Before turning on, press and hold the ON/OFF and CAL/▲ buttons simultaneously. The LCD will show "APO ON" or "APO OFF".
- Selection: Press the ON/OFF button to toggle between "APO ON" (auto-off after 15 minutes of inactivity, indicated by a timing icon) and "APO OFF" (device remains on indefinitely).
- Save: Press and hold the ON/OFF button to save the selection and exit.
Temperature Unit Conversion:
- Activation: Before turning on, press and hold the ON/OFF and ▼ buttons simultaneously. The LCD will show "°C" or "°F".
- Selection: Press the ON/OFF button to choose the desired unit.
- Save: Press and hold the ON/OFF button to save the selection and exit.
Outrange Indication: The backlight illuminates to indicate extreme pH values.
- Strong Acid: If the pH is below 3.5pH, the backlight turns on, signaling a strong acid.
- Strong Base: If the pH is above 12.5pH, the backlight turns on, signaling a strong base.
Maintenance Features
Proper maintenance is essential for ensuring the longevity and accuracy of the Dr.meter PH Meter.
- Electrode Cleanliness: The compound sensitive electrode must be kept clean at all times. Avoid frequently unplugging the electrode plug to prevent dust and moisture from entering the unit.
- Glass Ball Protection: The glass ball of the sensitive PH compound electrode should not touch any hard objects to prevent damage.
- Cleaning the Electrode: If the electrode becomes dirty, gently wipe it with medical cotton or rinse it with a 0.1 MOL/L HCL solution.
- Electrode Replacement: For optimal accuracy, replace the electrode if it shows cracks or burn-in. A new electrode should be immersed in a 3 MOL/L KCL solution for 24 hours before use.
- Buffer Solution Preparation: When preparing standard buffer solutions, ensure cleanliness for the best results. The manual provides instructions for making buffer solutions from the included sachets (pH 4.00, 6.86, and 9.18) by adding their contents to 250ml of distilled water and waiting 30 minutes for dissolution. Each bottle should be clearly labeled.
- Recalibration Necessity: The instrument requires recalibration in specific scenarios:
- If the electrode has been unused for a long time or is new.
- After measuring concentrated acids (pH < 2) or strong alkali solutions (pH > 12).
- After measuring solutions containing fluoride, acid (pH < 7), and concentrated organic solutions.
- Selecting Buffer Solution: Always choose a standard buffer solution that is closest to the expected pH value of the test solution for the most accurate measurements.
- Protective Cap: After use, always replace the protective cap to protect the glass ball of the electrode.
- KCL Solution for Storage: Ensure the glass ball of the sensitive PH compound electrode is kept in 3.3 MOL/L KCL solution under humid conditions when not in use.
- Electrode Outlet: Keep the electrode outlet dry and clean for best results.
- Avoid Prolonged Immersion: Do not immerse the electrode in distilled water, protein solution, or acid fluoride solution for extended periods.
- Silicone Grease: The electrode must not come into contact with silicone grease.
- Electrode Renewal: To renew a passivated electrode, immerse it in a 4% HF solution for 3-5 seconds, then rinse with distilled water, and soak it in a KCL solution. If the electrode is contaminated or blocked, rinse it with an appropriate solution based on the properties of the contaminating substances.