Section 3 -
Setting Box Addresses for Relay Boxes
Up to sixteen Relay Boxes can be controlled by one keypad.
This section explains how to set up the relay box address.
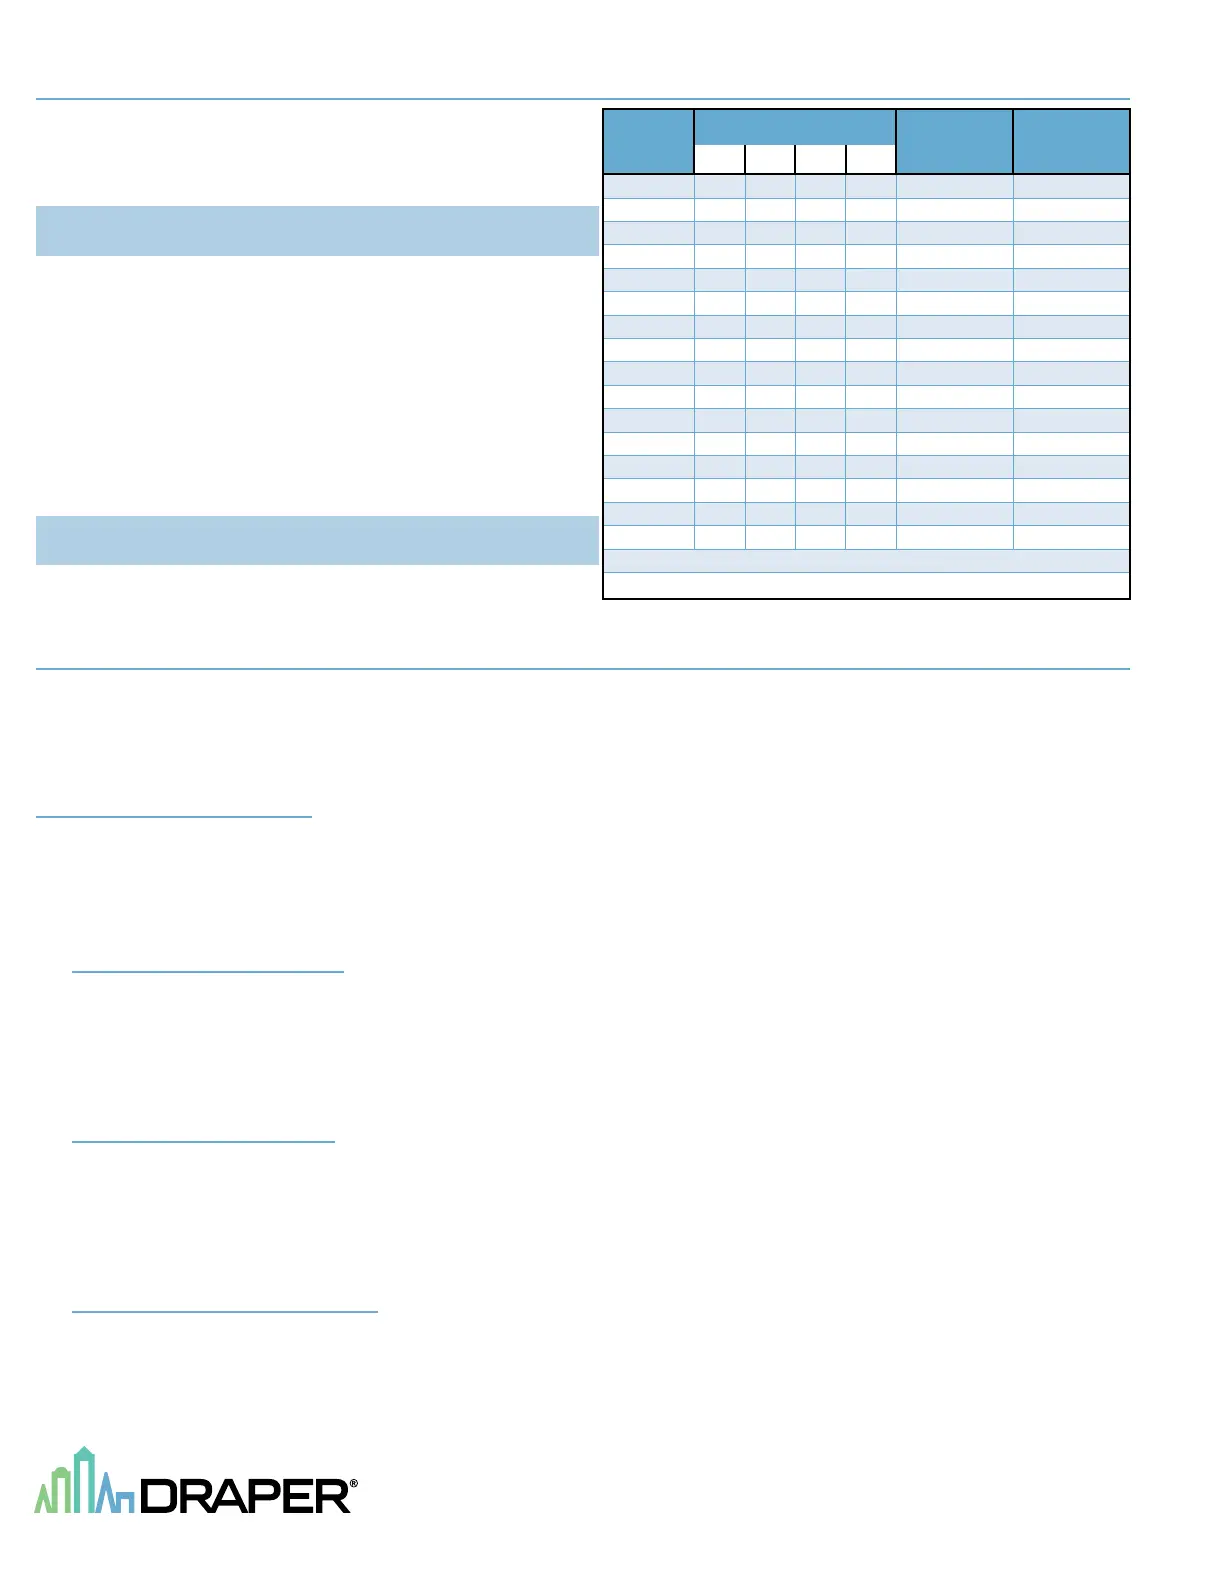
The 4-position dipswitch inside the Relay Box sets the box address.
The following table shows the state of the dipswitch positions.
Please Note: Box addresses are permanently set only after the unit
is re-powered.
When the box address is set, this determines the index of the relays in the box.
Each box contains 8 pairs of relays for driving motors, one relay for up and one for
down. Each pair of relays has an index associated with it.
For example relays 1 and 2 in box address 0 will be Device 1.
Relays 1 and 2 in box address 1 will be Device 11 and so on.
This is important for programming which relay set will control which apparatus.
Each box also has two auxiliary outputs for driving other gymnasium apparatus
such as scoreboards, PA systems, etc.
There can be up to 16 outputs, 9 and 10 are in box address 0, and 19 and 20 are in
box address 1 and so on
(see table at right).
Please Note: Installer should complete Relay Assignment Worksheets
(see page 4) as assignments are made.
Section 4 - Programming Passwords for the EZ Pad Plus Touch Pad
Touch Pads are shipped with a default user code of 555555 and a Supervisor’s code of 777777.
(Passwords should be changed during initial installation and programming. This password should also be changed anytime someone that should not be authorized to
operate equipment learns it or if someone leaves the facility.)
If codes are forgotten, please contact Draper for "back door code."
Passwords are stored in the touch panel, so passwords will need to be changed on every Touch Pad on network.
Section 4.1 - Supervisor Code
The following instructions will allow the supervisor to change the user code and make changes in setup at any time.
Passwords are stored in the touch panel, so passwords will need to be changed on every Touch Pad on network.
Touch any key to start. At “Enter Password”, enter the Supervisor Password Code.
Press the Set Up key. This will show the options of: 1) Config System; 2) Config Group; 3) Config Device Box.
Section 4.1.1 - Config System
When “Config System” is chosen, three options will be shown:
1 Set Time Out – Adjust Time Out to a minimum of 360 Seconds. Failure to do so could cause operational issues that could affect the warranty.
2 Set Password – Allows the supervisor to change the 6-digit Supervisor Password, Operator Password or Reset the passwords to the original numbers.
3 Reset Default – Choosing this option resets the entire unit to the original factory settings.
Section 4.1.2 - Config Group
When “Config Group” is chosen, three options will be shown:
1 Display Group – Displays the saved groups.
2 Add Group – Allows up to 9 groups (1-9) to be added with maximum of 8 devices, per group.
3 Delete Group – Allows a particular group(s) to be deleted.
Section 4.1.3 - Config Device Box
When “Config Device Box” is chosen, three options will be shown:
1 Display Device Box – Displays the available device boxes being used in the system.
2 Add Device Box – Allows up to 16 device boxes (0 -15) to be added. Each Relay Box number must be entered at each Touch Pad.
3 Delete Device Box – Allows a particular device box to be deleted.
Relay
Box No.
Dip Switch
Up/Down
Devices
Auxiliary
Devices
1 2 3 4
0 X X X X 1 - 8 9 - 10
1 X X X O 11 - 18 19 - 20
2 X X O X 21 - 28 29 - 30
3 X X O O 31 - 38 39 - 40
4 X O X X 41 - 48 49 - 50
5 X O X O 51 - 58 59 - 60
6 X O O X 61 - 68 69 - 70
7 X O O O 71 - 78 79 - 80
8 O X X X 81 - 88 89 - 90
9 O X X O 91 - 98 99 - 100
10 O X O X 101 - 108 109 - 110
11 O X O O 111 - 118 119 - 120
12 O O X X 121 - 128 129 - 130
13 O O X O 131 - 138 139 - 140
14 O O O X 141 - 148 149 - 150
15 O O O O 151 - 158 159 - 160
X = OFF
O = ON
page 2 of 4
E Z-Pad Pl u s
®
 Loading...