5
± 90 minutes (lowest
setting)
Heat-up time Instantly (open ame)
± 25 seconds (tips)
Nominal heat input 12 g/h (consumption)
Cool-down time Flame guard: 15 min.
(< 25°C)
Tips: 17 min. (< 25°C)
Temperature 1200°C (open ame)
680°C (hot air)
550°C (tips)
Weight 135 grams (empty tool)
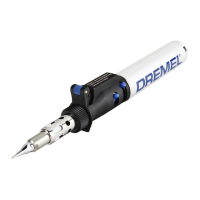
USE
Please familiarize yourself with the components of the
Dremel Versatip (picture 1), the different tips (picture
6) and the kit content (picture 7) before use.
DREMEL VERSATIP
A. Catalyst
B. Flame guard
C. Flame guard nut
D. Ceramic insulator
E. Child Safety Lock (stopper)
F. Trigger
G. Lock (for continuous working)
H. Flame control knob
I. Tank
J. Filling valve
KIT CONTENT
A. Tool with cap
B. Pocket to store cap
C. Shaping knife
D. Wide ame head
E. Deector
F. Pocket for soldering tip
G. Additional empty pocket
H. Cutting knife
I. Hot air tip
J. Tin box with soldering sponge
K. Tin box for hot tips
L. Soldering tin
M. Pocket for 2 wrenches
Remove the carton cover from the ignition switch
before using the Dremel Versatip.
(RE)FILLING THE TANK
The Dremel Versatip runs on liquid butane gas. Make
sure the gas you are using is rened butane gas that
can also be used in lighters.
Hold tool and container as shown in picture 8. Then
ll the tank with liquid butane gas observing the
instructions on the butane gas container. The tank
is full when liquid butane gas escapes through the
lling valve.
!
WARNING
DO NOT OVERFILL THE TANK!
GETTING STARTED
The Dremel Versatip is equipped with a child safety
mechanism. This mechanism requires two handed
operation to protect against (accidental) ignition by
children.
1. See pictures 2 and 3 to ignite the Dremel
Versatip.
2. The ceramic insulator will start to glow shortly
after ignition. When this is not the case, repeat
steps 1 and 2. When the Dremel Versatip is cold,
ignition might cause a short whistling sound. This
is normal and does not mean there is something
wrong with the tool.
* Note: the flame guard must be installed correctly, for
the tool to be able to ignite.
When the ignition switch is released, the ow of gas is
automatically shut off, causing the Dremel Versatip to
stop and slowly cool down. To continuously operate the
Dremel Versatip, follow the steps in pictures 2, 3 and 4.
To switch the Dremel Versatip off, let go of the ignition
switch and move the lock button to the right (picture 5).
This will immediately stop the ow of butane gas.
USING WITH AN OPEN FLAME
To use the Dremel Versatip with an open ame,
unscrew the ame guard, remove the catalyst (and tip
if attached) and screw ame guard back onto the tool
and securely tighten the ame guard nut.
FLAME LENGTH AND TEMPERATURE
ADJUSTMENT
After ignition, make sure the tool is on by checking
that the catalyst starts to glow. Then move the ame
control lever to the right to increase ame length and
temperature, or to the left to decrease ame length
and temperature. When using the open ame or hot
air the Dremel Versatip is at the correct temperature
immediately after ignition. Please allow 25 seconds of
heat up time for tips.
INSTALLING OR CHANGING TIPS
!
WARNING
ALWAYS ALLOW THE TOOL TO
COOL FULLY BEFORE
REMOVING OR REPLACING TIPS.
Make sure to use the right tip for the job you want to
do. Only use tips that t onto the tool perfectly. Loose
tting tips might result in an uncontrolled and unsafe
ame.
The use of tips requires the catalyst to be installed.
To install the catalyst unscrew the ame guard nut
and remove the ame guard. Slide in the catalyst into
the ame guard with the narrow part facing outward.
Place the ame guard and catalyst back on to the
tool and securely tighten the ame guard nut. The
soldering tip, cutting knife tip, shaping knife tip and
hot blower tip can be screwed onto the catalyst.
Secure the bits tightly using the 7mm wrench. To
remove a tip, simply use the 7 mm wrench to unscrew
 Loading...