EasyManua.ls Logo

DryBuddy FLEX 3 - User Manual

DryBuddy FLEX 3
3 pages
Print Icon
To Next Page IconTo Next Page
Loading...
The DryBuddyFLEX 3 is the third generation of the
DryBuddyFLEX bedwetting, enuresis and incontinence
detection and alarm system, and provides improvements and
enhancements over previous versions. It is a very feature-rich
true wireless system, where no wires of any kind are attached to
or worn by the user. It has been designed to provide unmatched
convenience, ease-of-use and exibility to the user and
caregiver, and oers many useful features and options to allow it
to be customized for the user.
The DryBuddyFLEX 3 oers one-button user simplicity. It
also allows customization of its many features so that it best
matches the needs of the user and the caregiver. After the
DryBuddyFLEX 3 system has been set up as required, the
user only needs to use the Power button on the Transceiver
to operate the system. The Remote oers additional
convenience for the user and the caregiver.
Where can the DryBuddyFLEX 3 be used?
The DryBuddyFLEX 3 can be used at home or any place where
there is an AC (alternating current) electric power source and
receptacle. It comes with a special power adaptor that allows ready
use with standard electric plug sockets in the U.S. (North America),
U.K. (United Kingdom) and EU (European Union). A 110 – 240 V AC
50/60 Hz electric power source must be used. For nations with a
dierent plug design, a plug adaptor may be needed.
Setting up the DryBuddyFLEX 3
Place the Transceiver on a bed-side table or other
convenient location.
Attach the plug at the end of the power cord from the power
supply to the socket at the end of the short cord of the
Transceiver. (See Fig. 6A – 6D)
Plug the Power Supply into a live electric wall socket. The
Power button will show a Yellow light. The system is now in
its SLEEP state.
Press the Power button on the Transceiver once. A Green
light will show under the button. The system is now in its
READY state, ready to receive a signal from the Sensor.
Attach the Sensor to the patient’s briefs or special wetness
sensing briefs. The wetness sensing briefs should have
been gently washed and dried before use. (See Panel A4)
The alarm has been pre-set to Audio (Trumpet Fanfare) at
maximum volume.
When the alarm sounds, a Red light will also ash under the
Power button. The alarm can be switched OFF manually by
pressing the Power button on the Transceiver, or remotely
by pressing the OFF button on the Remote. A Yellow light
will show under the Power switch. Make certain that the
child or patient is awake and gets out of bed before turning
the alarm OFF.
Remove the sensor and other items that may be soiled,
wash and dry them, and re-attach them to the patient’s
fresh briefs.
To reset the system so that it will be triggered by wetness,
press the Power button manually or press the ON button
on the Remote. The Power button will show a Green light
indicating that the system is in its READY state. The system
is again ready to be triggered by the Sensor when it detects
wetness.
If the DryBuddyFLEX 3 system is not being used, you can
turn the system completely OFF (Optional) by disconnecting
the power supply cable from the Transceiver.
Note: To conserve the Sensor’s sealed battery, once the Sensor
is triggered, it is automatically switched OFF for two (2) minutes.
Please wash and clean the sensor while it is OFF. If washed later,
it may re-trigger the Sensor. This does no harm except to use the
non-replaceable battery a little. To prevent false alarms, please
reset the Transceiver to its READY state after the cleaned Sensor
has been re-attached to the user’s fresh briefs.
Note: The DryBuddyFLEX 3 is designed to be perspiration
resistant. It requires a rapid increase in urine at the sensor
(coming in a “rush”). The magnetic Sensor senses the wetness
at the narrow gap separating the two large magnets. Position
the Sensor on the briefs so that urine is likely to fall directly
on the Sensor and at this gap. The Sensor may not respond
adequately to plain water or a creep in wetness soaking through
the briefs. Salt water should be used for any testing. Once the
DryBuddyFLEX 3 system has been set up, the easiest way
to test by activating the Sensor is to dip both magnets of the
Sensor into a cup of salt water.
Note: The feature-rich DryBuddyFLEX 3 is the most
sophisticated bedwetting alarm available today. It has many
The DryBuddyFLEX 3 or DryBuddyFLEX 3 Briefs system comes
ready-to-use. The included Sensor, Remote and Transceiver
have been synchronized with one-another at the factory. The
feature-rich DryBuddyFLEX 3 can be used simply by following
the following instructions. To use additional features please
refer to the additional instructions at www.DryBuddy.com:
www.DryBuddy.com Our Products DryBuddyFLEX
DryBuddyFLEX 3 Instructions
The DryBuddyFLEX 3 system consists of:
• A Sensor, which consists of a magnetic sensor with a built-in
wireless transmitter, and its magnetic “cap.” When used with
standard cotton briefs, the material of the briefs are clamped
between the magnets of the Sensor and the Cap. (See Fig. 1)
• A Transceiver, which receives the wireless signals from the
Sensor and Remote and alerts. It also re-transmits to other
transceivers (if used) so that all transceivers behave alike. A
power supply is included. (See Fig. 4A and 4B)
• A Remote, which wirelessly sends signals to the Transceiver
to control its behavior. (See Fig. 5)
Note: The Remote is optional, and may not be included
depending on which DryBuddyFLEX system has been
purchased. In the Instructions, please ignore matters
relating to the Remote if you do not have it.
The DryBuddyFLEX 3 Briefs system consists of the DryBuddyFLEX
3 system described above plus two (2) DryBuddy wetness sensing
briefs of the ordered size.
All DryBuddyFLEX 3 parts and wetness sensing briefs can be
obtained from DryBuddy.
DryBuddyFLEX 3 Quick-Use
Instructions (Con’t)
DryBuddyFLEX 3 Quick-Use Instructions
A3A1 A2
useful features which can be individually set and controlled by
the user. Understanding the DryBuddyFLEX 3 helps the user to
benet from its extra-ordinary capabilities. Learn more about
it on www.DryBuddy.com. Please contact DryBuddy with any
questions or comments at:
Tel: 1-912-352-8854 or email: Service@DryBuddy.com
To set the Transceiver’s sound and volume, use a
straightened metal paper clip, toothpick or similar narrow and
blunt device to push the buttons on the side of the Transceiver.
(See Fig. 4B) The Transceiver must be in its SLEEP state (Yellow
light) to activate these buttons.
Sound: Each time the Sound switch is pressed, it is switched to
the next sound in the order:
Trumpet fanfare Berlin police siren Silence (no sound)
The Silence setting can be used if the audio alarm is to be silent.
Volume: There are ve (5) volume levels. Each time the + or
button is pressed, the volume will increase or decrease by one level.
This new level will be heard if the sound is set to an audio setting.
Simple Daily Use
The DryBuddyFLEX can be set up to facilitate control of the
Transceiver and the ability of the patient (child) to control the
system. If you are not using a Remote, please ignore anything
about the Remote.
Universal Use (One-Button and Remote Use)
(This is the default factory setup)
Allows the caregiver and patient to turn the Transceiver ON or OFF
using the button on the Transceiver and/or the Remote.
To set the system to Universal Use, rst trigger the Sensor (One beep
is heard). The Transceiver light will become Blue ashing for 15
seconds and will then turn Green. If using a Remote, while the Blue
light is ashing, press the OFF button on the Remote (2 beeps are
heard). The light will then turn Green.
To Use: Switch the Transceiver to READY by pushing its power
button or the ON button of the Remote. A Green light will show.
When the alarm sounds, press the Transceiver’s power button or
the OFF button on the Remote to stop the alarm and place the
Transceiver in its SLEEP state (Yellow light).
When the cleaned sensor is reattached to the patient, press the power
button or the ON button on the Remote to switch the Transceiver to its
READY state. It can now be triggered again by the sensor.
Remote Only Use (if a Remote is used)
Used when the patient (child) is not allowed to switch the system ON.
The system can only be switched ON or OFF by using the Remote.
To set the system to Remote use, rst trigger the Sensor (one beep
is heard). While the Blue light ashes (for 15 seconds) press the ON
button on the Remote when synchronizing (2 beeps are heard).
To Use: Press the Remote’s ON button to switch the Transceiver to
its READY state (Green light).
When the alarm sounds, press the Remote’s OFF button to stop the
alarm and place the Transceiver in its SLEEP state (Yellow light). The
alarm can also be turned OFF by pressing the button on the Transceiver.
When the cleaned sensor is reattached to the patient, press
the Remote’s ON button to switch the Transceiver to its READY
state. It can now be triggered again by the sensor.
1.
2.
3.
4.
5.
6.
7.
8.
9.
10.
DryBuddyFLEX 3 Introduction
DryBuddyFLEX 3 System Contents
DryBuddyFLEX 3 Quick-Use
Instructions (Con’t)
Question and Answer IconNeed help?

Do you have a question about the DryBuddy FLEX 3 and is the answer not in the manual?

Summary

DryBuddyFLEX 3 Introduction

Where Can DryBuddyFLEX 3 Be Used?

Details on locations and power requirements for using the DryBuddyFLEX 3 system.

DryBuddyFLEX 3 System Components

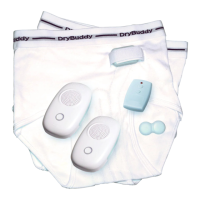
Lists the essential parts of the DryBuddyFLEX 3 system, including Sensor, Transceiver, and Remote.

DryBuddyFLEX 3 Quick-Use Instructions

Setting Up the DryBuddyFLEX 3

Step-by-step guide to connect and prepare the DryBuddyFLEX 3 system for use.

Simple Daily Use and Operation Modes

Explains basic operation and modes like Universal and Remote-only use.

Attaching the Wireless Magnetic Sensor

Instructions on how to properly attach the magnetic sensor to briefs.

Synchronizing the DryBuddyFLEX 3 System

Essential steps for pairing the Sensor, Transceiver, and Remote for system functionality.

Other DryBuddyFLEX 3 Features, Controls, and Operations

Cautions When Using the DryBuddy System

Overview

The DryBuddyFLEX 3 is a third-generation bedwetting, enuresis, and incontinence detection and alarm system designed to be a feature-rich, true wireless system with no wires attached to or worn by the user. It aims to provide convenience, ease-of-use, and flexibility, offering many customizable features and options for both the user and caregiver.

Function Description

The core function of the DryBuddyFLEX 3 is to detect wetness and trigger an alarm. The system consists of three main components: a Sensor, a Transceiver, and an optional Remote. The Sensor, a magnetic device with a built-in wireless transmitter, attaches to the user's briefs. When the material of the briefs between the Sensor's magnets becomes quickly wet, the Sensor transmits a wireless signal. The Transceiver receives this signal and activates an alarm, which can be an audio alarm (Trumpet fanfare or Berlin police siren) or silent. The Transceiver also re-transmits signals to other connected transceivers, ensuring all units behave alike. The optional Remote provides additional convenience for controlling the system wirelessly. The system is designed to be perspiration resistant, requiring a rapid increase in urine at the sensor to trigger. It senses wetness at the narrow gap separating its two large magnets.

Usage Features

The DryBuddyFLEX 3 emphasizes one-button user simplicity. After initial setup, the user primarily interacts with the Power button on the Transceiver, or the ON/OFF buttons on the Remote for additional convenience.

Setting Up the System:

  1. Place the Transceiver in a convenient location, such as a bedside table.
  2. Connect the power cord from the power supply to the Transceiver's socket.
  3. Plug the power supply into a live electric wall socket. The Power button on the Transceiver will illuminate Yellow, indicating the system is in its SLEEP state.
  4. Press the Power button once. It will show a Green light, signifying the system is in its READY state, prepared to receive a signal from the Sensor.
  5. Attach the Sensor to the patient's briefs or special wetness sensing briefs. The wetness sensing briefs should be gently washed and dried before use.
  6. The alarm is pre-set to "Audio (Trumpet Fanfare)" at maximum volume.

Daily Use:

When the alarm sounds (accompanied by a flashing Red light under the Power button), it can be turned OFF manually by pressing the Power button on the Transceiver, or remotely by pressing the OFF button on the Remote. A Yellow light will then show under the Power switch. It's crucial to ensure the child or patient is awake and out of bed before turning the alarm OFF. After the Sensor and other soiled items are cleaned and re-attached to fresh briefs, the system needs to be reset to its READY state to be triggered by wetness again. This is done by pressing the Power button manually or the ON button on the Remote, which will show a Green light.

Customization:

The Transceiver's sound and volume can be adjusted using buttons on its side while it is in the SLEEP state (Yellow light). A straightened paper clip, toothpick, or similar narrow device is needed to push these buttons.

  • Sound: Each press of the Sound switch cycles through "Trumpet fanfare," "Berlin police siren," and "Silence." The "Silence" setting allows the audio alarm to be silent.
  • Volume: There are five volume levels. Pressing the + or - button increases or decreases the volume by one level, which will be heard if an audio setting is selected.

Universal Use (One-Button and Remote Use) - Default Setup:

This mode allows both caregiver and patient to turn the Transceiver ON or OFF using either the Transceiver's button or the Remote.

  • To set up: Trigger the Sensor (one beep). The Transceiver light will flash Blue for 15 seconds, then turn Green. If using a Remote, press the OFF button on the Remote while the Blue light is flashing (two beeps), and the light will turn Green.
  • To use: Switch to READY by pushing the Transceiver's power button or the Remote's ON button (Green light). When the alarm sounds, press the Transceiver's power button or the Remote's OFF button to stop the alarm and place the Transceiver in SLEEP state (Yellow light). After cleaning and reattaching the sensor, press the power button or Remote's ON button to switch to READY state.

Remote Only Use (if a Remote is used):

This mode is for situations where the patient (child) is not allowed to switch the system ON. Only the Remote can switch the system ON or OFF.

  • To set up: Trigger the Sensor (one beep). While the Blue light flashes (for 15 seconds), press the ON button on the Remote (two beeps).
  • To use: Press the Remote's ON button to switch the Transceiver to READY state (Green light). When the alarm sounds, press the Remote's OFF button to stop the alarm and place the Transceiver in SLEEP state (Yellow light). The alarm can also be turned OFF by pressing the button on the Transceiver. After cleaning and reattaching the sensor, press the Remote's ON button to switch to READY state.

Synchronization:

Synchronization allows the Sensor, Transceiver, and optional Remote to recognize each other and work together. A new system comes pre-synchronized. However, synchronization is required when a new Transceiver, Sensor, or Remote is introduced, or if synchronization has been lost.

  • To synchronize:
    1. Attach the Transceiver to its power supply, ensuring it's in SLEEP state (Yellow light).
    2. Press the Synch button on the side of the Transceiver. The Power button light will flash BLUE for 15 seconds.
    3. Trigger the Sensor by dipping both magnets in salt water or pressing a clean, non-oily key or knife against both magnets. A beep will be heard, and the light continues flashing BLUE.
    4. If a Remote is not used, let the Blue light flash for 15 seconds, then the Transceiver light will turn GREEN.
    5. If a Remote is used, press the OFF button on the Remote while the BLUE light is flashing. Two beeps will be heard, and the flashing BLUE light will turn GREEN. Once the Transceiver light turns GREEN, the system is synchronized. If the process isn't completed within 15 seconds, restart from the beginning.

Testing the Sensor:

The easiest way to test the system after setup is to dip both magnets of the Sensor into a cup of salt water. Plain water is less effective for testing.

Maintenance Features

Sensor Care:

After the Sensor is triggered, it automatically switches OFF for two minutes to conserve its sealed battery. It's recommended to wash and clean the Sensor while it is OFF. If washed later, it may re-trigger, which uses a small amount of battery. To prevent false alarms, reset the Transceiver to its READY state after the cleaned Sensor has been re-attached to fresh briefs.

Attaching the Sensor:

  • Standard Cotton Briefs: The Sensor is attached to the outside of the briefs at the point of urination, with the stainless steel magnets pointing towards the body. The magnetic Cap is placed on the inside, directly opposite the magnets, clamping the briefs between the Sensor and Cap. For male briefs with a pouch, the Sensor should be placed inside the pouch with the magnets pointing towards the body.
  • Optional DryBuddy Wetness Sensing Briefs: The patient wears the briefs. The Sensor's male snaps are inserted into the female snaps at the waist of the briefs and firmly attached. The Velcro is firmly strapped around the Sensor to help keep it in place.
  • Detaching the Sensor: When detaching the sensor from snaps on the briefs, hold the briefs at one sensor location and gently detach the sensor with the other hand for both snaps. Pulling the sensor off without holding the snaps can damage them.

General Care:

Observe all sanitary precautions to keep the sensor and alarm parts clean and dry. Do not use the sensor for more than one user without thorough cleaning. Do not strike the magnetic sensor or cap on hard surfaces or make them hot, as this can reduce magnetism.

The DryBuddyFLEX 3 is designed in the USA and assembled in China. It is intended for use as a bed-wetting and enuresis alarm by children aged five and older, or as recommended by a medical authority. It can also be used by older patients as a urine sensor and wetness alarm and an incontinence alarm. It is a medical device and should be treated as such. It is not to be used as a potty training aid for babies, toddlers, and young children. Ensure no parts of the DryBuddy or sensor are put in the mouth to prevent choking.

DryBuddy FLEX 3 Specifications

General IconGeneral
Product TypeBedwetting Alarm
ConnectivityWireless
Power Source (Receiver)AC Adapter
Age RangeChildren and Adults
Warranty1 Year Limited Warranty
Alarm TypeSound, Vibration, Light
WaterproofYes (Transmitter)
FeaturesAdjustable Volume