162
Practical information
07
Before disconnecting the nozzle from the
charging connector:
► If the vehicle is unlocked, lock it and then
unlock it.
► If the vehicle is locked, unlock it.
The red indicator lamp in the flap goes out to
confirm that the charging nozzle is unlocked.
► Within 30 seconds, remove the charging
nozzle.
Domestic charging (mode 2)
The end of charging is confirmed by the fixed
lighting of the greenCHARGEindicator lamp on
the control unit and by the fixed lighting of the
green light guides in the flap.
► After disconnection, remove the protective
cover from the nozzle and close the charging flap.
► Disconnect the control unit's charging cable
from the domestic socket.
Accelerated charging (mode3)
The end of charging is confirmed by the
accelerated charging unit (Wallbox) and by the
fixed lighting of the green light guides in the flap.
► After disconnection, replace the nozzle on the
charging unit and close the charging flap.
Deferred charging
By default, charging begins when the nozzle
is connected. Deferred charging can be
programmed.
► Have a professional check that the
electrical system to be used complies with
applicable standards and is compatible with
the vehicle.
► Have a professional electrician install
a dedicated domestic power socket or
accelerated charging unit (Wallbox)
compatible with the vehicle.
Use the charging cable supplied with the
vehicle.
(During charging)
Never work under the bonnet:
– Some areas remain very hot, even an hour
after charging ends - risk of burns!
– The fan may start at any time - risk of cuts or
strangulation!
After charging
Check that the charging flap is closed.
Do not leave the cable connected to the
domestic power socket - risk of short-circuit
or electrocution in the event of contact with or
immersion in water!
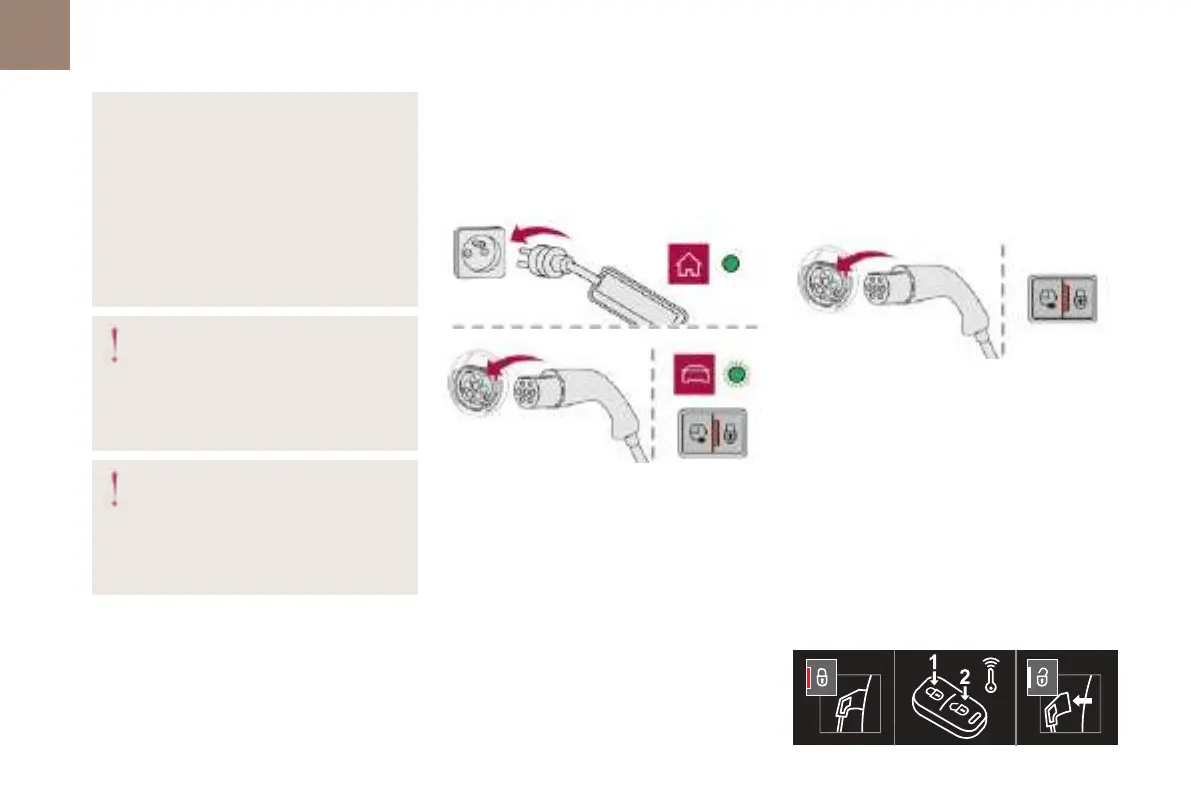
Charging procedure
Connection
► Before charging, check that the gear selector
is in mode P and the ignition is off, otherwise
charging is impossible.
► Open the charging flap by pressing the push
button and make sure that there are no foreign
bodies on the charging connector.
The light guides in the flap light up in white.
Domestic charging (mode 2)
► First, connect the charging cable from the
control unit to the domestic socket.
When the connection is made, all of the indicator
lamps on the control unit light up, then only the
POWER indicator lamp remains on in green.
► Remove the protective cover from the
charging nozzle.
► Insert the nozzle in the charging connector.
The start of charging is confirmed by the flashing
of the green light guides in the flap and the
flashing of theCHARGEindicator lamp in green on
the control unit.
If this is not the case, charging has not
started; restart the procedure ensuring that all
connections are made properly.
The red indicator lamp in the flap comes on to
indicate that the nozzle is locked.
Accelerated charging (mode3)
► Follow the instructions for use of the
accelerated charging unit (Wallbox).
► Remove the protective cover from the
charging nozzle.
► Insert the nozzle in the charging connector.
The start of charging is confirmed by the flashing
of the green light guides in the flap.
If this is not the case, charging has not
started; restart the procedure ensuring that all
connections are made properly.
The red indicator lamp in the flap comes on to
indicate that the nozzle is locked.
Disconnection
 Loading...