Do you have a question about the Dual Electronics Corporation XCAM200 and is the answer not in the manual?
Connects camera power wire to the vehicle's reverse lamp positive wire.
Connects camera power wire to the receiver/monitor power wire.
Defines warranty applicability to original purchasers and product coverage.
Details what is not covered, including accidents, misuse, and consequential damages.
Advises checking troubleshooting guides before contacting support.
Outlines proper procedures for packing and shipping the product for service.
Specifies required written details and contact information for service.
Provides toll-free number and email for service center inquiries.
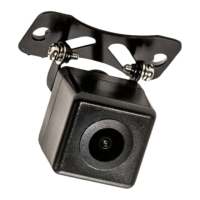
The XCAM200 is a rearview camera designed to enhance vehicle safety by providing a clear view behind the vehicle, complete with optional reverse/parking assist lines. This device is intended to be mounted on the exterior of a vehicle, offering drivers an improved perspective when backing up or parking.
The primary function of the XCAM200 is to transmit a video feed of the area behind the vehicle to a compatible receiver or monitor (not included). This video feed helps drivers identify obstacles, pedestrians, or other vehicles that might be in their blind spot, thereby reducing the risk of accidents during reverse maneuvers. The camera utilizes a CMOS image sensor to capture video, which is then transmitted via an RCA video cable.
A key feature of the XCAM200 is its ability to display reverse/parking assist lines on the screen. These lines provide visual guides that help drivers estimate distances and trajectory when backing into a parking space or navigating tight areas. The camera is designed to operate effectively in various lighting conditions, including low-light environments, thanks to its low Lux rating. It also features automatic white balance, ensuring consistent and accurate color representation in the video feed. The wide viewing angle of 170 degrees provides a broad perspective of the rear area, minimizing blind spots.
The camera is built to withstand outdoor conditions, boasting an IP67 rating, which signifies its resistance to dust and water ingress. This makes it suitable for continuous exterior use on a vehicle. Its operational temperature range ensures reliability in diverse climates.
Installation of the XCAM200 involves careful consideration of the mounting location to ensure an optimal view. It is recommended to avoid mounting the camera directly next to or under reverse/backup lamps or license plate lamps, as the glare from these lights can impair the camera's vision at night. The camera should be mounted flat against the chosen surface for proper installation.
There are two primary wiring options for connecting the XCAM200, offering flexibility depending on the vehicle's setup and the user's preference:
Option 1 (Connect to Vehicle's Reverse Lamp): In this configuration, the camera's red power wire is connected to the positive 12-volt wire of the vehicle's reverse lamp, and the black wire is connected to ground. This setup ensures that the camera automatically powers on when the vehicle is shifted into reverse. The video RCA cable is then run from the camera to the receiver/monitor. A red power wire located on either end of the video RCA cable in this option is not needed and should be capped or taped off to prevent potential power interruption.
Option 2 (Connect to Receiver/Monitor Power): This option involves connecting the camera's red power wire to a red power wire from one end of the video cable at the camera location, and the black wire to ground. The video RCA cable is then run to the receiver/monitor. At the receiver/monitor location, the red power wire from the end of the video cable is connected to the reverse wire lead of the video source. This method allows the camera to be powered and activated through the receiver/monitor's reverse trigger input.
A distinctive usage feature is the "Blue Loop" wire. This blue wire, if left intact, enables the display of the back-up lines on the screen. If the user prefers not to have these assist lines, the blue loop can be cut. It is crucial to insulate the two ends of the cut blue wire to prevent them from touching each other or shorting to ground, which could lead to electrical issues.
The camera's adjustable mount allows for precise positioning and angling, ensuring the best possible view of the area behind the vehicle. The included mounting screws and foam rubber mounting pad facilitate secure and stable installation.
The XCAM200 is designed for low maintenance, primarily due to its robust construction and IP67 rating. The plastic camera body is durable and resistant to environmental factors.
Regular cleaning of the camera lens is recommended to ensure a clear and unobstructed view. Dust, dirt, mud, or water spots can accumulate on the lens, potentially degrading image quality. A soft, damp cloth can be used to gently wipe the lens clean. Avoid using abrasive cleaners or materials that could scratch the lens surface.
Periodically, it is advisable to inspect the wiring connections for any signs of wear, corrosion, or looseness. Secure connections are vital for consistent power supply and video signal transmission. If any connections appear compromised, they should be re-secured or repaired as necessary, using crimp connectors or soldering tools for a robust connection.
The camera's design, with its sealed housing, means that internal components are protected from the elements, reducing the need for internal maintenance. The "Blue Loop" feature, while a user-configurable option, does not require ongoing maintenance once the decision to cut or leave it intact has been made, beyond ensuring proper insulation if cut.
The overall design emphasizes durability and ease of use, minimizing the need for frequent adjustments or repairs under normal operating conditions. The camera's ability to operate across a wide temperature range also contributes to its reliability in various climates, reducing the likelihood of performance issues due to extreme heat or cold.
| Brand | Dual Electronics Corporation |
|---|---|
| Model | XCAM200 |
| Waterproof | Yes |
| Image Sensor | CMOS |
| Waterproof Rating | IP67 |
| Night Vision | Yes |
| Voltage | 12V DC |
| Type | Rear View Camera |
| Parking Lines | Yes |