Do you have a question about the Dualit CONVEYOR and is the answer not in the manual?
Verify that the appliance's voltage rating matches the main supply before connecting.
Do not immerse any part of the product in water or other liquids to prevent electrical shock.
The appliance must be attended at all times while it is in use.
Unplug the appliance from the outlet or isolate from the supply when not in use.
Use this appliance only for its intended purpose as described in this manual.
Position the toaster on a flat surface with sufficient free space, away from children.
Do not cut or remove the plug or grounding prong from the plug.
Do not use food with coatings or fillings that may drip; toaster is for bread only.
Do not attempt to dislodge bread when the toaster is plugged in.
Ensure walls near the toaster are non-combustible and adhere to fire regulations.
Appliance use is not intended for persons with reduced capabilities without supervision.
Children should be supervised to ensure they do not play with the toaster.
Take extra care when using appliances with moving parts.
Be aware of hot surfaces on the outside cover of the toaster.
Never insert sharp or abrasive objects into the toasting chamber.
Allow the appliance to cool before cleaning, removing, or installing parts.
Use correct replacement fuses, ensuring the fuse cover is fitted and value is original.
Do not operate the appliance with a damaged cord or plug.
Damaged supply cords must be replaced by qualified personnel to avoid hazards.
This appliance is designed for indoor use only; do not use outdoors.
Operate unit only with crumb tray in place to prevent overheating and uneven toasting.
Retain these instructions for future reference and safety guidance.
Unpack the unit and components, removing all packing material from inside the chamber.
Read and understand all instructions and labels before operating the equipment.
Verify power supply voltage, amperage, and requirements match the rating plate.
Disconnect the unit from the power source before installing or removing any parts.
Ensure receptacle ground connection is properly wired to prevent injury or fatality.
Model DCTT 3 requires a 20Amp switched isolating box and specific connection parts.
This model must be permanently wired by a qualified electrician.
Power must be supplied via an all-pole isolator providing full disconnection.
If a power supply cord is used, it must be at least 2.5mm² H05RN-F.
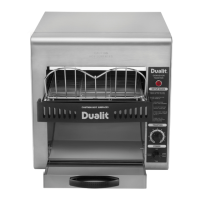
Familiarize yourself with all controls before using the toaster.
Guides bread into the toasting chamber for consistent feeding.
Collects crumbs for easy cleaning and fire prevention.
Indicator light showing when the unit is powered on.
Adjusts the toasting level for desired browning.
Controls the power supply to the toaster elements.
Resets the safety cut-out if the unit overheats.
Where toasted items are discharged from the toaster.
Turn the rotary switch to set functions: OFF, BOTH, TOP, POWER SAVER.
Activates both top and bottom elements for toasting bread.
Activates only the top element for single-side toasting.
Saves energy by reducing power consumption, use during off-peak periods.
Transitioning from Power Saver to active toasting is quick (within 30 seconds).
Instructions for toasting and warming various bread products.
Set the 'Power' knob to 'BOTH' for standard toasting.
Allow 10 minutes for the toaster to reach optimal operating temperature.
Elements cycling on and off is normal operation for temperature maintenance.
Adjust the toasting control for continuous toasting based on bread type.
Recommended settings for warming and different browning levels (1-9).
Any change to the toasting control takes up to 60 seconds to take effect.
For intermittent toasting, reduce continuous toasting level by 2.
Set power switch to 'Power Saver' when not toasting to save energy.
The Power Saver function reduces power consumption by up to 75%.
Use during off-peak periods; warm-up time is 30 seconds from Power Saver mode.
Different breads toast at different rates; adjust controls accordingly.
Machine is for bread products only; do not cook or heat any other food.
Disconnect power when the unit is not in operation.
Toast or warm a single side of items like buns, muffins, bagels, and croissants.
Set the power control to 'TOP' for single-side toasting of items like bagels.
Adjust the 'toasting' control to the required settings for single-side toasting.
Any change to the heat setting takes up to 60 seconds to take effect.
Ensure food products are less than 30mm thick to prevent jamming.
Do not toast items with toppings as they may fall off during discharge.
The TCF feature will not be activated when using the 'TOP' setting.
TCF automatically cycles elements to maintain correct toasting temperature.
Elements cycle On/Off for standby mode, saving 25% energy.
Elements automatically reactivate within 10-12 seconds of bread insertion.
Safety cut-out activates if control box temperature exceeds 190°F (88°C).
Manually reset the safety cut-out by pushing the red button underneath the toaster.
Never operate without the crumb tray; it prevents overheating and heat limit cutouts.
Do not hose down the unit or its surroundings; keep away from running water.
Set 'POWER' control to 'POWER SAVER' for cleaning the conveyor belt.
Clean lightly soiled belts with a damp cloth at the slowest speed.
Clean heavily soiled belts with a dry, light abrasive pad at the slowest speed.
After cooling, disconnect power, remove, clean, and reposition the crumb tray.
Clean the crumb tray daily to prevent crumb buildup and potential fires.
Ensure cooling fan is clear of dust/grease; clean air intake filter every 1-3 months.
Once fully cooled, wipe the exterior surface of the unit using a damp cloth.
Addresses issues with toast being burnt or underdone.
Adjust the 'TOAST' control to manage browning levels; allow time for settling.
Allow 10 minutes for the conveyor to heat up when switched on.
Use 'POWER SAVER' during idle periods to prevent heat buildup and burning.
Solutions for bread getting stuck inside the toaster.
Ensure bread thickness is under 30mm to prevent jamming and fire hazards.
Explains why toaster elements cycle on and off during operation.
Automatic element cycling maintains toasting temperature and saves energy.
Troubleshooting steps for conveyor overheating issues.
Check fan, clean if dirty, and reset switch for overheating.
Maintain 80mm rear and 30mm side clearance for adequate air circulation.
Overheating can occur if the crumb tray is missing or not properly positioned.
Guidelines for optimal positioning of the conveyor toaster.
Ensure there are no shelves or units directly above the conveyor.
Allow ample clearance around the conveyor for air circulation and cooling.
Do not cover or obstruct the cooling fan.
Explains why toaster elements may turn white over time due to starch buildup.
Silica glass elements may turn white; this is normal and does not affect performance.
One-year warranty covers repair/replacement, excluding elements, provided no misuse.
Warranty is void if the unit is misused, neglected, damaged, or modified.
A receipt showing the date of purchase is required for warranty claims.
Elements have a 3-month warranty for parts & labour, thereafter parts only.
The customer is required to pay any congestion charges if the location applies.
The guarantee provided does not affect your statutory consumer rights.
Contact Dualit for recommended repair agents if service is needed after one year.
Contact Dualit Care Line or email for further advice and product support.
| Type | Conveyor Toaster |
|---|---|
| Model | CONVEYOR |
| Category | Toaster |
| Frequency | 50/60Hz |
| Material | Stainless Steel |
| Adjustable Browning Control | Yes |
| Automatic Conveyor Speed | Yes |
| Removable Crumb Tray | Yes |