EasyManua.ls Logo

Duratrax TrakPower TK950 - User Manual

Duratrax TrakPower TK950
2 pages
Print Icon
To Next Page IconTo Next Page
Loading...
Retaining nut
Tip holder
Tip
Threads
Threads
Tip Retainer Nut
Setup
1. If desired, place the included optional graphics wrap on the iron. Use the box and manual pictures
as a guide.
2. Connect the cord assembly to the receptacle by aligning the pins and pushing straight in. Secure it
by rotating the retaining clip clock-wise.
3. Saturate the cleaning sponge with water, and place it into the holder.
4. Set the control knob to the desired temperature.
5. Turn on the power switch. The light on the front of the unit blinks when the tip reaches the set
temperature.
6. If you need to set the soldering station to the same temperature for multiple jobs the temperature
control knob can be locked. Once the correct temperature has been selected, tighten the screw on
the underside of the temperature control knob with the provided 1.5mm wrench.
Use
1. For the longest tip life select the lowest temperature required to properly do the job.
2. Once the iron has reached the desired temperature, wipe the tip on the cleaning sponge to remove
any build up.
3. Once the tip has been cleaned, coat it with a thin layer of fresh solder. This is called “tinning the tip.”
4. Use the smallest amount of solder needed to properly do the job. Extra solder requires extra heat,
increasing the chances of overheating the item being soldered.
5. When  nished, wipe the tip clean and tin it with fresh solder. Turn the iron off and let it cool before
storing.
Care
1. Clean the tip regularly using the cleaning sponge. This removes impurities and reduces the
oxidation that can limit heat transfer.
2. After every 4 hours of use: Allow the iron to cool. Remove the tip holder retaining nut, and wipe the
threads clean with a dry rag. Re-install the retaining nut  nger tight. This will reduce the oxidation
build-up that could cause the nut to seize onto the retainer.
3. Do not leave the unit turned on for long periods of time when not in use. Prolonged heating can
degrade the tip even when not in use.
4. Always keep the cleaning sponge moist when using the iron. If the sponge is dry it will not clean the
tip properly and can burn.
5. To help reduce oxidation always wipe and tin the tip with fresh solder when done soldering.
6. Check the condition of the tip. Tip life can vary greatly depending on the temperature used. Replace
the tip if it becomes deformed, or if solder will no longer stick to it.
Replacing the Tip
1. Turn off, unplug and allow the iron to cool
to room temperature.
2. Loosen and remove the retaining nut.
3. Remove the tip holder.
4. Remove and dispose of the old tip.
5. Wipe the threaded section of the iron and retaining nut clean with a dry rag.
6. Install the new tip, holder, and retaining nut. The nut should only be set “ nger” tight.
7. Plug in, and turn on the iron. When it reaches the desired temperature wipe the new tip clean on
the cleaning sponge, and tin it with fresh solder.
Replacement Parts
DTXR0960 908 iron
DTXR0965 Cleaning sponge
DTXR0968 3.2mm chisel tip
DTXR0969 2.4mm chisel tip (optional)
DTXR0970 1.0mm pencil tip
Optional Accessories
DTXR0975 TrakPower Rosin Core Lead Free Silver Solder
DTXR0976 TrakPower Rosin Core Silver Solder 100g
DTXR1015 TrakPower Cleaning Wire with Holder
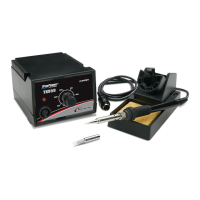
Tip Retainer
Iron Holder
Cleaning Sponge
Temperature Control Knob
Power Switch
(low right side)
Cord Receptacle
1.5mm wrench
Power Indicator
Tips
As the user of this product, you are solely responsible for operating in a manner that does not
endanger yourself and others or result in damage to the product or the property of others.
• Mishandling the iron could lead to burns or  re. Tip temperature can reach 480°C/896°F.
• Do not use the iron for applications other than soldering.
• The soldering process produces smoke. Make sure the area is well ventilated.
• Always store the iron in the holder when not in use.
• Do not leave a hot iron unattended.
• Do not touch any of the iron’s metal parts while operating.
• Let the iron cool to room temperature before replacing tips.
• Do not use or store the iron near  ammable items.
• Let the iron cool to room temperature before storing.
• Do not over tighten the temperature control lock screw.
• Do not adjust the temperature control knob if it is in the locked position.
• Turn the power off when  nished using the unit.
NOTICE
All instructions, warranties and other collateral documents are subject to change at the sole
discretion of Horizon Hobby, LLC. For up-to-date product literature, visit www.horizonhobby.com
or towerhobbies.com and click on the support tab or resources tab for this product.
Meaning of Special Language:
The following terms are used throughout the product literature to indicate various levels of
potential harm when operating this product:
WARNING: Procedures, which if not properly followed, create the probability of property
damage, collateral damage, and serious injury OR create a high probability of super cial injury.
CAUTION: Procedures, which if not properly followed, create the probability of physical
property damage AND a possibility of serious injury.
NOTICE: Procedures, which if not properly followed, create a possibility of physical property
damage AND little or no possibility of injury.
WARNING: Read the ENTIRE instruction manual to become familiar with the features
of the product before operating. Failure to operate the product correctly can result in
damage to the product, personal property and cause serious injury.
This is a sophisticated hobby product. It must be operated with caution and common sense and
requires some basic mechanical ability. Failure to operate this Product in a safe and responsible
manner could result in injury or damage to the product or other property. This product is not
intended for use by children without direct adult supervision. Do not use with incompatible
components or alter this product in any way outside of the instructions provided by Horizon
Hobby, LLC. This manual contains instructions for safety, operation and maintenance. It is
essential to read and follow all the instructions and warnings in the manual, prior to assembly,
setup or use, in order to operate correctly and avoid damage or serious injury.
Safety Precautions and Warnings
14
+
AGE RECOMMENDATION: Not for children under 14 years. This is not a toy.
DTXR0950
®
Soldering Iron
Instruction Manual
Question and Answer IconNeed help?

Do you have a question about the Duratrax TrakPower TK950 and is the answer not in the manual?

Summary

Soldering Iron Setup and Operation

Setup Procedures

Steps for connecting and preparing the soldering iron station for use.

Operating Instructions

Guidelines for proper use, including tip cleaning and soldering techniques.

Maintenance Guidelines

Procedures for cleaning and maintaining the soldering iron for optimal performance.

Tip Replacement Procedure

Step-by-step guide on how to safely replace the soldering iron tip.

Product Parts and Accessories

Replacement Parts

List of available replacement parts for the soldering iron station.

Optional Accessories

List of optional accessories to enhance the soldering iron's functionality.

Warranty and Service Information

Warranty Coverage Details

Details on what the 1-year limited warranty covers and does not cover.

Warranty and Service Procedures

Procedures for obtaining warranty service and returning products for inspection.

Contact and Support Information

Contact details for Horizon Hobby product support and service.

Regulatory Compliance

FCC Compliance Statement

Statement regarding compliance with FCC rules for digital devices.

Overview

The Duratrax TrakPower Soldering Iron Station I (DTXR0950) is a sophisticated hobby product designed for soldering applications, offering precise temperature control and various features for safe and efficient use. It is intended for users aged 14 and older and is not a toy.

Function Description:

This device serves as a soldering iron station, providing a controlled heat source for soldering tasks. It features a temperature control knob, a power switch, and an indicator light to show when the tip reaches the set temperature. The station is designed to facilitate clean and precise soldering by allowing users to select the optimal temperature for different jobs and maintain the soldering iron's tip in good condition.

Important Technical Specifications:

  • Model Number: DTXR0950
  • Tip Temperature Range: Up to 480°C (896°F)
  • Power Source: AC (requires connection via cord assembly)
  • Wrench Size for Locking Knob: 1.5mm
  • Recommended Age: 14+ years
  • Warranty: 1-year limited warranty covering defects in materials and workmanship.

Usage Features:

  • Setup:
    • Optional graphics wrap can be applied to the iron.
    • Cord assembly connects to a receptacle and is secured by a retaining clip.
    • A cleaning sponge must be saturated with water and placed in the holder.
    • Temperature is set via a control knob.
    • Power is activated by a switch, and an indicator light blinks when the tip reaches the set temperature.
    • The temperature control knob can be locked at a desired setting using a 1.5mm wrench for repetitive tasks.
  • Operation:
    • Users should select the lowest effective temperature for the longest tip life.
    • The tip should be wiped clean on the sponge and tinned with fresh solder once the desired temperature is reached.
    • Only the smallest amount of solder necessary should be used to prevent overheating.
    • After use, the tip should be wiped clean and tinned before turning off the iron and allowing it to cool.
  • Safety Precautions:
    • Mishandling can lead to burns or fire due to high tip temperatures.
    • The iron should only be used for soldering applications.
    • Adequate ventilation is required due to smoke produced during soldering.
    • Always store the iron in its holder when not in use and never leave a hot iron unattended.
    • Avoid touching metal parts of the iron during operation.
    • Allow the iron to cool to room temperature before replacing tips or storing.
    • Do not use or store the iron near flammable items.
    • Avoid over-tightening the temperature control lock screw.
    • Do not adjust the temperature control knob when it is in the locked position.
    • Turn off the power when finished.
    • Users are responsible for operating the product safely to prevent harm to themselves, others, or property.
    • The product is not intended for use by children without direct adult supervision.
    • Do not modify the product or use incompatible components.
    • Read the entire instruction manual before operation to prevent damage or injury.

Maintenance Features:

  • Tip Cleaning:
    • The tip should be cleaned regularly using the cleaning sponge to remove impurities and reduce oxidation.
    • The cleaning sponge must be kept moist; a dry sponge will not clean properly and can burn.
    • Always wipe and tin the tip with fresh solder after soldering to reduce oxidation.
  • Regular Maintenance (Every 4 hours of use):
    • Allow the iron to cool.
    • Remove the tip holder retaining nut and wipe the threads clean with a dry rag to prevent oxidation build-up that could cause the nut to seize.
    • Re-install the retaining nut finger tight.
  • Tip Replacement:
    • Turn off, unplug, and allow the iron to cool completely.
    • Loosen and remove the retaining nut, then remove the tip holder and the old tip.
    • Wipe the threaded section of the iron and retaining nut clean.
    • Install the new tip, holder, and retaining nut, tightening the nut "finger" tight.
    • Plug in and turn on the iron, then wipe the new tip clean on the sponge and tin it with fresh solder once it reaches the desired temperature.
  • Tip Condition Check:
    • Monitor the tip's condition; replace it if it becomes deformed or if solder no longer sticks to it. Tip life varies based on temperature used.
  • Storage:
    • Do not leave the unit turned on for long periods when not in use, as prolonged heating can degrade the tip.
    • Allow the iron to cool to room temperature before storing.

Replacement Parts (Available Separately):

  • DTXR0960: 908 iron
  • DTXR0965: Cleaning sponge
  • DTXR0968: 3.2mm chisel tip
  • DTXR0969: 2.4mm chisel tip (optional)
  • DTXR0970: 1.0mm pencil tip

Optional Accessories (Available Separately):

  • DTXR0975: TrakPower Rosin Core Lead Free Silver Solder
  • DTXR0976: TrakPower Rosin Core Silver Solder 100g
  • DTXR1015: TrakPower Cleaning Wire with Holder

The product is manufactured by Horizon Hobby, LLC, and is subject to their warranty and service policies. It complies with FCC rules for Class B digital devices, ensuring it does not cause harmful interference and accepts any interference received.

Duratrax TrakPower TK950 Specifications

General IconGeneral
BrandDuratrax
ModelTrakPower TK950
CategoryPower Tool
LanguageEnglish