This document describes the DURO Built-In Outdoor Grill (Model: 740-3024-BI LED), a stainless steel grill designed for either Liquid Propane (LP) or Natural Gas (NG) use. It includes installation, user care, and safety guidelines.
Function Description
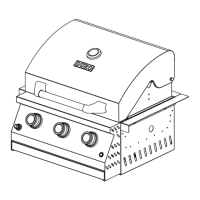
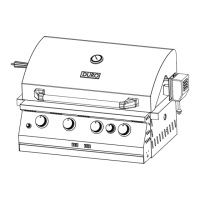
The DURO Built-In Outdoor Grill is a cooking appliance designed for outdoor use, specifically for installation into a non-combustible built-in enclosure. It features multiple main burners for direct heat cooking and is convertible between LP gas and natural gas. The grill is equipped with LED-illuminated control knobs and an igniter system for ease of use. It is intended for residential, single-family household use.
Important Technical Specifications
General:
- Model: 740-3024-BI LED
- Fuel Type: Liquid Propane (LP) or Natural Gas (NG) (convertible)
- Construction Material: Stainless Steel
- Installation Type: Built-in, designed for non-combustible enclosures (brick, firewall, steel). Not for use with wood or other combustible materials for the enclosure.
- Dimensions (Product):
- Width: 27.3" (69.4 cm)
- Depth: 23.4" (59.3 cm)
- Height (overall): 21" (53.7 cm)
- Height (excluding hood): 11" (27.9 cm)
- Cabinet Cutout Dimensions (for built-in enclosure):
- Width: 24" (65 cm)
- Depth: 17 3/8" (22 cm)
- Height: 17" (22 cm)
- Minimum clearance from bottom of grease tray to front wall of island: 1 7/8" (4.4 cm)
- Minimum clearance between back of grill and noncombustible materials: 3" (7.6 cm)
- Ventilation Requirements (for built-in enclosure):
- Top Openings (Hole A): At least two equally sized openings in side walls, within 5 inches of top, spaced at minimum 90 degrees, unobstructed. Total free area: not less than 20 in².
- Floor Level Openings (Hole B): At least two equally sized openings in side walls, bottom 1 inch or less from floor level, upper edge no more than 5 inches above floor level, spaced at minimum 90 degrees, unobstructed. Total free area: not less than 10 in².
- Minimum dimension for any opening: 3.2 mm rod entrance.
- Clearance to Combustible Construction:
- Minimum 24" (58.0 cm) from front of grill hood, sides, and back of grill to any combustible construction.
- Minimum 24" (58.0 cm) below cooking surface to any combustible construction.
LP Gas Specifics:
- LP Gas Tank: Standard 20 lb Liquid Propane Gas tank (approx. 12 inches diameter x 18-1/4 inches high). Tank not supplied.
- LP Gas Supply Cylinder Requirements:
- Constructed and marked in accordance with U.S. DOT or Canadian CAN/CSA-B339 specifications.
- Provided with a listed overfilling prevention device.
- Provided with a cylinder connection device compatible with the outdoor cooking gas appliance.
- Must include a collar to protect the cylinder valve.
- Operating Pressure (LP): 11" (27.9 cm) Water Column Pressure (WCP)
- Inlet (Supply) Pressure (LP): 11" (27.9 cm) WCP
- Gas Supply Line: New CSA International approved "outdoor" gas supply line.
- Regulator: Gas pressure regulator/hose assembly supplied with the grill must be used. Replacement parts must be specified by the manufacturer.
- Hose Holder: Supplied for securing the hose assembly.
Natural Gas Specifics (after conversion):
- Operating Pressure (NG): 4" (10.2 cm) WCP
- Inlet (Supply) Pressure (NG): 7" to 14" (17.8 cm to 35.5 cm) WCP (maximum)
- Conversion Kit: Model 740-3024BI LED Conversion Kit (purchased separately).
- NG Orifice (Main Burner): 1.32 mm (3 pieces)
- NG Regulator: 1 piece
- NG Hose: 10 ft (3.0 m) PVC flexible gas supply hose with 2 connectors (purchased by user locally). Must be CSA design-certified.
- NG Rating Label: 1 piece
- Gas Connection: Rigid pipe, semi-rigid tubing, or a connector complying with ANSI Z21.24/CSA 6.10 or ANSI Z21.75/CSA 6.27. Maximum length: 6 ft (1.82 m). Aluminum or aluminum alloy tubing is not permitted.
- Shutoff Valve: Supply line must have an approved shutoff valve, easily accessible near the grill.
Ignition System:
- Battery: 3 "AA" size alkaline batteries (for LED knobs) and 1 "AA" size alkaline battery (for igniter). Igniter battery not factory installed.
- Igniter Type: Pulse ignitor module.
- Electrode: 3 pieces.
Components (Parts List):
- Temperature Gauge (1)
- Main lid with Logo (1)
- Fire box side panel (Left, Right) (2)
- Fire box back panel (1)
- Main lid handle base (Left, Right) (2)
- Main lid handle tube (1)
- Warming Rack (1)
- Cooking Grate (2)
- Frame tamer (3)
- Main burner (3)
- Side trim Supporter (Left, Back, Right) (3)
- Control Panel (1)
- Lighting rod (1)
- Electrode (3)
- Grease Tray (1)
- Main Valve Setting (1)
- Regulator (1)
- Led Know Wire (1)
- Bezel (3)
- LED Knob (3)
- Electric ignition (1)
- Grill Cover (1)
- Griddle (1)
- Griddle hook (2)
Usage Features
Installation:
- Requires two or more people for moving and installation due to weight.
- Grill drops into the enclosure and is supported by side flanges; no bottom support needed.
- Gas connections must be securely tightened and leak-tested.
- LP gas tank tray must be secured, allowing easy access to the tank valve. A cylinders baffler is recommended to prevent heat from the grill reaching the cylinder.
- NG conversion must be performed by a qualified installer/gas supplier according to manufacturer instructions and local codes.
Operation:
- Lighting the Grill:
- Ensure control knobs are OFF and hood is open.
- Slowly open the LP tank valve or manual shutoff valve for NG.
- Push in and turn the burner knob to IGNITE/HI.
- Manual lighting is possible using a match and the manual lighting extension if the igniter fails.
- If a burner does not light immediately, turn the knob to OFF, wait 5 minutes, and relight.
- LED Knob Lights:
- Power switch on the control panel must be ON.
- Requires 2 "AA" 1.5V batteries (user-purchased).
- Cooking Methods:
- Direct Heat: Food placed directly above lighted burners. Hood can be up or down. Searing is achieved with intense heat.
- Indirect Heat: Food placed above an unheated burner, with lighted burner(s) on either side. Cook with the hood down for shorter cooking times. Not recommended in windy conditions.
- Grilling Tips:
- Preheat grill on high for 10 minutes with the hood closed.
- Thaw food before grilling.
- Shorten preheat time for high-fat cuts to reduce flare-ups.
- Lightly oil grill grates or low-fat food.
- Trim excess fat from meats.
- Turn foods only once to retain juices.
- Avoid puncturing meats to test doneness.
- Adjust heat settings for long-cooking or sugary sauces.
- Add barbecue sauce only during the last 10 minutes of cooking.
- Rotisserie Burner (if applicable):
- Use a portable meat thermometer to check internal doneness.
- Turn off burner when meat thermometer reads 5°F/3°C lower than desired temp, continue rotating for 10 minutes.
Safety:
- Never store fuel tanks in a garage or indoors.
- Do not use the grill near combustible materials.
- Do not store combustible materials near the grill.
- Ensure proper ventilation of the cylinder enclosure.
- Inspect gas supply hose before each use; replace if worn or cut.
- Turn off gas at the supply cylinder when the grill is not in use.
- Storage of the grill indoors is only permissible if the cylinder is disconnected and removed.
- Cylinders must be stored outdoors, out of reach of children, and not in enclosed areas.
- Never fill LP cylinder beyond 80 percent full.
- Do not let food sit for more than one hour before or after cooking to prevent food poisoning.
- If gas odor is detected, shut off gas, extinguish flames, open lid, and call gas supplier/fire department.
- In Massachusetts, installations and repairs must be performed by a qualified or licensed contractor, plumber, or gas fitter.
Maintenance Features
General Cleaning:
- Ensure controls are OFF and grill is cool before cleaning.
- Use soap and water with a soft cloth or sponge for routine cleaning. Rinse with clean water and dry immediately.
- Do not use steel wool, abrasive cleaners, or soap-filled scouring pads on any part of the grill.
- Use a vinyl grill cover to prevent weather damage.
Grill Grates:
- After cooking, loosen food soil with a brass bristle brush.
- Burn off food soil by turning all burners to HI for 10-15 minutes with the hood closed.
- Once cool, remove grates for thorough cleaning with mild detergent and warm water.
- For baked-on soil, soak grates in a solution of 1 cup (250 ml) ammonia to 1 gal. (3.75 L) water for 20 minutes, then rinse and dry.
Warming Rack:
- Clean with liquid detergent or an all-purpose cleaner.
- Rinse and dry with a soft, lint-free cloth.
- For tough spots, use a commercial degreaser designed for stainless steel.
Stainless Steel Surfaces (Exterior):
- Rub in the direction of the grain to avoid scratching.
- Use stainless steel cleaner, liquid detergent, or all-purpose cleaner.
- Rinse with clean, warm water and wipe dry with a soft cloth.
- Vinegar can remove hard water spots; glass cleaner for fingerprints.
- Apply stainless steel polish to non-cooking areas before first use and after each cleaning.
Interior:
- Discoloration from heat is normal.
- Clean with liquid detergent or all-purpose cleaner.
- Rinse with clean, warm water and wipe dry with a soft, lint-free cloth.
- A heavy-duty scrub sponge can be used with mild cleaning products.
- For small, difficult-to-clean areas, use a commercial degreaser.
Burners:
- Clean the exterior with a wire brush.
- Clear clogged burner ports with a straightened paper clip (do not use a toothpick).
- Check and clean burner/venturi tubes for insects and debris.
- Visually check burner flames; they should be blue with a slight yellow tip (LP gas) and approximately 1" (2.5 cm) high. Adjust air shutters if flames are noisy, lifting, or excessively yellow/orange.
- The rotisserie burner cannot be adjusted.
Drip Tray:
- Remove only when grill is completely cool.
- Wipe excess grease with paper towels.
- Clean with mild detergent and warm water. Rinse and dry thoroughly.
Knobs and Flange Area:
- Clean with mild detergent, a soft cloth, and warm water. Rinse and dry.
- Do not use steel wool, abrasive cleaners, or oven cleaner. Do not soak knobs.
Control Panel Graphics:
- Clean gently around burner labels with mild detergent, a soft cloth, and warm water. Rinse and dry.
- Do not spray cleaner directly onto the panel.
Igniter Battery Replacement:
- Unscrew igniter button cap counterclockwise.
- Remove old battery and replace with a new alkaline "AA" size battery (negative end first).
- Screw cap clockwise into place.