This document describes the Dyras ECM-1020X espresso coffee maker, providing instructions for its use, maintenance, and troubleshooting.
Function Description
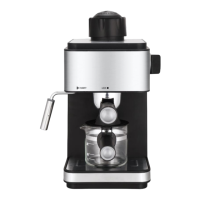
The Dyras ECM-1020X is an espresso coffee maker designed for household use. Its primary function is to brew espresso coffee and froth milk for cappuccinos. The device operates by heating water to extract coffee from ground beans and features a steam wand for milk frothing.
Key components include:
- Boiler cover (1): Top cover for the water tank.
- Steel mesh (2): Used to hold ground coffee in the funnel.
- Top cover (3): Another cover, likely for the main body.
- Steam knob (4): Controls the steam function for frothing.
- Indicator (5): A light that illuminates to show the device's status (e.g., ready for coffee, steam ready).
- Metal funnel (6): Holds the steel mesh and ground coffee.
- Press bar (7): Used to tamp down the ground coffee in the funnel.
- Funnel Handle (8): For inserting and removing the metal funnel.
- Steam conduit (9): The nozzle from which steam is dispensed for frothing.
- Carafe cover (10): Lid for the carafe.
- Frothing device (11): The component that froths milk, connected to the steam conduit.
- Carafe handle (12): Handle for the carafe.
- Carafe (13): Glass pot for collecting brewed coffee.
- Main body (14): The main housing of the appliance.
- Cup pad (15): A surface for placing cups.
- Drip tray (16): Collects any drips or spills.
- Measuring cup (17): For measuring water or coffee grounds.
- Coffee place (18): The position for the coffee funnel.
- Pause place (19): A setting on the control knob.
- OFF place (20): The off setting for the control knob.
- Steam place (21): The setting for activating the steam function.
- Insert (22): Indication for inserting the funnel.
- Lock (23): Indication for locking the funnel in place.
The control knob allows users to select between OFF, PAUSE, and STEAM functions.
Important Technical Specifications
- Model: ECM-1020X
- Rated voltage: 220 V - 240 V
- Rated frequency: 50 Hz / 60 Hz (manual states 50Hz in technical specs, but 50Hz/60Hz on cover page)
- Power: 800 W
- Contact protection class (against electric shock): I
- Manufacturer: Vöröskő Kft., 8200 Veszprém, Pápai str. 36.
- Certifications: CE symbol, complies with European standards 2014/35/EU, 2014/30/EU, 2011/65/EU, 10/2011/EU, and 1275/2008/EK.
Usage Features
Before First Use:
To ensure optimal taste, it is recommended to perform 2 or 3 brewing cycles with fresh water (without coffee). After each cycle, turn off the appliance and let it cool for 5 minutes before repeating with fresh water.
Making Coffee:
- Fill Water Tank: Twist the boiler cover (1) counter-clockwise to remove. Pour the appropriate amount of fresh water into the water tank, ensuring not to exceed the maximum capacity. The carafe (13) holds approximately 4 cups of water, with a minimum fill for 2 cups of coffee.
- Safety Check: Before adding water, ensure the appliance is unplugged and the steam knob (4) is in the OFF position. Replace the boiler cover by twisting it clockwise until it locks.
- Add Coffee: Place the steel mesh (2) into the metal funnel (6). Use a spoon to add ground coffee. One spoon of ground coffee is sufficient for one cup of high-quality coffee. Use the press bar (7) to tamp down the coffee.
- Insert Funnel: Align the metal funnel (6) with the grooves on the appliance and insert it from the "Insert" position (22). Twist the funnel counter-clockwise until it locks into the "Lock" position (23).
- Position Carafe: Place the carafe (13) on the removable cup pad (15).
- Start Brewing: Plug the power cord into the outlet. Turn the steam knob (4) to the coffee brewing position (indicated by a coffee cup icon). The indicator light (5) will illuminate. Wait approximately 2 minutes for the coffee to start flowing.
- Stop Brewing: Once the desired amount of coffee has been brewed, turn the steam knob (4) to the OFF position (20). The indicator light will turn off, and the coffee maker will stop.
- Caution: Do not leave the coffee maker unattended during brewing, as manual intervention may be required.
- Remove Funnel: After brewing, twist the metal funnel (6) counter-clockwise to remove it. Discard the coffee grounds. Allow the funnel and steel mesh to cool completely, then rinse under running water.
Making More Coffee:
If you wish to make more coffee after a batch, turn off the coffee maker and allow it to cool for at least 5 minutes before refilling the water tank.
Cappuccino:
- Make Espresso: First, brew an espresso as described above.
- Activate Steam: Press the steam switch (not explicitly numbered but implied by the steam place 21) to the "steam" position (indicated by a steam icon). Wait until the indicator light (5) illuminates, signifying the steam is ready. If the blue indicator extinguishes during operation, turn the steam control knob (4) counter-clockwise.
- Prepare Milk: Fill a jug with about 100 grams of whole milk (refrigerator temperature is recommended) for each cappuccino. The jug should have a diameter of at least 70±5mm and be tall enough to accommodate the milk's volume increasing by 2 times during frothing.
- Froth Milk: Insert the frothing device (11) about two centimeters into the milk. Move the jug up and down to froth the milk.
- Stop Frothing: Once the desired froth is achieved, turn the steam control knob (4) to stop frothing. Release any residual steam from the tank.
- Note: Do not turn the steam control button rapidly, as rapid steam accumulation can increase the risk of explosion.
- Clean Steam Outlet: Immediately clean the steam outlet with a wet sponge after steam stops generating, being careful to avoid burns.
- Combine: Pour the frothed milk into the prepared espresso. Sweeten to taste and sprinkle with cocoa powder if desired.
- Turn Off Steam: Press the steam switch to cut off the power.
Maintenance Features
Cleaning:
- Always unplug the appliance from the wall socket before cleaning.
- Never immerse the appliance in water.
- Clean the appliance with a damp cloth.
- The carafe (13), filter (steel mesh 2), and funnel (6) can be washed in hot soapy water.
Descaling:
- Regularly descale your coffee maker.
- To descale, operate the appliance as described for coffee making, but fill the water tank with ordinary vinegar instead of water and do not add ground coffee to the funnel.
- After descaling, run the appliance twice more with only water to rinse away any vinegar and scale residue.
Troubleshooting:
The manual provides a troubleshooting guide for common issues:
- Carafe leakage / water leaks from lid:
- Cause: Carafe not properly located, or water level exceeds MAX.
- Correction: Align carafe with brew basket opening, ensure water level is between MIN and MAX.
- Water leaks from bottom:
- Cause: Too much water in drip tray, or coffee maker malfunction.
- Correction: Clean drip tray, or contact service for malfunction.
- Water leaks from outer side of filter:
- Cause: Coffee powder on filter edge.
- Correction: Remove coffee powder.
- Acid (vinegar) taste in espresso:
- Cause: Not cleaned correctly after descaling, or old/improperly stored coffee powder.
- Correction: Clean coffee maker several times as per "before first use" instructions. Use fresh coffee powder and store unused coffee in a cool, dry, sealed container in a refrigerator.
- Coffee maker not working:
- Cause: Power outlet not plugged in well.
- Correction: Plug power cord correctly. If still not working, contact service.
- Steam not frothing:
- Cause: Steam ready indicator not illuminated, container too big/wrong shape, or skimmed milk used.
- Correction: Wait for indicator to illuminate, use a high and narrow cup, use whole milk.
Important Safety Instructions
- Children: This appliance can be used by children aged 8 and above if supervised and instructed on safe use, and if they understand the hazards. Cleaning and user maintenance should not be done by children unless they are over 8 and supervised. Keep the appliance and its cord out of reach of children under 8.
- Persons with reduced capabilities: Can be used by persons with reduced physical, sensory, or mental capabilities, or lack of experience/knowledge, if supervised and instructed on safe use and understanding of hazards.
- Play: Children should not play with the appliance.
- Damaged Cord: If the supply cord is damaged, it must be replaced by the manufacturer, service agent, or a similarly qualified person to avoid hazards.
- Intended Use: This appliance is intended for household and similar applications (staff kitchens, farmhouses, hotels, motels, bed and breakfast environments).
- Immersion: The appliance must not be immersed in water.
- Hot Surfaces: Heating element surface is subject to residual heat after use. The heating plate is hot during operation; do not touch to avoid severe burns.
- Misuse: Use the appliance according to instructions to avoid electric shock or other hazards.
- Cleaning Food Contact Surfaces: Refer to the "Cleaning" section for details.
- Voltage Check: Before connecting, ensure the appliance's indicated voltage matches your home's main voltage.
- Placement: Do not place the appliance on a hot surface.
- Outdoor Use: Do not use this appliance outdoors.
- Unplugging: Remove the main plug from the wall socket if problems occur during coffee making or before cleaning.
- Cord Contact: Do not allow the main cord to come into contact with hot surfaces.
- Children's Reach: Keep the appliance out of children's reach and prevent them from pulling the main cord.
- Water Before Use: Always pour water before turning on the appliance.
Disposal
The product bears a crossed-out wheeled bin symbol, indicating that it should not be disposed of with other household waste within the EU. This is to prevent harm to the environment and human health from uncontrolled waste disposal. Users should recycle the product responsibly to promote the sustainable reuse of material resources. To return a used device, contact the return and collection systems or the retailer where the product was purchased for environmentally safe recycling. This marking applies throughout the European Union. Outside the EU, inquire about local regulations for disposal.