EasyManua.ls Logo

Eachine DVR03 User Manual

Eachine DVR03
2 pages
To Next Page IconTo Next Page
Page #1 background imageLoading...
Page #1 background image
PRODUCT
SPECIFICATION
PRODUCT
SPECIFICATION
4.4 Long-press the button for 5 second until digital display
flicker. Then short-press the button to change the power,
25mW/50mW/200mW (one hyphen stands for 25rnW.
two hyphens stand for 50mW, and three hyphens stand
for200mW).
4.5 5 seconds after setting. CH, FRand power will flicker
alternately.
Notice: The vtx has memory for settings. To change the
settings, please repeat steps as above.
Frequency and channel frequency table:
Band Chi C^2 CI-J CH4 CH5 0:5 CH7 CKB
Band-A 5S65 5W f, 5825 5805
5785 5765 5/.! 5
B725
Band-b 8733 .,/',? 577! 5/90 iifiü'J 5825 58.1! 5KS0
Band-E
5705 5685 5665
5645
5885 5S05 5Ü25 59.15
Band-F 57.; 0 571] 0 575 ?, 580 G 58 2 0 55..;: 586;i 5860
Band-r 565 8 5655 sVji 576Ü 5806 5643 5B80
53-7
Band-U 5H5 5348 5356 5384 54Q2 5420 5438 5-156
Band-o 5474 M!j 2 55' 0 5528 5546 558.1
5582 !>£()()
Band-L 53:! :i :.:</:! 54' 3 5453 5493 5533 5573 5613
Band-H 56S3
5693 =733 577.1 5313 5853 st;:- 5333
E0GUINE
www.eachine.com
Operation Instruction:
1, The menu Settings
1.1 When recording videos, press CS2 key to end video
recording, long press CS2 to enter the Settings menu.
Long press CS2 again to exit menu and return to the main
page.
» 1.2 When out of video recording, short press + long press
CS2 keys to enter the menu function, press CS1 and CS3
to choose up and down. Long press CS2 to exit menu and
return to the main page.
2. Video recording
2.1 Insert SD card, the recording function automatically
activated, short press the CS2 key to end video recording,
short press the CS2 key again for the next round of video
recording.
a 3. Video playback
Long press CS1 to enter the v'deo play page, press CS1
and CS3 to choose up and down, press CS2 button to play
and pause, long press CS1 to exit play video and return to
the main page
4. Adjust "CH" "FR" and the power operation
4.1 Powering on the vtx, blue LED display 0, indicating
the vtx is powered on, but it is in off status without
any transmission.
4.2 Short-press the button to change channel (CH),
digital display will change synchronously. Digitai
display changes cyclically from 1 to 8.
4.3 Long-press the button for 2 seconds until digital
display flicker. Then short-press the button to
change the frequency band (FR), digital display will
change synchronously. Digital display changes
cyclically from A. b, E, F. r. U. o, L. H.
EPKUINE
DVR03
5.8GHz 72CH FPV Transmitter+520TVL FPV
Camera+Four leaf antenna+DVR
0/25mW/50mW/200mW adjustable
Product Instruction
Manual
Question and Answer IconNeed help?

Do you have a question about the Eachine DVR03 and is the answer not in the manual?

Eachine DVR03 Specifications

General IconGeneral
BrandEachine
ModelDVR03
CategoryTransmitter
LanguageEnglish

Summary

Product Specification and Operation Instructions

Adjusting Power Output

Adjust power output (25mW/50mW/200mW) by long-pressing the button and short-pressing to cycle through options.

Entering Settings Menu

Enter settings by long-pressing CS2 (during recording) or short+long pressing CS2 (not recording). Navigate with CS1/CS3.

Video Recording and Playback

Recording starts automatically with SD card. Short press CS2 to stop/start. Long press CS1 for playback.

Channel and Frequency Band Adjustment

Short press button to cycle channels 1-8. Long press for 2s then short press to cycle frequency bands A-H.

Power On Status Indicator

Blue LED displays '0' on power-on, indicating VTX is on but not transmitting.

Specification and Parameters

Output Power and Input

Output power is 0/25mW/50mW/200mW adjustable. Input power is 3.2-5.5V.

Current Consumption

Current consumption varies with power output: 640-330mA (25mW), 730-410mA (50mW), 860-553mA (200mW).

Video and Camera Specifications

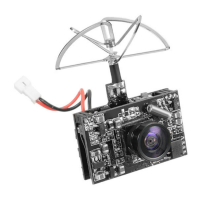
Camera resolution 520TVL, NTSC/PAL system, 1 lux illumination, 120° FOV, 1/4" CMOS sensor.

Recording and Photo Formats

Video format AVI, resolution 1280x720P@30fps. Photo format JPG.

Storage and Operating Conditions

Supports Micro SD card up to 32GB (Class 10). Operating temperature -10 to 60 degrees C.

Antenna and Frequency Details

Antenna dimensions 22x29mm, 4 lobe RHCP. Frequency 5.8GHz, 9 bands, 72 channels, Raceband 5325-5945 MHz.

Physical Dimensions and Weight

Size 30.3*18.04mm (L*W). Weight 6.8g.