EasyManua.ls Logo

Eagly Eye HGD-2000 User Manual

Eagly Eye HGD-2000
3 pages
To Next Page IconTo Next Page
Page #1 background imageLoading...
Page #1 background image
HGD-2000 Hydrogen Gas Detector
Installation & Operation Instructions - Dual Relay Model
Hydrogen gas is only 7% the density of air, and thus rises. Your hydrogen gas detector,
therefore, should be installed at the highest, draft-free location in the battery room or
compartment where hydrogen gas would accumulate.
Remove the cover from the detector box using care not to break the hinge
connection at the top of the box.
Attach the detector to the wall, ceiling, or optional junction box using the
mounting holes at the top and bottom of the detector box.
For hard wiring using conduit, the detector box will fit the following junction boxes: Appleton
25075, Bowers 702 SPL, Raco 951, or Steel City 2G-1/2&3/4. If you have difficulty finding one
of these junction boxes, you can order one from your dealer.
The detector has a terminal block for connection to a single-phase ac power source and to one
or two internal relays. The relays can be used to switch a remote exhaust fan and/or alarm on
and off.
For 120 volts ac power, use an 18 gage SJT 3-condustor PVC jacketed cable (Belden 19348,
equivalent or better). For relay wires, use 14 gage wire (Belden 9989, equivalent or better).
The detector's relay dry contacts are rated at 10A / 250VAC, sufficient for most 1/3 HP exhaust
fans. For higher current requirements, add external relays.
Ensure that your installation complies completely with all relevant local, state, federal, and
OSHA safety and health regulations.
An optional 2 inch (5 cm.) square remote box with duplicate LEDs, test button, and buzzer if
wanted, can be placed anywhere. This remote box connects to the detector box via a standard
style 6-connector, 6-contact telephone-type modular cable.
Operation
Keep the detector on at all times. If the green LED is lit, power is on.
When power is first turned on, approximately 10 minutes will elapse before the detector will start
to function. This delay is to prevent false activation of the internal relay and alarm.
If the unit has been stored un-energized for more than 1 week, the sensor will require 7 days or
more to stabilize. During this period the sensor will be overly sensitive to hydrogen gas. This
Alarm on & off
Question and Answer IconNeed help?

Do you have a question about the Eagly Eye HGD-2000 and is the answer not in the manual?

Eagly Eye HGD-2000 Specifications

General IconGeneral
BrandEagly Eye
ModelHGD-2000
CategoryOther
LanguageEnglish

Summary

Hydrogen Gas Detector Installation

Detector Placement Guidelines

Install detector at the highest, draft-free location where hydrogen gas accumulates.

Mounting and Wiring Instructions

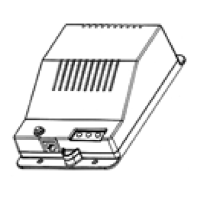
Attach detector using mounting holes. Connect to power source and relays using specified cable types.

Junction Box Compatibility

Lists compatible junction boxes for hard wiring using conduit.

Safety and Regulatory Compliance

Ensure installation complies with all relevant local, state, federal, and OSHA safety regulations.

Optional Remote Box

Optional remote box with LEDs, test button, and buzzer connects via a standard modular cable.

Detector Operation and Indicators

Initial Power-Up and Delay

Keep detector on. Green LED indicates power. A 10-minute delay prevents false alarm activation.

Sensor Stabilization After Storage

Sensor requires 7+ days to stabilize after storage, being overly sensitive during this period.

Hydrogen Gas Detection Levels

1% H2 triggers yellow LED and relay; 2% H2 triggers red LED, alarm, and second relay.

Response to Decreasing Gas Levels

Indicators and relays deactivate as gas concentration falls below detection thresholds.

Calibration and Testing Procedures

Factory Calibration and Field Adjustment

Detector is factory calibrated for hydrogen gas. DO NOT ATTEMPT TO FIELD CALIBRATE THIS UNIT.

Testing the Unit's Electronics

Use the push-to-test button to verify electronics, LEDs, relays, and internal alarm.

Push-to-Test Limitations

The push-to-test button does NOT test the sensor itself.

Sensor Board Lifespan and Replacement

Sensor board may need recalibration/replacement over time; replace every five years.

Safety Warnings and Support

General Safety Precautions

Detector is added protection, not a substitute for safety measures. Use multiple detectors for large areas.

Contact Information

Contact EAGLE EYE power solutions for sales and support via phone or email.