Charging
2) I nsert the batteries m aking sure the contacts a re
Installation
1) Press the release button l ocated on the bottom of
Low Indicator
power–b attery should be charged or replaced.
Battery
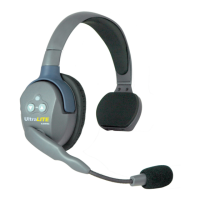
All UltraLITE headsets are powered by a Lithium Polymer
battery that will o perate 6 h ours when fully c harged.
IMPORTANT
UltraLITE systems i nclude one
headset labeled “MASTER”.
This MASTER headset must b e
turned “ ON” to link the corresponding REMOTE h eadsets.
1) Batteries are charged via t he multi-charger.
properly aligned.
3) RED: Charging; GREEN: Fully C harged.
the battery compartment.
2) Insert t he battery in to the compartment ( arrow
indicates proper direction) and snap door closed.
To ensure optimum charge level remove battery from headsets
when s ystem not in use.
(Note: Blue LED on headsets indicates pairing mode. When h eadset b lue LED i s NOT
illuminated, this does NOT necessarily indicate that t he headset is off . Please check
switch on Master headset to ensure that it is in OFF position . The battery w ill continue
to drain if left in the headset, a nd the switch is not turned t o OFF p osition.)
A r epetitive beep ( every 2 0 s econds) indicates l ow
Battery C are
Release Button