EasyManua.ls Logo

Earth Way SPRAY PRO S25 - User Manual

Earth Way SPRAY PRO S25
6 pages
Print Icon
To Next Page IconTo Next Page
Loading...
SPRAY
SPRAY
EarthWay
EarthWay
®
®


Congratulations on the purchase of this new EarthWay product. Please call us if you have any difculty with assembly
or operation of this sprayer. We can be reached via the telephone at 800-294-0671 or 574-848-7491 Monday—Friday
9:00am ~ 4:00pm or visit us online at www.earthway.com This sprayer comes with lifetime technical support, email us at
techsupport@earthway.com.
HELPFUL HINTS: READ THE DIRECTIONS BEFORE ASSEMBLY
THIS SPRAYER COMES PARTIALLY ASSEMBLED, REQUIRING YOU TO INSTALL THE WHEELS, HANDLE ASSEMBLY,
SPRAY GUN HOLDER, AND CONTROL ROD. IT SHOULD TAKE APPROXIMATELY 15 MINUTES WITH THE USE OF TWO
7/16” WRENCHES AND 1 PAIR OF PLIERS.
5 Your sprayer is designed to be pushed at three miles per hour, which is a brisk walking speed. Slower or faster speeds
will change the spray patterns & volumes.
5 Clean your sprayer tank thoroughly after each use. Wash with clean water and push sprayer a several feet to evacuate any
residual materials until you see clean water in a safe area as described in the chemical supplier directions.
5 Gears are permanently lubricated at the factory. Do not open the gearbox or dirt may enter.
5 Check all hose connections regularly to ensure they remain tight.
5 If unit fails to spray on initial use, loosen the yellow cap on the DCV slightly, then retighten.
5 Coat all metal surfaces (inside & out) with WD-40 to help prevent corrosion.
S25 SPRAY PRO PUSH SPRAYER
ASSEMBLY and OPERATING INSTRUCTIONS
Pt.# 52230 MKII PAGE 1
1. Open carton and remove the Handles, Control Rod, Handle Shaft
assembly, hardware pack, wheels, and the S25 from carton.
Rotate wheel
to help
replace pins
Slide pins into hub
then spray with WD-40
now slide wheel in fully and
add cotter pin
1” Cotter Pin
Coast Wheel
Drive Wheel
1” Cotter Pin
2. Turn the S25 upside-down on to the tank.
S
L
I
D
E
Gearbox
Axle Assembly
Lower
Handle
Frame
Brace
Cross Brace
3. Ensure that the axle bearings are pushed into the axle bushing on both sides as shown
at the right. Install the Coast wheel (this wheel does not have the steel ring on the inside
hub as shown below) on to axle using the cotter pin hole closest to edge of the axle. Insert
1” cotter pin through the axle and bend with pliers to prevent pin from falling out.
4. Install the at washer (included with the 3 knurled
dowel pins) onto the axle and slide to the lower
handle. Next, position the Drive wheel onto the axle
about 2 inches, now install 3 knurled
dowel pins into each pin slot located in
the hub by sliding 1 dowel pin between
the hub and the axle as shown below,
coat the knurled pins with WD-40 or a
light oil, nish by sliding the wheel tight
against the lower handle. Now insert 1
cotter pin through axle, bend with pliers
to prevent cotter pin from falling out.
Cotter Pin
Locations
Steel Ring
Flat Washer
Question and Answer IconNeed help?

Do you have a question about the Earth Way SPRAY PRO S25 and is the answer not in the manual?

Summary

Assembly and Operating Instructions

Helpful Hints Before Assembly

Provides essential tips and safety advice to read before beginning the assembly process.

Initial Assembly Steps

Covers unboxing, orienting the sprayer, and installing the wheels and cotter pins.

Handle and Control Assembly

Details attaching the handle shaft, upper handles, control rod, and gun holder.

Product Information and Support

Warranty Details

Explains the product warranty period, coverage limitations, and conditions for repair or replacement.

Customer Support Contacts

Lists contact information for technical assistance and inquiries in North America and Europe.

Spray Pattern Guidance

Advises on achieving optimal spray patterns and coverage for various application needs.

Operating the S25 Sprayer

Sprayer Calibration and Preparation

Covers nozzle selection, calibration, and pre-use checks for accurate and safe spraying.

Practice and Basic Operation

Recommends practicing with water to familiarize users with sprayer functions before actual use.

Spray Application Process

Step-by-step guide on how to correctly fill, transport, and operate the sprayer for application.

Technical Spray Information and Maintenance

Ensuring Spray Accuracy

Explains factors affecting spray width and accuracy, including nozzle height and ground parallel.

Post-Operation Procedures

Details how to properly empty, clean, and winterize the sprayer after each use.

S25 Spray-Pro Parts List

Illustrated Parts Diagram

Provides a visual reference of all sprayer components with part numbers for identification.

Overview

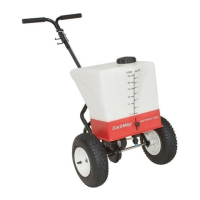
The EarthWay S25 Spray-PRO Push Sprayer is a robust and user-friendly device designed for accurate and efficient liquid application, suitable for a variety of spraying tasks. It is engineered for ease of use, offering years of reliable service for both professional and home users.

Function Description:

The S25 Spray-PRO is a push-operated sprayer that dispenses liquid products through a nozzle system. It is designed to be pushed at a brisk walking speed of approximately three miles per hour, ensuring consistent spray patterns and volumes. The device features a tank for liquid products, a handle assembly for user control, a spray gun holder, and a control rod to manage the spray function. The sprayer utilizes a pump system that circulates liquid from the tank to the nozzle, providing agitation to keep mixed liquids in suspension. It offers adjustable spray width, ranging from approximately 3 feet (0.9 meters) to 6 feet (1.8 meters), depending on the selected nozzle. The Teejet TF nozzles are specifically designed to "feather" at the edges, allowing for a 15% overlap on each side (total 30%) to ensure uniform coverage during subsequent passes. The sprayer can be set to "Spray" (on) or "Transport" (off) mode via a lever on the handlebar, which also controls the circulation of liquid within the tank during transport.

Important Technical Specifications:

  • Tank Capacity: 6.6 gallons (25 liters).
  • Nozzle Options: Supplied with three different nozzle options (TF-VP4-5, TF-VP4-7.5, TF-VP4-10) to accommodate various application rates and spray patterns.
  • Volume Coverage (per 1,000 sq ft / per sq meter):
    • TF-VP4-5: 74/.58 fl oz/gal US per 1,000 sq ft (23.6 ml per sq meter) for 11,400 sq ft (1,059 sq meters) coverage.
    • TF-VP4-7.5: 116/.90 fl oz/gal US per 1,000 sq ft (37 ml per sq meter) for 7,280 sq ft (676 sq meters) coverage.
    • TF-VP4-10: 120/.94 fl oz/gal US per 1,000 sq ft (38.2 ml per sq meter) for 7,040 sq ft (654 sq meters) coverage.
  • Optimal Operating Speed: 2-3 MPH (brisk walking speed).
  • Optimal Nozzle Height: 9 inches (23 cm) from the ground surface to ensure accurate spray width and application.
  • Tire Pressure: Recommended 20 psi.
  • Assembly Time: Approximately 15 minutes with two 7/16" wrenches and one pair of pliers.
  • Materials: Features plated steel or painted steel frames (note: warranty advises cleaning and drying after each use due to corrosive nature of fertilizers and ice melters).

Usage Features:

  • Assembly: The sprayer comes partially assembled, requiring the installation of wheels, handle assembly, spray gun holder, and control rod. Detailed instructions are provided for each step, including specific hardware (e.g., 1" cotter pins, 7/16" wrenches, pliers).
  • Handle Adjustment: The upper handle offers three position options (lower, middle, upper) to adjust the handlebar height for different user heights, enhancing comfort and spray accuracy. The handle shaft should be installed with the long end facing toward the sprayer.
  • Wheel Installation: The Coast wheel (without a steel ring on the inside hub) is installed first, followed by the Drive wheel (with a steel ring and three knurled dowel pins). Knurled pins should be coated with WD-40 or light oil for easier installation.
  • Control Rod and Gun Holder: The control rod connects to the valve adapter at the back of the sprayer skirt and the gun holder. The gun holder is secured to the lowest bolt on the handle shaft.
  • Pre-Use Preparation: Users should thoroughly read the product label of any liquid being applied, ensure the sprayer tank and nozzle are clean, and check all hose connections for tightness. It is recommended to spray on days with minimal wind and wear appropriate safety clothing. Tires should be inflated to 20 psi.
  • Practice: First-time users are advised to practice with water on a dry tarmac surface to familiarize themselves with the machine's operation and achieve optimal spray accuracy.
  • Spraying Operation:
    • Select the appropriate nozzle based on the product and desired application rate.
    • Ensure the control lever is in the "Transport" (off) position (lever to the right) before filling the tank and moving the sprayer to the application area.
    • Lift the machine off its two feet so the body is parallel with the ground.
    • To spray, roll the On/Off lever to the "Spray" (on) position (lever to the left) and walk forward at 2-3 MPH.
    • To stop spraying, roll the lever back to the "Transport" position. In this mode, the pump circulates liquid back into the tank, providing agitation.
  • Spray Pattern: Most applications require a single pass (up/back). For higher application rates, a cross-pattern (two passes, perpendicular to each other) should be used to ensure even coverage.
  • Accuracy: Maintaining the nozzle height at 9 inches (23 cm) from the ground is crucial for accurate spray width and application. Pushing the sprayer at a downward angle will reduce spray width and over-apply, while an upward angle will widen the spray and under-apply. Using a proprietary spray dye indicator can help visualize sprayed areas.

Maintenance Features:

  • Cleaning: The sprayer tank should be thoroughly cleaned with clean water after each use, pushing the sprayer a few feet to evacuate residual materials until clean water is seen. This is critical for preventing corrosion and ensuring proper function.
  • Lubrication: Gears are permanently lubricated at the factory and should not be opened. All metal surfaces (inside and out) should be coated with WD-40 to help prevent corrosion.
  • Hose Connections: Regularly check all hose connections to ensure they remain tight.
  • Troubleshooting (No Spray): If the unit fails to spray initially, loosen the yellow cap on the DCV slightly, then retighten.
  • Winter Storage: Empty all water from the sprayer, ensuring no water is left in the pump over winter to prevent freezing, unless the S25 is set up for freezing temperatures with ice melt or snow pre-treatments.
  • Technical Support: Lifetime technical support is available via phone (800-294-0671 or 574-848-7491) or email (techsupport@earthway.com).
  • Warranty: The product has a 90-day warranty against defects in original workmanship and materials. The manufacturer will repair or replace defective products at no charge, provided the defect is not due to mishandling or tampering and the product is received with shipping charges prepaid. The warranty covers parts only, not labor charges for repair. Due to the corrosive nature of most fertilizers and ice melters, the warranty does not cover corrosion failure on steel frames.

Earth Way SPRAY PRO S25 Specifications

General IconGeneral
BrandEarth Way
ModelSPRAY PRO S25
CategoryPaint Sprayer
LanguageEnglish