EasyManua.ls Logo

EarthQuake 15683 User Manual

EarthQuake 15683
4 pages
To Next Page IconTo Next Page
Page #1 background imageLoading...
Page #1 background image
Instruction Sheet
Hiller/Furrower Kit with Adapters
Check for parts online at www.getearthquake.com or call 800-345-6007 M-F 8-5
15683 HILLER/FURROWER KIT (OPTIONAL ACCESSORY)
Thank you for purchasing a hiller/furrower attachment for your rototiller. We know that you will be pleased with the many uses
you can accomplish with this handy tool.
PARTS BREAKDOWN
P/N: 25133
ECN: 11711
REV2: 06/20/17
© 2017 Ardisam, Inc.
All Rights Reserved
All weights, specications and features are approximate and are subject to change without notice. Due to continuous product
improvements, product images may not be exact. Items used for props not included. Some assembly may be required.
KEY # PART # DESCRIPTION QT Y.
16513 BRACKET HILLER/FURROWER RED 1
2 16514 WING LEFT HILLER/FURROWER RED 1
3 16515 WING RIGHT HILLER/FURROWER RED 1
4 16516 SHOVEL HILLER/FURROWER RED 1
5 20143 WASHER M8 X 16 X 1.5 MM GR8.8 ZN 4
6 21247 BOLT M10 X 1.5 X 30 MM HHCS GR8.8
ZN
2
7 21810 WASHER M8 EXTERNAL TOOTH LOCK 4
23204 NUT M8 X 1.25 MM W GR8 ZN 4
9 23205 BOLT M8 X 1.25 X 20 MM CRG GR8
ZN FT
4
KEY # PART # DESCRIPTION QT Y.
10 23206 BOLT M10 X 1.5 X 40 MM CRG GR8
ZN FT
2
11
W1265V0903
NUT M10 HNYLK GR8.8 ZN 4
- 25126 HILLER ADAPTER HUSQVARNA 1
- 25127 HILLER ADAPTER SOUTHLAND/
POWERMATE
1
- 25128 HILLER ADAPTER TROYBILT/
CUB CADET
1
9
3
8
7
5
6
1
11
2
4
10
INSTALLATION
1. Attach the bracket (1) to the shovel (4) using two M10 x 40mm carriage bolts (10) and M10 locknuts (11).
NOTE: The M10 carriage bolts (10) are installed from the front of the shovel (4), while the bracket (1) is installed from the
back of the shovel (4).
2. Align the curved slots of the left wing (2) with the square holes on the left side of the shovel (4). The small bend of the left
wing (2) should be facing up. Using two M8 x 20mm carriage bolts (9), at washers (5), external tooth washers (7), and wing
nuts (8), secure the left wing (2) to the shovel (4). Repeat step to install the right wing (3).
NOTE: Adjust the left and right wing (2, 3) to the correct hill size before tightening the wing nuts (8).
3. Remove two carriage bolts (A) that hold the tail to the tine shield. Slide the slotted end of the bracket (1) over drag stake
mount (under the tail hood of your tiller).
4. Align the holes in the bracket (1) with the single hole in the middle of the drag stake mount. Using the M10 x 30mm bolt (6)
and a M10 locknut (11), secure the hiller/furrower to the tiller.
NOTE: There is an extra M10 x 30mm bolt (6) and M10 locknut (11) that is used for the 25127 adapter only.
5. Re-attach the tail to the tine shield.
A
Question and Answer IconNeed help?

Do you have a question about the EarthQuake 15683 and is the answer not in the manual?

EarthQuake 15683 Specifications

General IconGeneral
CategoryPower Tool Accessories
Shank TypeHex
MaterialHigh Carbon Steel
Product TypeAuger Bit
UsageWood Drilling

Summary

INSTALLATION

Attach Bracket to Shovel

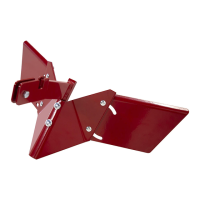
Attaching the bracket to the shovel using carriage bolts and locknuts.

Attach Left and Right Wings

Securing the left and right wings to the shovel with bolts, washers, and wing nuts.

Mount Bracket to Drag Stake

Sliding the bracket over the drag stake mount after removing carriage bolts.

Secure Hiller/Furrower to Tiller

Aligning bracket holes and securing the hiller/furrower to the tiller with a bolt and locknut.

Re-attach Tail to Tine Shield

Reattaching the tail to the tine shield after the main assembly.

PARTS BREAKDOWN

25126 Husqvarna Hiller/Furrower Adapter Assembly

Remove Standard Depth Stake

Removing the standard depth stake from the back of the tiller.

Slide Adapter into Slot

Inserting the adapter into the slot where the depth stake was located.

Secure Adapter with Pin

Securing the adapter by inserting a pin into the top hole of the adapter.

Secure Hiller/Furrower to Adapter

Fastening the hiller/furrower to the adapter using specific bolts and locknuts.

25127 Southland & Powermate Adapter Assembly

Reinstall Drag Stake

Removing and reinstalling the drag stake so its end is at the bottom of the mount.

Secure Adapter to Drag Stake

Placing the adapter over the drag stake and securing it with a bolt and locknut.

Secure Hiller/Furrower to Adapter

Fastening the hiller/furrower to the adapter using specific bolts and locknuts.

25128 Troy-Bilt & Cub Cadet Adapter Assembly

Remove Kick-back Stake Bolt

Removing the larger bolt that secures the kick-back stake.

Loosen Kick-back Stake Nut

Loosening the smaller nut on the kick-back stake to facilitate adapter insertion.

Place and Secure Adapter

Inserting the adapter into the kick-back stake mount and securing it.

Tighten Smaller Nut

Tightening the smaller nut on the kick-back stake after adapter placement.

Place Hiller/Furrower Bracket

Sliding the hiller/furrower bracket onto the adapter, ensuring the tail sits on top.

Secure Hiller/Furrower to Adapter

Fastening the hiller/furrower to the adapter using specific bolts and locknuts.