EasyManua.ls Logo

EASTCOLIGHT Galaxy Tracker 375 - User Manual

EASTCOLIGHT Galaxy Tracker 375
3 pages
Print Icon
To Next Page IconTo Next Page
Loading...
1
COMPONENTS OF THE TELESCOPE
1. Focusing Knob
2. Focusing Tube
3. Diagonal Mirror
4. Eyepiece
5. Telescope Tube
6. Tripod Legs
7. Knob bolt
8. Objective Lens
9. Bracket
10. Barlow Lens
11. Smartphone Adapter
12. Smartphone Adapter Knob
Read the following information and instructions before use.
Follow them and keep them for reference.
M-32015-ENG
A) HOW TO CARE FOR YOUR TELESCOPE
Appropriate care of the telescope will allow many years of pleasant
viewing enjoyment.
The Objective Lens
The objective lens of Telescope has been intensely polished and
established to minute tolerances. It must be cleaned with care and
as seldom as possible to avoid affecting its precision and
performance. An inexperienced person must never take the lenses
out of their mount.
Cleaning The Lens
Clean the lens only when it is required. The first step is to remove
the dust with a camelhair brush or an ear-type syringe. Set few
drops of ether or isopropyl alcohol on a piece of clean cotton that
has been washed several times and wipe the lenses very delicately,
avoiding a circular motion. In addition, blow any remaining lint or
dust off with an ear-type syringe.
Sudden Temperature Changes
If possible, avoid taking the telescope from cold outside air into a
warm room. This will make the objective lens covered with
condensed moisture, which must be removed at once. To do this,
place the objective lens at a safe distance from heat source and let it
warm slowly until the moisture has vanished.
It is important to note that any stains left on the lenses must be
delicately wiped off after the lenses are completely dry.
Features:
Professional aspherical lens for super sharp images
This telescope employs aspherical lenses to reduce image
abberration often found in conventional spherical lens elements,
producing a sharp and less distorted image from the center to the
edge of the field of view.
Image from spherical lens Image from aspherical lens
Wide angle view
This telescope employs wide angle eyepieces, which offer a larger
view of the sky while still retaining the same magnification, giving a
greater area of sky coverage
.
B) HELPFUL HINTS FOR SETTING UP THE TELESCOPE
Tripod Set-Up
1. Remove the tripod from the box.
2. Spread tripod legs (6) so that the leg braces are fully extended
and rest safely at the base of the tripod center post.
3. Fasten all locks to hold legs securely in place.
4. Temporarily remove the knob bolt.
Telescope Set-Up
1. Take out the Telescope Tube (5) from the box.
2. Put the telescope on the tripod such that the holes of the bracket
(9) align with the tripod’s knob bolt position. Re-install and
tighten the knob bolt.
Putting In Diagonal Mirror & Eyepiece
1. Insert diagonal mirror (3) into focusing tube (2). Secure by
tightening the small retaining screw.
2. Install the soft eyepiece cap over the eyepiece (4) if needed.
Insert eyepiece (4) into diagonal mirror (3). Secure by tightening
the small retaining screw.
Putting In The Barlow Lens
1. Remove the diagonal mirror (3) and
insert the Barlow lens (10) into the
focusing tube (2).
2. Now the eyepiece can then be inserted
into the Barlow lens. If needed, diagonal
mirror should be installed between the
Barlow lens and the focusing tube.
C) OBSERVING ASTRONOMICAL OBJECTS THROUGH
YOUR TELESCOPE
1. Glance through the main telescope’s eyepiece (4) for your object.
(Note : You may have to alter the angle of the telescope slightly.)
The object will most likely seem to be blurry at this stage, but that
is normal. You are just trying to get the object in the viewing field
of your telescope lens. Once you have accomplished this task,
fasten the knobs to keep the accuracy of your telescope steady.
2. Now adjust the Focusing Tube (2) by turning the Focusing Knob
(1) slowly back and forth until the blurred object becomes precise.
3. If you are going to be looking through the telescope for a short
period of time, you can insert the Eyepiece directly into the
Focusing Tube. To be more comfortable when using your
telescope for longer periods of time, place the Diagonal Mirror (3)
into the Focusing Tube and the Eyepiece into the Diagonal Mirror.
WARNING ! NOT SUITABLE FOR CHILDREN UNDER 36
MONTHS DUE TO SMALL PARTS. CHOKING
HAZARD. THIS TELESCOPE SET IS
APPROPRIATE FOR CHILDREN OVER 8
YEARS OLD. TO BE USED UNDER THE
DIRECT SUPERVISION OF ADULTS.
CAUTION ! DO NOT VIEW SUN THROUGH TELESCOPE AS
SERIOUS INJURY TO EYE MAY RESULT.
1
2
3
4
6
9
8
11
12
7
10
5
10 10 10 10 10
10
10
42947912
Galaxy Tracker® 375 Smart Telescope
Question and Answer IconNeed help?

Do you have a question about the EASTCOLIGHT Galaxy Tracker 375 and is the answer not in the manual?

Summary

How to Care for Your Telescope

Objective Lens Care

Detailed instructions on cleaning the telescope's objective lens with care to maintain precision and performance.

Handling Sudden Temperature Changes

Guidance on managing condensation caused by temperature changes to prevent lens damage or fogging.

Setting Up Your Telescope

Tripod and Telescope Assembly

Steps for setting up the tripod and securely attaching the telescope tube using the bracket and knob bolt.

Installing Optical Accessories

Instructions for inserting the diagonal mirror, eyepiece, and Barlow lens into the focusing tube.

Observing Astronomical Objects

Initial Observation and Focusing

Guide to finding objects, achieving initial focus, and steadying the telescope for clear viewing.

Safety Warnings and Precautions

Child Safety and Sun Viewing Warning

Crucial safety advice for children under 36 months and a warning against viewing the sun.

How to Use the Telescope

Understanding Viewing Factors

Explains how power, brightness, and resolution affect image clarity and field of view in a telescope.

Selecting Eyepieces for Magnification

Details how to calculate magnification and choose eyepieces for desired viewing power.

Using the Smartphone Adapter

Attaching Smartphone to Adapter

Step-by-step guide to connecting a smartphone to the adapter, securing it for use.

Connecting Adapter to Telescope

Instructions on how to attach the assembled smartphone adapter to the telescope eyepiece.

Using STAR WALK 2 Software

Identifying Celestial Objects

How to use the STAR WALK™ 2 app with the telescope to identify stars and celestial objects.

Technical Specifications

Telescope Power Limits

Chart detailing eyepiece and Barlow lens combinations for different magnification powers.

Overview

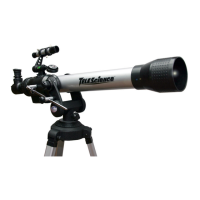
The Galaxy Tracker® 375 Smart Telescope is a precision optical instrument designed for astronomical observation, offering an extensive selection of parts and accessories to enhance the exploration of celestial objects. It is suitable for children over 8 years old and should be used under the direct supervision of adults.

Function Description:

The primary function of the telescope is to magnify images, bringing distant celestial objects closer to the viewer. The magnifying power, expressed as "X" (e.g., 125X), indicates how many times closer an object appears. This power is determined by dividing the focal length of the objective lens by the focal length of the chosen eye lens. Eyepieces with shorter focal lengths provide greater magnification, while those with longer focal lengths offer less. The telescope employs aspherical lenses to reduce image aberration, producing sharp and less distorted images from the center to the edge of the field of view. It also features wide-angle eyepieces, which provide a larger view of the sky while maintaining the same magnification, thus covering a greater area.

The telescope is designed to be used with a smartphone adapter, which allows for photo and video capture through the telescope eyepiece. This adapter also facilitates the use of stargazing smartphone software applications (e.g., Star Walk™ 2 for iOS and Android). These applications help users find and identify celestial objects easily. By aligning the smartphone's orientation with the telescope, the app can display a real-time simulated sky view matching what is seen through the telescope, showing names of stars or celestial objects and updating them as the telescope is adjusted. The software also guides users on which direction to move the telescope to find specific celestial objects.

Usage Features:

Setting up the telescope involves several steps:

  1. Tripod Set-Up: Remove the tripod from its box, spread the legs until the leg braces are fully extended, and ensure it rests safely. Fasten all locks to secure the legs and temporarily remove the knob bolt.
  2. Telescope Set-Up: Take the telescope tube from its box, place it on the tripod, aligning the bracket holes with the tripod's knob bolt position. Re-install and tighten the knob bolt.
  3. Inserting Diagonal Mirror & Eyepiece: Insert the diagonal mirror into the focusing tube and secure it with the small retaining screw. If needed, install the soft eyepiece cap over the eyepiece. Then, insert the eyepiece into the diagonal mirror and secure it.
  4. Inserting the Barlow Lens: To use the Barlow lens, first remove the diagonal mirror. Insert the Barlow lens into the focusing tube. The eyepiece can then be inserted into the Barlow lens. Alternatively, the diagonal mirror can be installed between the Barlow lens and the focusing tube.

Observing Astronomical Objects:

  1. Initial Object Acquisition: Glance through the main telescope's eyepiece to locate your desired object. The object may appear blurry initially, which is normal. The goal at this stage is to get the object within the viewing field. Once achieved, fasten the knobs to maintain accuracy.
  2. Focusing: Adjust the focusing tube by slowly turning the focusing knob back and forth until the blurred object becomes clear and precise.
  3. Eyepiece Configuration: For short viewing periods, the eyepiece can be inserted directly into the focusing tube. For longer, more comfortable viewing, the diagonal mirror should be placed in the focusing tube, and the eyepiece inserted into the diagonal mirror.

Using the Smartphone Adapter:

  1. Attaching Smartphone to Adapter: If the telescope clip is connected to the smartphone holder, separate them by pressing the quick release lever and sliding out. Loosen the large knob at the back of the adapter, place the smartphone face up, and adjust the horizontal arm to fit its width. Tighten the large knob to secure the phone. Align the center of the adapter hole of the swing arm with the smartphone camera and tighten the screw to hold the smartphone securely.
  2. Attaching Adapter to Telescope: Loosen the small knob on the base of the clip and open the arc of the ring. Attach the clip to the telescope tube with the flat side in the upper position. Close the ring and secure it by tightening the small knob.
  3. Attaching Adapter-Smartphone Assembly to Eyepiece: Loosen the small screw at the top of the adapter. Attach the adapter-smartphone assembly to the telescope eyepiece, ensuring it is fully inserted for best results. Tighten the small screw.
  4. Camera Adjustment: With the camera app open, re-adjust the smartphone camera position by slightly loosening the main adapter screw if necessary. Ensure the image circle is at the center of the screen and adjust the focus knob for clarity.
  5. Removing Adapter: To remove the adapter from the telescope, press the quick release lever and slide the smartphone adapter out.

Maintenance Features:

Proper care of the telescope ensures many years of viewing enjoyment.

  1. Objective Lens Care: The objective lens is precisely polished and manufactured to minute tolerances. It must be cleaned carefully and infrequently to avoid affecting its precision and performance. Users should never attempt to remove the lenses from their mount.
  2. Cleaning the Lens: Clean the lens only when necessary. First, remove dust with a camelhair brush or an ear-type syringe. Apply a few drops of ether or isopropyl alcohol to a clean, washed cotton piece and gently wipe the lenses, avoiding circular motion. Blow off any remaining lint or dust with an ear-type syringe.
  3. Temperature Changes: Avoid moving the telescope directly from cold outdoor air into a warm room, as this can cause condensation on the objective lens. If condensation occurs, place the objective lens at a safe distance from a heat source and allow it to warm slowly until the moisture dissipates. It is crucial to ensure that any stains left on the lenses are delicately wiped off only after the lenses are completely dry.

Important Safety Note: Do not view the sun through the telescope, as this can result in serious eye injury.

EASTCOLIGHT Galaxy Tracker 375 Specifications

General IconGeneral
Optical DesignRefractor
Focal Length700 mm
Tripod IncludedYes
Finder Scope5x24
Eyepieces Included20mm
Barlow Lens IncludedYes

Related product manuals